Yes, I realize this is the gazillionth baked oatmeal recipe that I’ve shared this month as part of the 31 Days of Breakfasts series. AND…I have another one to share on the Tuesday! At the rate we’re going with baked oatmeal, I might be able to apply for a world record…”Food blog with most # of baked oatmeal recipes” – lol! Surely that’s a valid category! Ok, so….I’m getting a little off track here…
If you’ve never had baked oatmeal my friend, you really need to try it. It’s part-cake, part-oatmeal. It’s more cake that oatmeal, and it’s not overly sweet (usually!). It’s nothing like oatmeal if you don’t like the consistency of oatmeal. I always add a little flour to mine to make it more cake-like. It slices and serves like cake. And does a fantastic job of soaking up any milk or cream that you pour into the bowl with it.
This Amish Baked Oatmeal doesn’t have any flour in it, so it will be a bit more crumbly than my regular baked oatmeals. You can totally serve it on a plate. (Like pictured above.) And you can serve it in a bowl, mash it up and pour milk or yogurt over the top. And of course, you can make it a ‘one-dish breakfast’ by adding some berries or sliced fruit on top!
Preheat the oven to 350. Lightly grease an 8×8-inch glass baking dish with non-stick cooking spray.
In a large mixing bowl, whisk together the eggs, vanilla and brown sugar. Add the baking powder, cinnamon, salt and both types of oats. (Note: If you want to use all of one type of oat, that’s totally fine! I just like to mix mine up with this recipe and when making granolas!) Pour in the milk and oil and whisk well. Batter will be slightly ‘loose.’ Pour into the prepared baking dish and bake for 30 minutes, or until toothpick comes out clean in the middle.
Let cool slightly before serving.
Serve Amish Baked Oatmeal with milk, cream or yogurt and some fresh fruit.
FREE DOWNLOAD! Get the Recipes for Eight 20-Minute Meals That Will Help You Survive Chaotic & Busy Weeknights! Register Now!
Original article and pictures take 344apz3bh6di1m0sag1etg3fxyz.wpengine.netdna-cdn.com site
Almond & Flax Protein Snack Bars flax and almond bars
These snack bars are so good they should almost be a dessert. This recipe is very easy because it consists of throwing everything into the food processor and has very little cleanup. These are great to take along with you as a snack for yourself and for the children. It is a great way to satisfy a sweet tooth without a lot of sugar.
Place almonds, flax seeds, shredded coconut in a food processor and process until all chopped. Add Almond butter and pulse. In a small sauce pan, melt coconut oil over very low heat. Remove coconut oil from heat, stir in maple syrup and vanilla. Add coconut oil mixture to food processor and pulse until ingredients form a paste.
Press mixture into an 8 x 8 glass baking dish. Chill in freezer for 10 minutes until hardened. In a small saucepan, melt chocolate over very low heat, stirring continuously. Spread melted chocolate over bars and let sit in freezer for 10 minutes or refrigerator for 30 minutes, slice and serve.
Hope you enjoy!
Original article and pictures take theholisticmama.com site
All-Natural Sunscreen Alternatives Finally, a natural sunscreen alternative that uses what I already have at home! Love these easy recipes for homemade sunscreen and the logic behind when to use them. They're definitely on my must-try list for my natural skincare routine! :: DontWastetheCrumbs.com
I was originally going to share a tutorial for making your own sunscreen today.
But then I changed my mind. Because I don’t plan on making my own sunscreen… yet.
But I’m drawing the line at homemade sunscreen for good reason –
I’m really not sure it’s a good fit for my family right now.
When We Don’t Use Sunscreen
For years we’ve been told that sun damage can cause skin cancer. Then the argument was updated to say that sun light itself isn’t harmful, but sun burns are.
On the flip side, our bodies need Vitamin D for healthy bones, a strong heart and a healthy immune system. While it’s added (often in synthetic form) to products, the American Medical Association admits in a 2009 report that “The human body is designed to manufacture vitamin D3 from sunlight.””
That same report also claims that our bodies get the minimal dose of Vitamin D needed in as little as 5 minutes of sun exposure between 10 am and 3 pm, twice a week. (Although this does NOT take into consideration extenuating factors like the season, cloud cover, the thickness of the ozone layer, skin pigmentation, age or the latitude of where you live.) (source)
We live in central California and get more than our fair share of cloudy and overcast days. Do the sun’s rays penetrate through the clouds? Yes, and my fair skin has unexpectedly become a bit too pink a few times to prove it. But in our area, these cloudy rays are sometimes the only rays we get for days on end.
Given the fact that wearing sunscreen with a minimal SPF 15 reduces my body’s ability to naturally synthesize vitamin D by 99%, (source) I’m not sold that it’s helpful my for family (key phrase there) to wear sunscreen on a daily basis. Your family might be different!
However, there are times when we always, ALWAYS wear sunscreen.
Finally, a natural sunscreen alternative that uses what I already have at home! Love these easy recipes for homemade sunscreen and the logic behind when to use them. They're definitely on my must-try list for my natural skincare routine! :: DontWastetheCrumbs.com
When We Do Use Sunscreen
I have fair skin and light hair. My daughter has also been blessed with what I affectionately refer to as “see-through skin” and if we’re ever in direct sun for longer than 30 minutes, or indirect sun for longer than 90 minutes, we wear sunscreen like nobody’s business.
We spent several weeks in Costa Rica earlier this year and putting on sunscreen was a required part of our morning ritual. Wake up, eat breakfast, brush teeth, put on swim suit, put on sunscreen.
Our summer tradition is to pack up our beach toys and spend Fridays at the Santa Cruz Beach Boardwalk for the free concerts. Right next to our homemade lunchables are at least two containers of sunscreen. We apply as soon as we arrive, reapply after some time in the water, and then apply again when we’re setting up our spot for dinner and the show.
Why use sunscreen if your body needs sun?
There are studies abound linking sun burns to cancer, and there are plenty to refute the evidence as well. Whatever the final answer may be, suffice to say that sunburns hurt – and they are surface-level proof of damage to the skin – so we do what we can to protect ourselves when we know we’ll be in potential sun burn situations.
Finally, a natural sunscreen alternative that uses what I already have at home! Love these easy recipes for homemade sunscreen and the logic behind when to use them. They're definitely on my must-try list for my natural skincare routine! :: DontWastetheCrumbs.com
Natural Sunscreen Alternatives
Most homemade sunscreens are not waterproof, so it really doesn’t make sense for us to make homemade sunscreen only to not use it because it’ll wash off as soon as we get in the ocean.
It’s like cooking food and not eating it. Which is just plain ‘ol silly!
So for this season in our life – based on our outdoor activities and where we live – I’m choosing one of these natural sunscreen brands:
Why these brands? My long-time blogging friend Katie reviews sunscreens ever year and has compiled a MASSIVE list of 40+ sunscreens that she and her family have tested over the past several years. Although her methods aren’t 100% scientific (nor would mine be), they’re incredibly practical and true to life. She’s also very thorough in her research, so I trust her recommendations like I would any friend.
Finally, a natural sunscreen alternative that uses what I already have at home! Love these easy recipes for homemade sunscreen and the logic behind when to use them. They're definitely on my must-try list for my natural skincare routine! :: DontWastetheCrumbs.com
Preventing Sun Burn with What You Already Have on Hand
Another super-cool alternative to traditional sunscreens is food!
Another blogging friend Kimi totally caught my eye this past week when I stumbled across her post for preventing sunscreen with food. You’ll have to click over to read the details, but let me just say that fellow fair-skinned folks should start their day with green tea, feast on tomatoes, watermelon and salmon cooked in butter, and top if off with an indulgence in dark chocolate.
Beyond the food you eat, there are items you stock in your real food and natural living cabinets that have properties to naturally prevent sunburn too:
Finally, a natural sunscreen alternative that uses what I already have at home! Love these easy recipes for homemade sunscreen and the logic behind when to use them. They're definitely on my must-try list for my natural skincare routine! :: DontWastetheCrumbs.com
Recommended Homemade Sunscreen Recipes
If I was going to make my own homemade sunscreen, I’d start with these ingredients first. I have most of them on hand, which means no additional expense and the ability to make more whenever I need to.
I will say that homemade sunscreen is a bit of science though. You can’t just dump without measuring and expect your concoction to magically repel the sun’s rays. As with any great homemade product, you should first start with a recipe and then tweak to your liking.
I REALLY like that this recipe starts with diaper cream instead of zinc oxide. Working directly with zinc oxide can be tricky, and I haven’t found an affordable source that doesn’t require me to buy a million pounds. I can get diaper cream (with the key ingredient zinx oxide) locally anytime, and I can buy just as much as I need!
This homemade sunscreen recipe would be next on my list since it only has four ingredients, but the notes at the bottom of this recipe seriously have me considering mashing my favorite lotion with diaper rash cream and adding some essential oils from above to thin as needed.
If I end up making my own sunscreen after all, I’ll let you know how it turns out!
How do you protect yourself from the sun’s rays? Do you make your own sunscreen?
Disclaimer: This post contains affiliate links. By making a purchase through those links, I will earn commission that helps to keep the lights on in the Crumbs house – with no additional cost to you. Thank you for supporting Crumbs in this way. Read my full disclosure statement here.
Original article and pictures take dontwastethecrumbs.com site
Also, I used the Silicone Muffin Cups for the first time and was pleasantly surprised with how well they worked and how easy they were to clean and wash! I’m definitely sold on using these — especially because they kept the muffin pan so clean and easy to wash!
Next up, I made the Crockpot Baked Potatoes. This was my first time to make baked potatoes this way and it was so easy, as well.
The only thing I will mention is that they took longer to bake through then the recipe said they would. This would be such a great way to make Baked Potatoes if it’s hot in the summer or you’re having a big group of people over for a Baked Potato Bar!
I also made the Pumpkin Spice Waffles (and forgot to get a picture of them once they were baked!). These were good, although they were almost too sweet for me. If I make them again, I’d cut back on the amount of sugar in them.
And last but not least, I made Slow Cooker Rotisserie Chicken. This recipe was the BOMB. So, so, so easy. And it turned out beautifully and incredibly moist and delicious. I’d highly recommend this recipe!
Welcome back to Best Brunch Seattle’s Easy Healthy Breakfast Recipes!
Today’s healthy breakfast is a peanut butter lover’s dream! With generous helpings of all-natural, freshly-ground peanut butter inside whole wheat toast, topped with real maple syrup and banana slices, this meal is not only easy-to-make but also hearty and scrumptious.
With the addition of peanut butter, this isn’t a typical French toast; but it’s delicious and gives you plenty of energy, and therefore a great idea for breakfast! Now onto the recipe…
Easy Healthy Breakfast Recipe: All Natural Peanut Butter with French Toast
Ingredients:
– 2 pieces of whole wheat bread
– 1 egg
– 1/2 table spoon of butter
– 2 table spoons of all natural peanut butter
– 1/2 medium banana
– 1 table spoon of real maple syrup
– 1 pinch of sea salt
Directions:
1. In a mixing bowl, crack egg, add sea salt and slightly whisk.
2. On a plate, spread peanut butter over one piece of bread. Top with the other piece of bread, and make it into a sandwich. Then cut sandwich in half.
3. Dip each half-sandwich in egg, front and back.
4. Heat frying pan on high. Add butter.
5. When butter melts, reduce heat to medium. Add the egg-dipped peanut butter sandwich, and cook both sides until egg’s thoroughly cooked.
6. Lay sandwich on plate and top with banana slices. Drizzle with real maple syrup.
Enjoy!
Hope you like the recipe! Here’s a printable version, just in case:
Easy Healthy Breakfast Recipe: All Natural Peanut Butter French Toast Original article and pictures take www.bestbrunchseattle.com site
I think we can probably all agree by now that the list of ingredients on a standard commercial antiperspirant can be a bit scary. The list often contains mineral oils, fragrances, alcohol, (not too bad so far), polyethylene glycol distearates, triclosan (getting worse), and aluminum salts, particularly aluminum chlorohydrate (the worst).
Aluminium chlorohydrate is included because it’s an effective suppressant of perspiration (although is stopping sweat even a good thing?), but it has also been linked to breast cancer and Alzheimer’s disease in several studies. Studies haven”t confirmed that the exposure specifically from use of antiperspirants is at a harmful level, but for anyone trying to reduce exposure to toxic chemicals, avoiding antiperspirant seems pretty sensible.
When I first started actively reducing my exposure to environmental toxins, and changing my beauty routines accordingly, I lived in New Zealand. So I just threw out my antiperspirant, and never looked back. Even in a fairly warm (for New Zealand) summer, I didn’t sweat enough to really be bothered by body odor. But then we moved to Brunei, where the average day is 86 degrees fahrenheit (30 degrees celsius) and 70% humidity, and something had to change.
Not wearing deodorant was no longer going to cut it.
So I turned to the internet, and found several different recipes. Most included just a few simple ingredients:
an oil of some sort as a carrier
a starch of some sort to reduce moisture
essential oils for fragrance, and for antibacterial properties
These give a solid deodorant. It’s not antiperspirant, but it reduces moisture, and can kill some of the bacteria that cause underarm odors. The recipe below is based off this formula, with a few adjustments and suggestions as to how you can make it work with what you have available.
The Ingredients
First, you need to gather your ingredients.
1/3 cup oil: You want an oil that is solid at room temperature for a solid deodorant. Coconut oil is a great choice for many climates, and has the added bonus of being antibacterial. I can”t buy coconut oil, and it is melted at room temperature, so I chose palm oil. You can also use a liquid oil and add beeswax to create a solid deodorant.
1/4 cup baking soda: Apparently this can be an irritant for some. Skip it, and use extra starch if you have sensitive skin.
1/4 cup starch: Common choices are cornstarch and arrowroot. I used tapioca starch because it was the cheapest at the supermarket here.
a few drops of essential oil: I used mandarin for fragrance and tea tree for its antibacterial properties, because they were what I had on hand. You can use whatever you like, but anything antibacterial ( lavender, cinnamon, lemon) is great to include.
**Don’t want to make your own? Grab some at our store!**
The Method
Once you have the ingredients together, making the deodorant is ridiculously simple. Combine your powdered ingredients in a bowl. Add the oils, and mix it all together, either by hand or with a hand mixer.
You may need to add more oil, or more starch, depending on the texture you’re after. You can make the deodorant as hard or as soft as you like. A harder one can be applied like a stick deodorant, something softer may need to be applied with your fingertips.
The End Result
Once all the ingredients are combined, transfer it to a container. If you have an old stick deodorant container around, that”s perfect. Otherwise, any container will do. Mine is a bit soft, so I put it in a simple plastic container, and apply it with my fingertips. Then just leave it to set for a while, and there you have it. An all natural, completely customizable, homemade deodorant.
This all natural deodorant is a fairly new addition to my life, but so far, it”s perfect. It spreads on easily, and keeps me dry and sweet smelling. It leaves slight white marks on dark tops (as do most deodorants, I find!). But even my husband is happy to use it. And we hope it keeps working, because this recipe makes a fairly large supply!
I may receive a commission if you purchase something mentioned on this page. See more details here.
Changing out the hand soap we use in our house was an early non-toxic swap for me. As concerned as I am about ingredients in food and what we put in our bodies, I am slowly starting to make changes for what we put ON our bodies as well. We have been making our own lotion, breath spray and sugar scrub and are enjoying our experimenting with Young Living Essential Oils. Are you feeling overwhelmed with the whole swapping process? No worries, we created this awesome PDF to help guide you through!
You know what ingredient is in a lot of liquid hand soaps? Triclosan. And guess what, The American Medical Association doesn't recommend use of Triclosan in people's homes as it may lead to antibiotic resistance of certain bacteria! Yikes!!
I have started using more natural hand soaps at home, in particular Thieves Foaming Hand Soap from Young Living and feel great about my choice. But what to do when out in public and faced with gross soap with questionable ingredients? Try this portable foaming hand soap recipe! It is great and easy to toss in your purse, beach bag, diaper bag, whatever.
I have liked these 50 ml portable soap dispensers from SKS Bottle and Packaging and guess what?! They are offering our readers 10% off your purchase. Simply check out the 50 ml dispensers (item number 0022-01) and use coupon code: SKSCoupon11.
Original article and pictures take ohlardy.com site
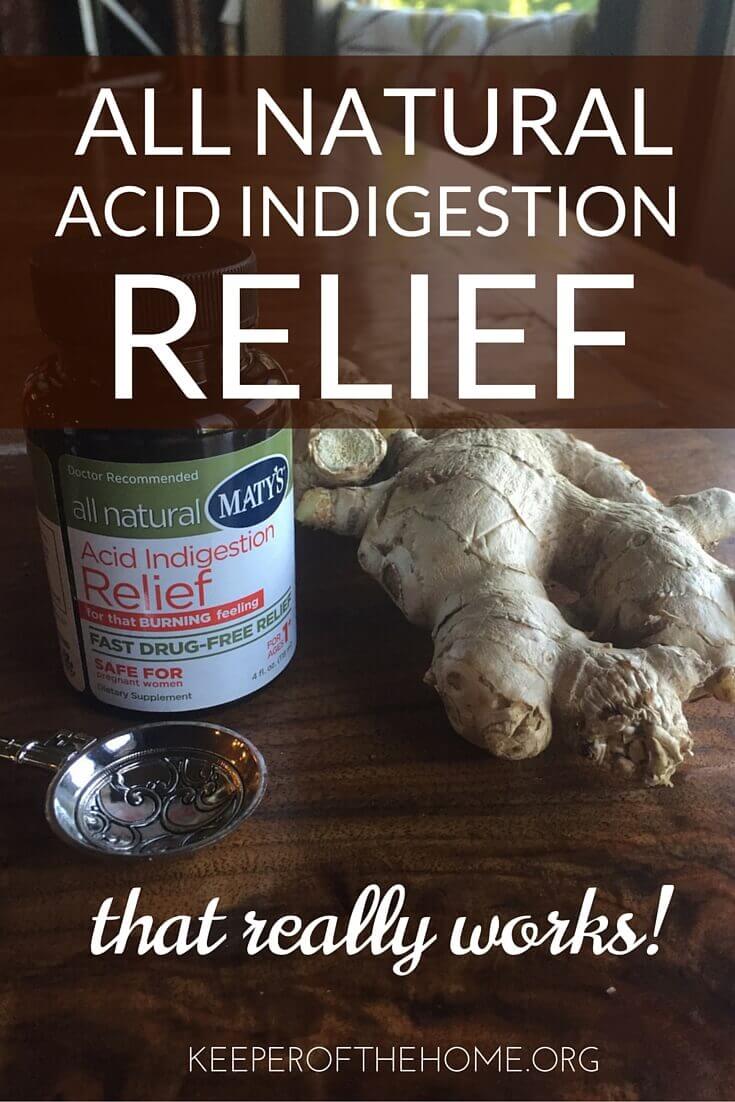
All Natural Acid Indigestion Relief (That Really Works!)
I’ll be honest: when I was asked to write a review for Maty’s Healthy Products, I wasn’t so sure about it. Even though Stephanie had been reviewing Maty’s on Keeper of the Home for a while, I had never tried them for myself. Even when I received my product, their all natural Acid Indigestion Relief, in the mail, I was a little disappointed because it was a product that I thought I wasn’t likely to ever use.
I hardly ever experience heartburn or indigestion so I wasn’t sure how I would be able to accurately or fairly write a review.
I left the box sitting on the counter for a few days trying to decide whether or not to go through with writing this review when my husband walked through the kitchen complaining of heartburn. Ding! Hubs gets heartburn frequently: he can be my test dummy! ;D
I’m always trying to get him on my healthy living track, but more often than not, he reaches for what he knows and for heartburn and indigestion that’s usually Prilosec. Sometimes I will convince him to try ginger tea or drink warm lemon water and even raw milk helps, but that takes preparation and he’s not usually that patient!
When I offered him the Maty’s syrup and it was ready to use, he didn’t even hesitate: he happily took it right away.
Then took a glance at the box and said, “Look! The ingredients in this are the same ingredients you always try to get me to use, but ready for me in a convenient little bottle!”
Taking the box back from him, I noticed the ingredients were all food-based. *Although not evaluated by the FDA and not intended to diagnose, treat, cure or prevent any diseases, we know how helpful and beneficial real food is!
Check out these ingredients:
Apple Cider Vinegar
Sea Salt
Ginger
Clove Powder
Turmeric
Ascorbic & Citric Acid
Right on, honey! These are exactly the kinds of real food products that I would treat his symptoms with if given the time.
Two days later, an expectant mom and friend of mine was hanging out in my kitchen and noticed the bottle of Maty’s Acid Indigestion Relief and commented that she was always looking for something safe to use while she was pregnant because she was frequently experiencing heartburn, indigestion and acid reflux.
I was happy to share with her that Maty’s is made with real, food-based ingredients. It is so safe that unlike many other products, it is safe for pregnant women.
After taking a closer look at all of the information on the box and the ingredient list, my friend decided to do a taste test. She wasn’t experiencing any discomfort at the moment, but wanted to see if it was something she would even want to take.
The taste passed her test and she was so pleased that I decided to taste it as well. Not bad! It totally tasted like something I would make with real ingredients.
I was immediately impressed and remembered to ask hubs if the syrup had actually helped when he tried it. Apparently it had helped so much and so quickly that he had forgotten all about the discomforts. Instead of searching for something else to help, like the Prilosec, he had gone on about his day!
I asked him if he would be willing to trade in his Prilosec and reminded him of all the negative side effects including liver disease, bone fractures, infections, pneumonia, breathing problems, agitation, nervousness, vomiting, unusual bleeding and bruising, breast enlargement, and constipation (or diarrhea), to name a few.
People who suffer from frequent, but mild attacks of heartburn quickly reach for these PPI drugs thinking they are safe. But studies are proving otherwise.
Recently, NBC News released this video: Heartburn Medicine Linked to Chronic Kidney Disease Risk stating that over 15 million Americans spent over 10 Billion dollars in 2013 for Proton Pump Inhibitors. New research has raised more red flags regarding PPI drugs commonly used for heartburn, indigestion, and acid reflux. This critical report may change the way you consider treating your symptoms.
If you experience heartburn, indigestion, acid reflux or gastroesophageal reflux disease (GERD), you are familiar with Proton Pump Inhibitors (PPIs). Frequently used to treat minor symptoms, they may also be increasing your risk for chronic kidney disease.
Unfortunately, PPIs have been advertised on a broad scale to consumers and heavily promoted to physicians. With this new information, red flags should be waving everywhere warning our health care industry there is trouble ahead.
It shouldn’t be surprising, but it still was: my husband said he would pick Maty’s over Prilosec any day. The convenience got his attention and the taste didn’t hurt, but what really won him over was that it really worked!
This product came in a liquid form, in a 4 ounce bottle. From what I’ve found, it costs around $8-9 from your neighborhood Target or Rite-Aid and $11.99 from the Matys website if, like me, you would like to forego the trip to a big store (where you’re going to probably spend $80 before you can get out of the door!).
Always a sucker for a good story, Maty’s has it. Founder Carolyn Harrington’s daughter was born with major heart defects, she found herself suddenly involved in health in a way she had never planned nor dreamed. (It’s worth taking the time to read her daughter Maty’s story. Trust me. And grab a tissue while you’re at it…)
Pair that with the fact that not long after Maty’s birth and diagnosis of heart issues, Carolyn was struck with Rheumatoid Arthritis and debilitating back pain. She couldn’t move easily and was in constant pain.
Thus began her journey to natural remedies. She writes,
As a result of my research, I began creating a line of health productsthat were naturally safe and effective. Today, I am virtually pain-free. I no longer have Rheumatoid Arthritis and my daughter, Maty, is a healthy young woman. There is so much to learn about disease and the human body.
I’ve learned firsthand about the mind, body, and spirit connection. Now I’m on a mission to help others heal too. My products are just one way to help you get healthy and stay that way, but I also believe we all have the power to heal.
As a result of Carolyn’s research, Maty’s continues to use all natural ingredients in all of their products, which includes the Acid Indigestion Relief my hubby benefitted from, Baby Chest Rub, Baby Ointment, a Nasal Ointment to relieve nasal congestion, Cough Syrup for both children and the whole family (including a nighttime version), an Organic Cough Syrup, and a Vapor Rub.
And I can’t not mention the good they’re doing with their business. In addition to helping people with these great products, they’re also supporting Vitamin Angels to help at-risk populations in need get the vitamins and minerals they need, supporting the American Heart Association’s Go Red for Women program, and donating annually to the American Diabetes Association.
How do you find natural indigestion relief? What products or best practices have you used?
Disclosure: I received free sample of the product in exchange for my honest review.
Disclaimer: Although all Keeper of the Home contributors are passionate about nutrition, natural living and alternative health issues, we are not certified nutritionists, medical doctors, or practitioners of any kind. We are not licensed to counsel anyone in medical matters, nor may we be held responsible for any course of action that you choose in regards to your own health or that of your family. Please remember that what we are sharing is the result of our own experiences and years of study, but may not necessarily be the right course of action for you. We are advocates of becoming informed, knowledgeable and responsible for one’s own health, but our desire is not to be an authority on any matters of health for you, nor would we presume to have sufficient knowledge to do so. Our hope is that what we share may encourage you and start you on the road to doing your own research, and seeking out the opinions of professionals or others that you trust
Original article and pictures take keeperofthehome.org site
I think we should have a chocolate themed “Less than $1.00″ day – wouldn’t you agree?
I’ll start us off with a breakfast (or snack) recipe that tastes quite a bit like a specialty store-bought granola, but costs much less. This Dark Chocolate Almond Granola is our family’s favorite of all granola options. It costs less than $1.00 per serving!
Tip: Want to make granola this summer, but prefer to leave the oven off as much as possible to avoid heating up the house? Make it with this5-Minute Stove-Top Granola Making Method. I kind of like cheating and making granola this way. Be sure to wait and add the chocolate pieces after you’ve removed it from the stove. Come to think of it, you could just stir them right in to make a chocolate coating all over the granola. No one would complain, right?
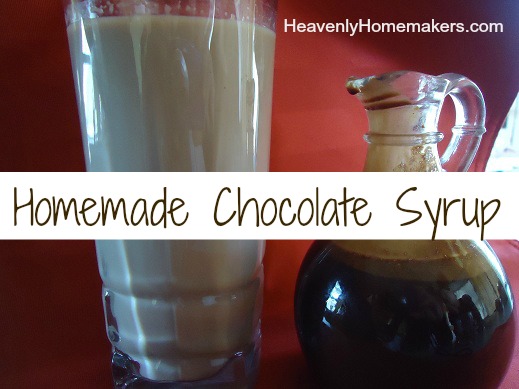
Make your own Chocolate Milk Mix!
Follow the recipe for Homemade Chocolate Syrup and not only will you be avoiding high fructose corn syrup, it’ll cost you less than $1.00 for the whole batch. You’ll notice that I wrote that recipe before I began cutting down the sugar quantities in my recipes. Feel free to experiment with using less sugar. I’m sure it will still taste great!
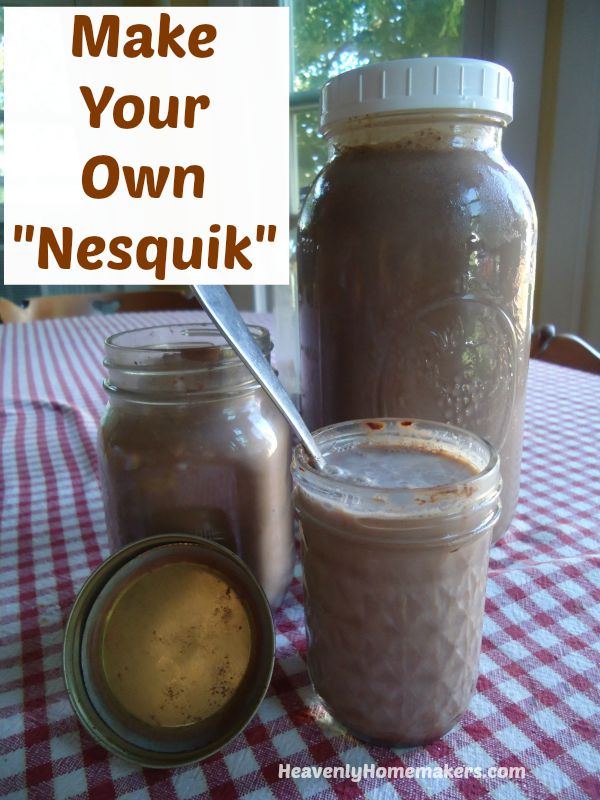
Here’s another variety of chocolate milk mix you might enjoy: Homemade Nesquik! Again, that entire mix can be made for about $1.00. :)
Make your own Frappe
Save a bundle by avoiding the coffee shop and making yourself a Chocolate Frappe at home. A big glass of this definitely costs less than $1.00. You can make this as sweet or as “barely sweet” as you like. I use stevia, but you can use sugar if you prefer.
Chocolate Peanut Butter Cups?
Yep. These Chocolate Peanut Butter Cups aren’t necessarily low in sugar, but they are made with healthier ingredients. I only make these every once in a while as a special treat – and they fit the theme because they are less than $1.00!
See the other “less than $1.00″ ideas I shared this week here and here. More “less than $1.00″ ideas coming up tomorrow!
Original article and pictures take heavenlyhomemakers.com site
Ages 4-5 ! Feed pets ! Wipe up spills ! Put away toys ! Make the bed ! Straighten bedroom ! Water houseplants ! Sort clean silverware ! Prepare simple snacks ! Use hand-held vacuum ! Clear kitchen table ! Dry and put away dishes ! Disinfect doorknobs
Ages 6-7 ! Gather trash ! Fold towels ! Dust mop floors ! Empty dishwasher ! Match clean socks ! Weed garden ! Rake leaves ! Peel potatoes or carrots ! Make salad ! Replace toilet paper roll
Ages 8-9 ! Load dishwasher ! Change light bulbs ! Wash laundry ! Hang/fold clean clothes ! Dust furniture ! Spray off patio ! Put groceries away ! Scramble eggs ! Bake cookies ! Walk dogs ! Sweep porches ! Wipe off table
Ages 10-11 ! Clean bathrooms ! Vacuum rugs ! Clean countertops ! Deep clean kitchen ! Prepare simple meal ! Mow lawn ! Bring in mail ! Do simple mending
(hems, buttons, etc.)
! Sweep out garage
Ages 12 and up ! Mop floors ! Change overhead lights ! Wash/ vacuum car ! Trim hedges ! Paint walls ! Shop for groceries w/list ! Cook complete dinner ! Bake bread or cake ! Do simple home repairs ! Wash windows ! Iron clothes ! Watch younger siblings
Original article and pictures take www.flandersfamily.info site