понедельник, 29 сентября 2014 г.

Make Your Own Toothpaste

Make Your Own Toothpaste
Skip the questionable ingredients, plastic trash and expense of commercial toothpaste and make your own!  The Homesteading Hippy

There are many ingredients in commercial toothpaste that I do not like giving to my family.


Among them are Sodium Lauryl Sulfate and Flouride.


SLS and SLES are esters of Sulphuric acid – SLS is also known as “Sulfuric acid monododecyl ester sodium salt”, however there are over 150 different names by which it is known – see them here. In fact, SLES is commonly contaminated with dioxane, a known carcinogen.


And, of course, we have all heard about flouride and some of the many reasons to avoid that like


INGESTION OF FLUORIDE HAS LITTLE BENEFIT, BUT MANY RISKS.
Whereas fluoride’s benefits come from topical contact with teeth, its risks to health (which involve many more tissues than the teeth) result from being swallowed.Adverse effects from fluoride ingestion have been associated with doses attainable by people living in fluoridated areas. For example:
Risk to the brain. According to the National Research Council (NRC), fluoride can damage the brain. Animal studies conducted in the 1990s by EPA scientists found dementia-like effects at the same concentration (1 ppm) used to fluoridate water, while human studies have found adverse effects on IQ at levels as low as 0.9 ppm among children with nutrient deficiencies, and 1.8 ppm among children with adequate nutrient intake. (10-13)
Risk to the thyroid gland. According to the NRC, fluoride is an “endocrine disrupter.” Most notably, the NRC has warned that doses of fluoride (0.01-0.03 mg/kg/day) achievable by drinking fluoridated water, may reduce the function of the thyroid among individuals with low-iodine intake. Reduction of thyroid activity can lead to loss of mental acuity, depression and weight gain (14)
Risk to bones. According to the NRC, fluoride can diminish bone strength and increase the risk for bone fracture. While the NRC was unable to determine what level of fluoride is safe for bones, it noted that the best available information suggests that fracture risk may be increased at levels as low 1.5 ppm, which is only slightly higher than the concentration (0.7-1.2 ppm) added to water for fluoridation. (15)
Risk for bone cancer. Animal and human studies – including a recent study from a team of Harvard scientists – have found a connection between fluoride and a serious form of bone cancer (osteosarcoma) in males under the age of 20. The connection between fluoride and osteosarcoma has been described by the National Toxicology Program as “biologically plausible.” Up to half of adolescents who develop osteosarcoma die within a few years of diagnosis. (16-19)
Risk to kidney patients. People with kidney disease have a heightened susceptibility to fluoride toxicity. The heightened risk stems from an impaired ability to excrete fluoride from the body. As a result, toxic levels of fluoride can accumulate in the bones, intensify the toxicity of aluminum build-up, and cause or exacerbate a painful bone disease known as renal osteodystrophy. (20-23)


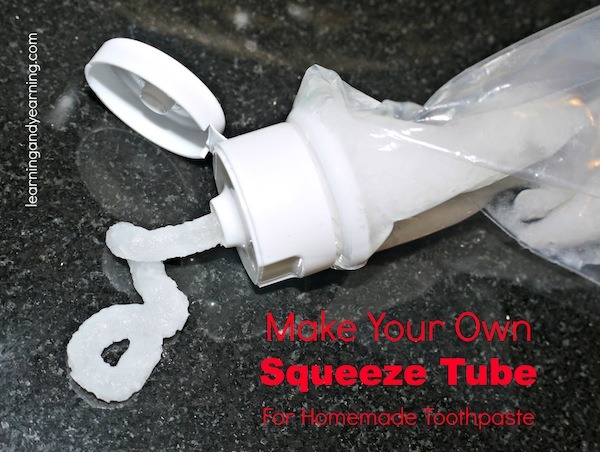
And, unfortunately, finding toothpaste without these ingredients is not very budget friendly for us. So, we began to make our own. Here’s our recipe:


HOMEMADE TOOTHPASTE


6 T. coconut oil

1 tsp baking soda

15 drops peppermint oil or mint extract

10 drops orange oil

1 packet stevia (or 2-3 drops liquid stevia)


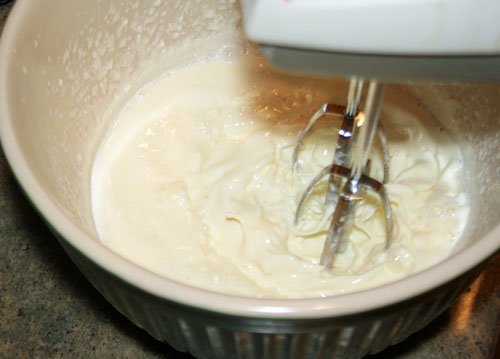
Mix together and store in a tightly covered jar.


We use a spoon to dip some out, and then place it on our brushes for use. We have been using this for over 5 years now, and my children have NEVER had a single cavity! Plus, the added benefit of not having to worry about recycling the packaging is nice.


BE SURE TO PIN THIS TO YOUR FAVORITE BOARD FOR LATER


stocks and broth newsletter

Original article and pictures take thehomesteadinghippy.com site

среда, 24 сентября 2014 г.

Make Your Own Squeeze Tube for Homemade Toothpaste

Make Your Own Squeeze Tube for Homemade Toothpaste
Making your own squeeze tube for homemade toothpaste is super simple. Give it a try!

Make your own squeeze tube for homemade toothpaste.


I like the idea of homemade toothpaste. What I don’t like is keeping it in a jar and dipping my toothbrush into the jar. Even if I’m the only one using that toothpaste, it just doesn’t seem sanitary to me. Yes, you could buy a refillable squeeze tube like this one, but it’s easy to make your own. Here’s what you need to do to make your own squeeze tube:


Beg, borrow or steal an empty store-bought tube of toothpaste. Make sure it’s the kind with a two piece flip-top cap. The only other item that you’ll need is a small zip-lock bag. Use a heavy duty freezer bag, not just a sandwich bag. Trust me, a sandwich bag will not hold up. Don’t ask how I know that.


DISCLOSURE: In order for me to pay my blogging expenses, I may receive monetary compensation for my endorsement and/or link to products mentioned on this blog. I am a participant in the Amazon Services LLC Associates Program, an affiliate advertising program designed to provide a means to earn fees by linking to Amazon.com and affiliated sites.


Cut the cap from the toothpaste container. Just use regular scissors; the tubes cut easily. Give the cap a good cleaning. Now make a small hole in the zip lock bag by cutting a small triangle off of one of the corners. Don’t cut too much; you can always make the hole larger, but you can’t make it smaller. But you knew that.


Now, poke the male part of the cap into the hole, and then screw the female part onto it. Oh, boy, this is not going well. I need to find some new terminology. Let’s just move on.


Make your own squeeze tube for homemade toothpaste

Fill the bag with your favorite homemade toothpaste, squeeze out any air and seal the bag. Your homemade squeeze tube is ready to use!


And if you’re looking for a recipe for toothpaste, here are a few you might like to try:


Cinnamon Nutmeg Toothpaste from Nourishing Joy


DIY Whitening Peppermint Toothpaste from Happy Healthnut


DIY Clay Toothpaste Recipe from Raising Vintage Kids in a Modern World


Homemade Remineralizing Toothpaste from Wellness Mama


Homemade Toothpaste Recipe: Remineralizing from Food Renegade


Make Your Own Toothpaste from Homesteading Hippy


Heather Dessinger’s book DIY Organic Beauty Recipes includes several toothpaste recipes and lots of other great recipes for making your own beauty products. Check it out here.


Do you make your own toothpaste? What recipe do you use?


Original article and pictures take learningandyearning.com site

понедельник, 22 сентября 2014 г.

Make Your Own Real Food Pudding Cups (and Save Money!)

Make Your Own Real Food Pudding Cups (and Save Money!)

Perhaps you are excited as I am about the Easy Peanut Butter Pudding recipe I shared a few days ago. If so, you can get even more excited about how you can make different varieties of homemade pudding to create your own transportable Real Food Pudding Cups! Not only are these Pudding Cups made with real food, you will be amazed at the low cost for such a wholesome treat!


pudding cups4

Take note that some people (who shall remain nameless) tried to overfill their cute little cups and then the lids wouldn’t go on. Correction: The lids did go on, but pudding pushed up and over the top through the lid and squished down the sides of the cup, ruining the cuteness and creating a mess. I don’t know who would do this, but some people did this, so don’t be one of these people.


The nameless people who overfilled their cups had to scoop out pudding into an extra cup before placing lids on top. But then look:


Homemade Pudding Cups

Transportable pudding cups!


A couple years ago I discovered these awesome BPA Free Cups with Lids at Amazon and have used them over and over. We’ve used them for applesauce cups and for transporting berries or veggie dip. They come in super handy! And now, we learn that we can use them to make these Easy Homemade Pudding Cups.


Let’s talk Pudding Cup Ingredients and Cost


I recently checked the price and ingredients for pudding cups at the store. First of all, the store-bought pudding cups sit on a shelf instead of in a fridge, so we can be sure there are many preservatives included. The biggest reason to avoid these is that they include two kinds of hydrogenated oils plus vegetable oil, none of which can our bodies digest well or utilize for nourishment. Cost for store-bought is roughly $0.25 for a 3.25 ounce cup.


How much do Homemade Real Food Pudding Cups Cost?


I used all real food, organic ingredients and my cost break down was still surprisingly low! So if you use non-organic ingredients you might find yourself saving even more!


I estimated that one batch of pudding cost me about $1.75. This made six 5-ounce cups of pudding, which breaks down to $0.29 per pudding cup! But since the cups I’m using are slightly bigger than store-bought pudding cups, the price per ounce of homemade pudding is actually less expensive than purchased pudding cups!


How about that? Making Real Food Pudding Cups saves us money and ensures that we’re getting a wholesome, filling snack or dessert!


pudding cups5

You can have fun making pudding varieties and mixing and matching fun flavors! Reuse the disposable cups (they wash up easily!) to save even more.


Easy Recipes for Pudding Cups


Two Great Pudding Cup Tips


  1. Adjust the sugar amount in each of these recipes to your liking. Take note also that you can use any sweetener you choose, from maple syrup to honey, brown sugar, or sucanat.
  2. These Pudding Cups freeze well! Make a bunch ahead of time, then pull out a few at a time to thaw as needed.

What can you do with extra egg whites after making homemade pudding?


These pudding recipes call for egg yolks as the egg whites tend to create a funny texture as the pudding cooks. I set the egg whites aside, store them in a jar in the fridge, then often add them to our scrambled eggs to use them up. Or you can make Coconut Macaroon Cookies.


Make Your Own Real Food Pudding Cups

What’s your favorite variety of pudding? Do you have any other great ideas for utilizing these reusable plastic cups with lids?


Some of these links are affiliate links.


Original article and pictures take heavenlyhomemakers.com site

четверг, 18 сентября 2014 г.

Make Your Own Healthy Homemade Salad Dressing #DIYFriday

Make Your Own Healthy Homemade Salad Dressing #DIYFriday

It’s not hard to make your own healthy homemade salad dressing…so what’s stopping you from trying? Here’s my story…


My fridge is home to many different kinds of salad dressings from Annie’s Naturals and Bragg’s to Simple Truth Organic and yes, even Hidden Vally Ranch that a couple of my teens always seem to sneak into the cart!


Many of these dressings on the market, believe it or not, often have a lot of ingredients that are fake and, even more, unneccesary.


Here’s a list of ingredients from a typical bottle of ranch dressing, like the one my kids favor:


Vegetable oil, water, egg yolk, salt, sugar, cultured nonfat buttermilk, natural flavors, spices, dried garlic, dried onion, vinegar, phosphoric acid, xanthan gum, modified food starch, monosodium glutamate, artificial flavors, disodium phosphate, sorbic acid and calcium disodium EDTA as preservatives, disodium inosinate, disodium gaunylate


That’s over 20 ingredients of mostly chemicals and bad fats in your dressing! YUCK! Even worse, many salad dressings are made with rancid oils (like vegetable and canola oil) that cause inflammation and damage to your cells, all 70 trillion of them.


Chances are, you’re eating that salad to be healthier…did you know that your dressing could be hindering instead of helping you achieve that goal?


We love to have a salad bar with our family dinners so everyone can make their own salad. I watch as our kids are learning to make healthy choices, picking a colorful array of fresh produce, but then they bury all those delicious, healthy vegetables under gunk that isn’t good for them!


Unlike buying “organic” fruits or veggies, processed foods like salad dressings aren’t always clear with that “natural” or “organic” means on the label: vegetable oil could easily be the first ingredient.


Plus those organic or all natural dressings tend to be much more expensive.


Here’s an easy alternative: make your own salad dressings! You control the ingredients, save a little money, and serve your family something that isn’t just homemade, but healthy and nourishing!


It's not hard to make your own healthy homemade salad dressing...so what's stopping you from trying? Here's my story...

Don’t know where to start to make healthy homemade salad dressing?


First: stock your kitchen.


Here’s a great list of ingredients that you may already keep on hand or that you can start keeping on hand:


  • honey – try to use a honey local to you for more benefits
  • liquid amino’s – great alternative to soy sauce
  • egg yolks
  • filtered water

Second: give it a try!


I promise: it’s easy to make your own healthy homemade salad dressing!


It's not hard to make your own healthy homemade salad dressing...so what's stopping you from trying? Here's my story...
Summer is the perfect time to start with a fresh fruit dressing: raspberry is one of my favorites!

It's not hard to make your own healthy homemade salad dressing...so what's stopping you from trying? Here's my story...
So here’s how to make a raspberry vinaigrette:

It's not hard to make your own healthy homemade salad dressing...so what's stopping you from trying? Here's my story...
Print

Raspberry Vinaigrette


  • 1-2 T filtered water
  • 1/4 cup organic raspberries

Here are 9 more salad dressing recipe favorites to help you start making your own:


1. Ranch

2. Thousand Island

3. Asian Sesame

4. Cesar

5. Blue Cheese

6. Zesty Italian

7. French

8. Honey Mustard

9. Greek


So what are you waiting for?


Get started making your own healthy homemade salad dressings!


You can even get creative and make up your own concoctions. Use leftover fruit before it goes bad…like raspberries or try blueberries, blackberries, or even strawberries.


Here are some deliciously fresh salad recipes for you to try your own DIY homemade dressings out on:


https://keeperofthehome.org/simple-summer-salad-recipes-vinaigrette-dressings/


*Salad dressings will keep for up to 2-3 weeks in the refrigerator .


What’s your favorite salad dressing? Have you ever tried making it yourself?


It's not hard to make your own healthy homemade salad dressing...so what's stopping you from trying? Here's my story...
Disclosure: This post includes affiliate links.

Original article and pictures take keeperofthehome.org site

вторник, 16 сентября 2014 г.

Make Your Own Apple Cider Vinegar

Make Your Own Apple Cider Vinegar

Apple Cider Vinegar has many health benefits, from being used as an energizing tonic to a healing elixir.


It’s a completely natural product, with all the benefits of apples PLUS the added benefits from being fermented, which include acids and enzymes. Here’s some ways I like to use it:


  • as a hair rinse, adding 2 Tablespoons to 1 cup cool water
  • as a “pick me up recovery drink” after a workout, adding 2 Tablespoons with 2 Tablespoons maple syrup to 1/2 cup water
  • as an aid for indigestion, adding 2 Tablespoons to 1/2 cup cool water
  • in cooking, to add zing and a “sour” note
  • in homemade condiments like mayo and salad dressing
  • adding to chicken bones and veggies, to help draw out the minerals when making broth, using 3 Tablespoons for an 8 quart crockpot size.

Apple Cider Vinegar has wonderful health benefits, as well as many beauty uses. Learn to make your own easily~The Homesteading Hippy

The list goes on and on. Buying apple cider vinegar, or ACV is fairly easy and widespread.


But, did you now you can make your own apple cider vinegar? Yep! It’s so easy, you’ll wonder why you never did before!


Do you make your own apple cider vinegar? How do you use it? Be sure to pin this for later!


stocks and broth newsletter

Original article and pictures take thehomesteadinghippy.com site

пятница, 12 сентября 2014 г.

Make Your Own “Nesquik”

Make Your Own “Nesquik”

Oh yeah. Homemade Nesquik coming right up.


Homemade Nesquik

Want to know something about Chocolate Milk?


Nobody needs it. It’s not a health food. We probably shouldn’t drink it.


Yet I still have a homemade “Nesquik” recipe to share with you. Why?


Because it’s fun, because it’s tasty, and because some people love their chocolate milk. So if you at least had an option to drink a healthier version of chocolate milk, wouldn’t that be nice?


Here’s the info I found on the official Nesquik website. This is what you find in the store-bought variety of the powdered mix…


INGREDIENTS: SUGAR, COCOA PROCESSED WITH ALKALI, SOY LECITHIN, CARRAGEENAN, SALT, NATURAL FLAVOR, SPICE. VITAMINS AND MINERALS: SODIUM ASCORBATE (VITAMIN C), FERRIC PYROPHOSPHATE (IRON), NIACINAMIDE, ZINC OXIDE, THIAMIN HYDROCHLORIDE, COPPER GLUCONATE, MANGANESE SULFATE, BIOTIN.


What’s with all that stuff in there? If you can possibly imagine, I just learned to make a chocolate milk mix with the simple yet magical ingredients I like to call cocoa and sugar. For real? Are we sure we can have our chocolate milk without adding some niacinamide? Because I just don’t know.


Here’s how easy this is: You put your cocoa and sugar in a jar, then you add two dashes of salt – which is a fun little ingredient that enhances the sweetness and completes the package. Shake it up, and you’ve got a fine little treat – if you think you can get along without the copper gluconate. (I am having the best time listening to all of you try to pronounce these words as you read.)


  • ½ cup cocoa powder (they're still offering a 25% off Amazon coupon on Nativas organic cacao powder!)
  • 1 cup sucanat or brown sugar
  • 2 dashes of salt (I use Redmond Real Salt)

  1. Put all ingredients into a pint sized jar.
  2. Put a lid on and shake the ingredients until they are well mixed.
  3. To make chocolate milk, add 1-2 Tablespoons of mix to a 12 ounce glass of milk.
  4. Stir well.

And that’s it. Making Homemade Nesquik will take less effort than finding your missing shoe.


Make Your Own Nesquik

My boys were thrilled with this fun treat, so I went ahead and made a half gallon of chocolate milk. The next morning was chilly, so I used the mix to make hot chocolate. (Just warm the milk, then stir in the milk as directed above.)


What’s your relationship with chocolate milk?


Original article and pictures take heavenlyhomemakers.com site

среда, 10 сентября 2014 г.

Make Your Own {Pure and Simple} Diaper Rash Cream– No More Desitin!

Make Your Own {Pure and Simple} Diaper Rash Cream– No More Desitin!

Diaper cream is a tough one for many moms, because rashes can hit hard and they need something effective. Desitin is a popular thick, creamy, zinc-oxide based diaper cream that is a standard on change tables all over North America. But, it's not the safest choice either – never fear, you can make your own zinc-oxide diaper rash cream with only THREE ingredients!

If there’s one thing that us moms can be especially picky about, it’s what we put on our precious baby’s skin.


I’m the same way. I only want to use the most gentle and natural products possible whether it’s laundry soap, castile soap, sunscreen, or lotion for my little ones.


Diaper cream is a tough one for many moms, because rashes can hit hard and they need something effective. Desitin is a popular thick, creamy, zinc-oxide based diaper cream that is a standard on change tables all over North America.


It’s popular, of course, because it works. But it’s not the safest choice for babies, either. In particular, it contains multiple ingredients that disrupt hormones, which is a very big concern.


What makes it work, though, is primarily the zinc oxide. You can buy many natural brands of diaper cream that contain zinc oxide and don’t include the nasty chemicals, but you’ll usually pay a pretty penny for them.


diaper cream ingredients

What if you could make your own zinc oxide diaper rash cream with only 3 pure and simple ingredients?


The three ingredients are:


Now, you might be wondering why zinc oxide?


  • it has both antibacterial and antioxidant properties
  • zinc is an important trace mineral and stimulates the immune system
  • it coats and protects the surface of the skin, forming a barrier against wetness (this is probably the most important way that it works)

As for the other ingredients, the coconut oil is the cream’s base and what helps it to go on smoothly. Coconut oil is wonderful for skin, and has its own antibacterial and antifungal properties. I’ve used it with some success for diaper rashes just on its own, when I was in a pinch.


The beeswax actually binds the oil and zinc oxide together into a cream that absorbs into the skin, and won’t ruin your cloth diapers (did I just hear a hooray?)!!


This recipe is based on Simply Soothing rash cream from MadeOn Skin Care Products. I tried it a couple years ago, when Renee was first perfecting her recipe. I thought it worked very well on rashes, and was mostly easy to use, except that the room I kept it in was a bit cold (it’s right beside our attic), which meant that sometimes it was a bit too hard. She has since made the recipe even better, and in her ebook she came up with a version for colder weather and one for warmer weather.


Her eBook, My Buttered Life: Baby Edition, includes this extremely simple-to-make Diaper Cream recipe that I used for this tutorial, as well as 4 other recipes to nourish your baby’s skin.


Homemade Diaper Rash Cream Tutorial


(used with permission by Renee of MadeOn Skin Care)


Beeswax 1/8 cup (1/2 oz.- granules are easiest, but not necessary)

Coconut Oil 2/3 cup (4 1/2 oz.)

Zinc Oxide powder 3/4 Tbsp.


beeswax and coconut oil in pan
Here’s how you make it:

1. Add coconut oil and beeswax to a glass bowl and melt using a double boiler set-up. I always improvise this, so don’t stress yourself out thinking that you have to do it in a fancy way.


In fact, this time I was in a hurry and did it straight in the pot (no double boiler) and just watched it really carefully and it was fine.


melted diaper cream oils
Warm at a low-med heat until both are completely melted. It only takes a few minutes.

beating diaper cream
2. Add zinc oxide powder to the bowl with the melted oil and wax.

Using a stick blender, blend for several minutes until the powder is completely mixed in with no clumps.


Again, I deviated (what a rebel, huh?). My stick blender broke a while back, so I just used my hand mixer.


It’s important to clean things out right away, and it really it easiest if you wipe it with a paper towel or disposable napkin first. I’m a cloth-in-the-kitchen gal as much as any other “green” homemaker, but honestly? It was hard to clean just using hot water and soap. I should have taken the ebooks recommendation and just wiped it out first.


finished diaper cream in jar
3. Pour into containers and let cool and solidify.

I asked Renee about the addition of essential oils that would be safe for babies. Here were her thoughts:


You could certainly add a baby-safe essential oil to the rash cream. I would allow it to slightly cool before stirring in the oil. Or pour melted rash cream into container and then stir in essential oil. I personally would prefer not having a scent, especially if it’s a gift for a friend’s newborn because the friend may be particular about scent, or the newborn could be sensitive. But if it’s the plan, aim for about 9-12 drops per 4 oz of cream, trying as little as possible first, especially with essential oils that have a strong scent, like chamomile.


You could definitely pour it into some metal tins like these ones (they would also be perfect for things like homemade vapor chest rub or herbal salve, and are just over $1 a piece- I’m buying some soon!). Mountain Rose Herbs also sells tins.


Since I haven’t bought tins yet and didn’t have any empty ones to reuse, I opted for small glass jars, my go-to for practically everything.


This particular batch was mostly made as a baby shower gift. I put it in a cute jar and added one of these adorable printable canning labels that I found on (where else?) Pinterest.


Where do you get the supplies to make diaper cream?


I got mine in a DIY kit from MadeOn Skin Care. The kit includes coconut oil, beeswax, and shea butter (it’s intended for making your own hard lotion bars) but you can also add on a package or two of zinc oxide powder. Right now, the kit comes with a free bonus copy of the eBook My Buttered Life: Baby Edition!


Another site that Renee recommends is From Nature With Love (they are one of the few that sell the zinc oxide powder). I haven’t used this site yet, but it looks fantastic and I trust Renee’s recommendation.


Just so you know, this is what I reach for when dealing with most diaper rashes or wanting to prevent them. However, when we get a rash that is just extremely raw or red and really needs some extra healing power, then I reach for this healing herbal salve. It isn’t meant to protect the skin the same was as the thicker diaper cream, but it does heal up open sores or irritation very quickly!


What do you use for diaper rashes?


Disclosure: This post contains affiliate links.


Original article and pictures take keeperofthehome.org site

пятница, 5 сентября 2014 г.

Make This Tea to Debloat Your Belly Naturally

Make This Tea to Debloat Your Belly Naturally
teatodebloat

Being bloated is such an uncomfortable experience. People often feel self-conscious about their appearance and are usually also dealing with physical discomfort. I know that when I get bloated, not only does my stomach stick out, but it’s also hard and tender to the touch. Thankfully, this natural bloating remedy is easy and effective, and quick to pull together.


Another frustrating aspect of bloat is that there are so many different causes of it. This makes it hard to pinpoint exactly what is the trigger, especially since a person is likely experiencing different triggers at different times. Here are a number of causes of a bloated belly.


  • Overeating
  • Eating too fast
  • Water retention
    • Sometimes this is, counter-intuitively, caused by dehydration or too much refined sodium
  • Gas in the digestive tract
  • Indigestion
  • Irritable bowel syndrome (IBS), celiac disease, or other diseases of the gut
  • Constipation
  • Rich and fatty foods without veggies/starches/etc. to balance
    • Fat takes longer to digest
  • Food allergies, sensitivities, and intolerances
  • Stress
  • Hormonal changes
    • Commonly occurs alongside PMS
  • Swallowing air
    • From drinking through a straw, chewing gum, carbonated beverages, or hard candies
  • FODMAP foods
    • Specific kinds of carbs and sugars that some people have a hard time digesting
  • Consuming dairy
  • Abruptly increasing fibre intake
  • Inflammation
    • May be brought on by spicy foods or additives
  • Food intolerances or sensitivities

Whatever the cause, this natural bloating remedy should be able to help you find quick relief for the discomfort of a bloated belly. Here’s the recipe.


Easy and SO effective!! Natural Bloating Remedy

  • 1-1 ¼ cup water
  • 1 bag green tea or equivalent for loose leaf
  • 1 inch piece of fresh ginger, minced
  • ½ tablespoon apple cider vinegar
  • juice of half a lemon (approx. 1 tablespoon)
  • Optional: 1 tsp honey (or sweetener of choice)

  1. Pour boiled water over the green tea and ginger in a mug.
  2. Green tea should steep for no more than 3 minutes.
  3. Ginger can steep for up to 10 minutes.
  4. Remove tea bag and diffuser at desired times.
  5. Add apple cider vinegar and lemon juice. Stir in honey if including.
  6. Sip away.

You can really drink this any time of the day that you are feeling bloated. I find it especially effective first thing in the morning after overindulging the night before. I also enjoy drinking the Debloat Tea cold in the summer time.


In all honesty, this tea is a bit of an acquired taste if you are not used to consuming these ingredients already. I really do enjoy it now, but I did not my first time making it. If you find it less than palatable, include the optional honey to add a bit of sweetness.


So how does this Debloat Tea reduce bloating?


Here is why the ingredients in this tea work so effectively.


Green Tea


Green tea has been a part of traditional Chinese and Indian medicine for centuries, and now modern studies have shown it to have a great number of health benefits due to its high antioxidant content. For the purposes of debloating, the green tea acts as a diuretic. This helps to eliminate any excess water your body may be retaining. Green tea also improves digestion and reduces gas.


Ginger


Ginger is known for aiding in digestion which is beneficial to reducing bloat. Considered a carminative spice, this means that ginger relieves gas. It is also anti-inflammatory and a muscle relaxant. Bloating is sometimes caused by tension or spasms, so ginger helps with this. Ginger is a natural pain reliever meaning it will also relieve any cramps or discomfort that commonly accompanies bloating.


Natural bloating remedy. Works so well!

Apple Cider Vinegar


Apple cider vinegar is another digestive aid. This is at least in part because it balanced the pH levels in the intestine. Also, apple cider vinegar particularly helps break down the fats which I mentioned above as a possible cause of bloat because fats take so long to digest.


Lemon


Lemon juice is another diuretic which will help relieve water retention. It is also a gentle laxative which will help keep your digestive system moving along and alleviate the cause of the bloating if it is related to constipation.


Water


Even just drinking the water content in this tea can be helpful in reducing bloating. As I mentioned above, dehydration can play a factor whether it is causing water retention, constipation, or something else. Just be sure you are sipping and not guzzling or chugging which will only cause you to swallow more air and make matters worse.


If you pay attention to what you are eating and how you are eating that should help you hone in on what your bloating triggers are. Remember to stay hydrated and be active to keep your digestion moving along smoothly. And the next time a bloated belly hits, I encourage you to drink this Debloat Tea so you can feel better quickly. You can also pair it with the Stomach Soother Massage Oil for a double-whammy relief treatment.


Grace Furman is a freelance writer and blogger at Heartful Habits. Heartful Habits is a place of inspiration and support for your natural health and wellness journey. Check out her free Dynamic Dialogue conversation starters pack to create positive and engaging connections during your family time.


Original article and pictures take redandhoney.com site

четверг, 4 сентября 2014 г.

Make Healthy Choices Easy For Your Family

Make Healthy Choices Easy For Your Family

I’ve told you how much my kids love corndogs. And how I still love Dortitos. And how, if given the choice, my kids would choose the candy over the good stuff.


Oh look. My family is normal! (Normal is relative. Thank you for your support.)


This is why I have to be strategic when putting food on the table for meals and snacks. Yep, sometimes I offer chips. So be it. But in an effort to fill us all with as much nourishment as possible – as easily as possible – these are the tricks I’ve discovered through the years.


How To Make Healthy Choices Easy For Your Family

Healthy Choices Are Easier When There Are Several Choices


I’m not about to become a short-order chef. But when I know I’ll be serving a fruit or veggie one of my kids doesn’t love, I’ll always serve another one or two he does love. Then I don’t have to fight a battle that doesn’t even make sense. After all, even I don’t love every single veggie on the planet (sorry jicima, I tried).


Serve the Healthy Choices on a Plate


This one may sound silly, but the truth is that the easier I make the food to grab and eat, the more my family will eat. Last week I got out jars and bowls filled with little bits of fruit and raw veggie leftovers from the past couple days’ meals. Had I put them on the table as-is – which would have meant that my kids would have had to reach farther across the table and down into jars to access the food – I know without a doubt that they wouldn’t have eaten as many fruits and veggies. Instead, I dumped everything out of the jars and made a big platter of the fruits and veggies for the table. The munching started even before I was ready to call everyone in for the Potato Soup meal. Bingo. My plan worked.


Assign a Number


Often when there is a plate of healthy grab-and-eat foods, I’ll tell my kids, “You each need to eat at least 8 foods from the plate.” Then Malachi says, “What if we eat 10, is that okay?” Smarty pants. Again, some of the foods on the plate aren’t my kids’ favorites, so they don’t even have to touch those and it doesn’t matter as long as they eat at least 8 (or sure, 10).


Healthy and Delicious Should Happen At the Same Time


What I love about healthy food is that it is so yummy and flavorful – naturally. But if a fruit is not in season, it’s not going to taste as good – so choose accordingly for the best chance at your family loving the food choices. Also, be sure your family doesn’t equate the word “healthy” with “dry, boring, and flavorless.” As for me and my household, we will avoid rice cakes at all cost and instead make delicious and flavorful dishes and snacks with herbs and spices, milk, cheese, meats, fruits, veggies, real butter, sea salt, and coconut oil. Real food is what deliciousness is made of.


Serve the Favorites – the Healthier Way


We all love pizza, tacos, hamburgers, fries, and did I mention corndogs? Sometimes we splurge on the not-so-good-for-you variety. Mostly though, it is less expensive and tastier to make all of these favorites with our own wholesome ingredients. Have you ever made homemade fries? On my stars. And corndogs? We can make those too.


I’d love to hear the tricks you use to make healthy choices easy for your family!


Original article and pictures take heavenlyhomemakers.com site