вторник, 29 сентября 2009 г.

Build your brain, heart, and each cell in your body with your new refreshing beverage

Build your brain, heart, and each cell in your body with your new refreshing beverage

My favorite winter-time health supporting drink is by far “golden tea” or even “golden milk” (especially the latter for my kiddos). The last flu season was brutal for us and I kept those roots simmering on my stove top as a lifeline. Summer is a great relief from colds and flu and yet I still find myself dragging. Being a mom of young boys is never easy. Being a mom of young boys who is herself of “advanced maternal age” (*cough*) adds another layer of challenge and so I find myself dragging around, wanting to get out and live a whole lot more, trekking here in the Sequoia National Forest and playing in seasonal creeks like Huckleberry Finn. The creek play will have to wait until both California’s epic drought has turned and until I’ve had a lot more of the beverage at hand.


And so I am here in the summer dragging in the swelter and it occurs to me that my go-to winter drink needs only a tweak to help me out and so the “golden spice” sits in my refrigerator in a jar, ready for the day.


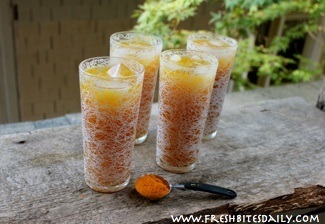
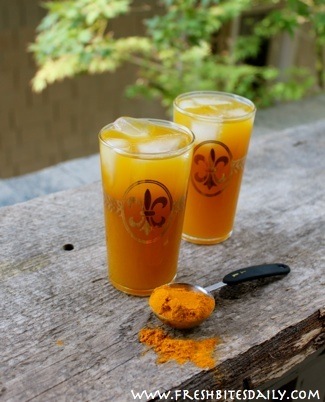
This is a tea, just like the wintertime version, except that it is cold (at the risk of being overly obvious…). I make a very strong tea base to use as a concentrate and then add carbonated water because I love the fizz. The fizz part is obviously optional.


You can also make this tea with fresh root or powder. I provide a starting place below for each.


Why I Gush Over This Root


Build your brain, heart, and each and every cell with your new refreshing beverage

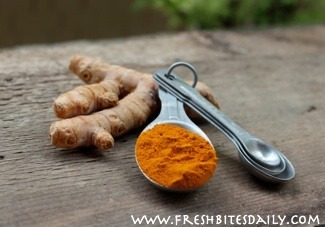
I do admit that I gush over turmeric on this website and, really, in this instance, ginger should get its cred too for adding exceptional health-building properties and great flavor at the same time. I have written an epic review of turmeric with research citations (here) that you can explore as you have time. As a recap, turmeric has centuries of use in the Ayurveda and Unani systems of medicines in India and that strong tradition seems to be vindicated weekly as published research appears in western academic journals extolling its health benefits. Some of the highlights are these:


  • Turmeric is a cancer-fighter: Curcumin in turmeric is probably most widely known for its anti-tumor properties.
  • Turmeric builds your heart and may reduce your symptoms of depression, both in part at least to its anti-inflammatory properties.
  • Turmeric may relieve arthritis pain by reducing joint stiffness and swelling.
  • Turmeric may reduce your risk of Alzheimer’s Disease due once again to its powerful anti-inflammatory properties.

Read more about it and follow up on the research citations (here).


As for a summertime beverage, I was inspired to try this otherwise-very-wintery beverage as I sat in the swelter feeling that “summer puffiness” — that water retention from the heat. As I sit I can nearly feel that mild inflammation in my cells. Ugh. Drag.


Flavor Adjustments


Before diving into this recipe, you should know that turmeric has a strong flavor on its own and it not particularly pleasing on its own. The ginger and honey make all of the difference in the world. In fact, if you’ve had a turmeric beverage and nearly gagged, you will want to give this version a try. If you are hesitant, double the ginger portion to cover the turmeric flavor more. Ginger is wildly healthy too. You cannot lose.


You may also choose to add more sweetener. The flavor of the honey is a great complement to the turmeric and ginger flavors in the tea but you could also use stevia or a regular sugar. A whole, unrefined sugar like sucanat may play pretty well too, adding some musky depth. (Note to self to try this combination.)


If you find the drink to be bitter, you might not be heating it enough. My picky-eating sons love this drink and actually discuss this key point in a little video below.


In any case, use these recipes as a starting point and make adjustments to make this your own. You may want to dilute it quite a bit just using the concentrate as a bit of flavor to your water.


Turmeric and Ginger Iced Tea from Dried Powder: Ingredients


Build your brain, heart, and each and every cell with your new refreshing beverage

My basic ratio for tea is one teaspoon each of dried turmeric and dried ginger per two cups of water. The recipe below makes about eight cups and fills a nice half gallon canning jar that fits well in my refrigerator. You can also just refrigerate the base concentrate and add water as you drink your tea. The black pepper in the recipe simply helps your body absorb the curcumin in the turmeric. It doesn’t take a lot and you can certainly add more if you wish.


  • 2 cups plus 6 cups of water. (2 cups for steeping, 6 cups of cool water to add to your steeped concentrate)
  • 8 teaspoons (or 2 heaping tablespoons) of dried turmeric
  • 8 teaspoons (or 2 heaping tablespoons) of dried ginger
  • 1 teaspoon ground black pepper
  • 1/4-1/2 cup of honey

Turmeric and Ginger Iced Tea from Fresh Root: Ingredients


Build your brain, heart, and each and every cell with your new refreshing beverage

  • 2 cups plus 6 cups of water. (2 cups for steeping, 6 cups of cool water to add to your steeped concentrate)
  • Four inches of fresh turmeric, thin sliced or chopped (including the skin is fine)
  • Four inches of fresh ginger (or less if it’s the fatter ginger variety but it’s hard to go wrong), thin sliced or chopped (including the skin is fine)
  • 1 teaspoon ground black pepper
  • 1/4-1/2 cup of honey

Turmeric and Ginger Iced Tea Steps


With either dried or fresh root, your process is basically the same:


  1. Add the turmeric, ginger, and pepper to a saucepan. Cover with two cups of water. Bring to a boil. Reduce the heat to a simmer for a few minutes. Turn off the heat.
  2. Cover your pan and allow it to steep for an hour or so or even overnight.
  3. Add the honey in the heating stage to help it dissolve. If it is high-quality raw honey, allow the mixture to cool a bit before adding it.
  4. Strain out the root. If you are using fresh root, you can save it and make more tea. If you are using powder, I recommend straining your mixture through cheesecloth or a tight-weave strainer just to remove some of the gritty powder. The texture of your drink will be far better.
  5. You now have a concentrate. Cool it in your refrigerator and dilute it to taste. I would add an extra six cups of water to the mixture as the recipe calls for but you may want to add far more water for a lighter beverage. Experiment.

I also want to point out something epic about this iced tea. My boys drink it. I didn’t have to beg them or pay them to do that. They saw the tea and wanted to try it. I pretended like it was any other beverage. They drank it and wanted more.


I died a small death.


The drink the winter version and so I suppose I shouldn’t be surprised and yet I always am.


Our Other Turmeric Recipes


Find more of our turmeric-intensive recipes:


  • Golden milk made with turmeric powder and some simple flavor options to help it come alive. Find it here.
  • Turmeric tea paste, a great option for making tea from the powder that is also portable and easily taken on the road. Find it here.
  • A turmeric facial mask with an accompanying scary photo here.
  • Roasted cauliflower with turmeric here, combining great foods into one recipe.

Original article and pictures take www.freshbitesdaily.com site

четверг, 24 сентября 2009 г.

Bug Bite Salve

Bug Bite Salve
BugBiteSalveMAH

By Katie, Contributing Writer


Summer days are here at last! School is out and kids are enjoying every last bit of daylight spending as much time outside as possible. Gardens are in and starting to bear fruit. Warm summer nights are spent catching lighting bugs and visiting with friends in the late evening over glasses of iced mint tea.


Sounds perfect, right? Unfortunately, lighting bugs aren’t the only little critters out. Bugs are everywhere you go in these hot summer months. If it’s not mosquitoes then, it’s chiggers; if it’s not chiggers, then it’s….well, you get the picture.


When you are going to be outside then you might want to think about using Nina’s Homemade Insect Repellent. If you forget or, for some reason it doesn’t work, then keeping this bug bite salve on hand is a must. It is a simple blend of herbs, oil and bees wax that heals your bug bites in no time.


**Don’t want to make it? Grab some in our store!**


  • Plantain– This plant draws out poisons and soothes the skin.
  • EchinaceaThis king of herbs relieves itching from bug bite and promotes healing.
  • LavenderThis fragrant flower repels insects and reduces swelling.
  • Coconut oil– Has antifungal, antiviral and antibacterial properties.

Bug Bite Salve


Ingredients:


  • 1/4 cup Dried Plantain Leaf
  • 8oz (1/2 cup) bee’s wax

1. Add all your ingredients to a crock pot and turn it on to the lowest setting. Leave for two to three days. (Note: Because my crock pot tends to get rather hot, I periodically check on it and turn it off at night.)


2. After three days you will have an herb-infused oil. Strain out all the herbs. You can do this by using a stainless steel stainer or a cheese cloth. I use both. The cheese cloth allows you to squeeze out as much of the herb oil as possible.


3. Pour your herb infused oil back into the crock pot and turn it medium heat.


4. Slowly stir in about 4 TBS of beeswax pastilles. Once the beeswax pastilles are completely melted, pour into a container of your choice.


Bug Bite Salve
**Don’t want to make it? Grab some in our store!**

Have you ever tried a bug bite salve? Did it help?


Original article and pictures take modernalternativehealth.com site

понедельник, 21 сентября 2009 г.

Broccoli Apple Salad

Broccoli Apple Salad


For this Broccoli Salad I was trying to recreate a side dish my sister-in-law brings to a lot of our parties. A lot of broccoli salads have cheese, nuts, grapes or dried cranberries. This one has a delicious, crisp apple, with red onion, celery and crumbled bacon. I adapted a recipe I found at The Kitchen is My Playground for this.


In the original recipe, it calls for 1 head of broccoli, which vary in size. I had two smaller heads of broccoli so I ended up bumping up the dressing to 1 cup of mayo with just a pinch more sugar and about 1 tsp extra apple cider vinegar in order to get everything a light coating of dressing. Enjoy!


Broccoli Apple Salad

Makes about 8 servings


Ingredients


Salad:


  • 1 bunch broccoli, cut into small florets
  • 1/2 cup red onion, diced small
  • 1 cup celery, diced small
  • 1 apple, sweet variety, diced small
  • 8 slices bacon, cooked & crumbled
  • 1/2 cup dried cranberries (optional- I skipped)

Dressing:


  • 3/4 cup mayonnaise
  • 1/4 cup sugar
  • 2 Tbsp. apple cider vinegar

Directions


1. Combine salad ingredients in large bowl. In a small bowl, combine dressing ingredients and whisk until combined; pour over salad and toss. Serve chilled.


Recipe adapted from The Kitchen is My Playground. Sharing this recipe at the following fun link parties. Sharing this recipe at the Recipe Lion Blog Hop - Summer Potluck Recipes.


Ina's Carrot and Pineapple Cake with Cream Cheese Frosting

Pineapple Sherbet Punch

Original article and pictures take www.jamhands.net site

пятница, 18 сентября 2009 г.

Bring On the Salt! (Why I Don’t Restrict My Sodium Intake)

Bring On the Salt! (Why I Don’t Restrict My Sodium Intake)
When you start with real, whole foods, and add unrefined salt to taste on top, you can generally trust your body to tell you when enough is enough. // So true! And the brand mentioned in the post is absolutely THE best.

Have you ever noticed that the official line on what’s healthy is constantly changing?


It’s irritating, isn’t it? I mean, it was just a few decades ago that “they” were saying that cigarettes weren’t all that bad. Obviously, they were wrong on that one. What else are they wrong about?


Even in my relatively short lifetime of three decades, I’ve seen the “party line” do a total one-eighty on a number of issues, like trans-fats, margarine vs. butter, eggs, saturated fat, and yes, even salt.


That’s not the only reason I distrust government-approved nutritional guidelines, though. There are lots of ingredients today in our food industry that are terrible for you. Many should be banned altogether, but by the power of corporations with deep pockets and heavy political influence, they remain on tables and on shelves.


As a consumer with limited resources, I find that disheartening.


At the end of the day, the best thing that I can do is to get educated about what is in the products on the grocery store shelves so that I can make an informed decision.


I cannot currently grow/raise all of my own food, nor can I buy 100% organic, nor can I make everything from scratch. All good things, to be sure, but none that fit within my current reality. Knowledge is power, though, and it just so happens to be readily available if you’re looking.


Today I want to tell you all about one of my favourite foods – one that has indeed been unfairly framed as a bad guy: salt.


saltandpepper

I have always had a love affair with salty foods. People talk about swooning over chocolate, and how it would be first on the list of things to bring to a deserted island. I feel the same way about a bag of chips or a plate or nachos (mmm, nachos), or ALL TEX-MEX EVER CREATED, or even just an unrestrained sprinkle of salt over my dinner, salt combined with melting butter atop steaming hot veggies, or a good hearty sprinkle of salt in a bowl of homemade stew, or WHOA NELLY I need to stop there or else this article will never get finished because I’ll be in the kitchen noshing on whatever salty snacks I can find.


[runs to find the tortilla chips and hummus]


So, salt. It’s probably the most popular seasoning of all-time, and I think it’s a darn shame that most people enjoy it with a hefty side of guilty conscience. I enjoy my salt guilt-free for two reasons:


  1. I use only unrefined real sea salt.
  2. The majority of my diet is comprised of unprocessed whole foods.

There is only one time I will recommend that you eat a low-salt diet: if you eat a SAD (standard American diet) where most of what you eat comes from a box or can, and each item has a bajillion-million milligrams of sodium listed on the nutritional label.


Then no, you probably shouldn’t add salt from the shaker on top of that. But instead of just buying the boxes and cans labeled “lower sodium!” consider how you might include more whole, fresh foods in your diet instead.


When you start with real, whole foods, and add unrefined salt to taste on top, you can generally trust your body to tell you when enough is enough.


Because I consume salt freely and usually let my tastebuds guide the amount, I am rather picky about the type and brand of salt I buy. I need to ensure that it’s a beneficial part of my diet, not a harmful one. This is where that whole knowledge-is-power thing comes in again.


Truth be told, there is one company that I been loyal to for about five years now when it comes to the salt I put on our family’s table, and that company is Redmond. I have been wanting to write about this topic for a while now, and when they contacted me a few months ago about maybe reviewing some of their products, I did a little jig in my kitchen and said “heck yes”.


I mean, I could have written a generic sort of post, but I just totally love it when I can write about the specific companies that I genuinely love and want to share with you.


From their website: “Redmond real salt is salt exactly the way nature made it–unlike most other salt companies, we don’t add anything and we don’t take anything away. The result is a natural sea salt with more than 60 trace minerals, a unique taste our customers love, and reports of health benefits around the globe.”


ocean

I will admit that I don’t have the most refined and sophisticated palette ever… but I can honestly say that I taste the difference with this salt. It tastes better. It tastes… saltier?! I realize that sounds silly… but I can’t think of any other way to say it.


I grew up on the East coast of Canada, and spent many summer days at the oceanside. I can vividly still taste the saltwater in my mouth, and it is reminiscent of that taste: salty, earthy, and unrefined.


They sent me a box full of goodies (they sell other things in addition to salt, like clay, which is a really amazing little product that I may write about sometimes soon) to try out, among them were a few salt products, including a seasoning salt, a garlic salt, and an onion salt.


I use the regular salt all the time in my kitchen. The only reason I’ve bought the bleached, processed stuff at the store in the last five years is to make homemade play dough. I didn’t want to waste my precious Redmond salt on it!


And a new surprise favorite

I had never used their other salt products, though, and I must tell you that I have fallen in love with their seasoning salt. I used to think that seasoning salt was silly. I could just make my own. And it’s true – you could. But their blend is absolutely perfect in the balance of flavours and spices – it’s UH-MAZING on chicken – and it’s ready to use.


As we’ve walked through a lot of stressful seasons of life in the last few years, I have very much appreciated products that have made my life a little easier without compromising on any of my standards. Even real foodies need convenience foods every now and then, and it’s nice to have options for “those days”.


Lately we’ve kept some boneless, skinless chicken breasts (a cut we wouldn’t normally buy) in the freezer, which, combined with my Redmond seasoning salt provides a perfect last-minute meal when fried up quickly in my cast-iron, and paired with some frozen veg. It’s not the most frugal meal ever, but it’s healthier and cheaper than take-out!


So, to recap: I love Redmond salt, and have for years. I love that I can write about stuff I love and get paid for it. You peeps are smart – you know this is sponsored… but let me remind you once again: I only talk about products that I adore for real. Can’t buy my love, people. Unless you have a million-trillion dollars. Then have your people call my people, and take me to lunch. Tex-mex, obviously.


Disclosure: Redmond sponsored this post because they are awesome, I am awesome, and so are you. And that’s just how we roll around here.


Original article and pictures take redandhoney.com site

понедельник, 14 сентября 2009 г.

Breastfeeding While Working Full-Time

Breastfeeding While Working Full-Time
Breastfeeding While Working Full Time
Breastfeeding while working full- or part-time can be a challenge, but with a good breast pump and an established routine, it is more than workable. https://www.intoxicatedonlife.com/2013/05/28/breastfeeding-while-working-full-time/

I am the proud mother of a 6-month old baby girl. She is beautiful and wonderful and hungry…very hungry. She was born weighing 5 pounds and decided to waste no time getting caught up to her larger cousins.


I knew from the beginning that I would be returning to work and that I wanted to continue breastfeeding when I did. Our doula recommended an electric double breast pump. The price tag was a bit shocking but we were able to find one for sale at our local kids consignment sale for less than half of what it costs new. We only had to purchase the replacement parts (tubing, bottles, etc.), and my bank account was much happier.


Once our daughter was born we started the process of getting her comfortable with both the breast and the bottle. We started nursing as soon as possible (I had a C-section) and the next day I started pumping. We introduced the bottle during my recovery, it helped her adapt from the beginning and it gave me a chance to rest. Thankfully, she was able to switch back and forth without any confusion.


One of the things that really helped was that I never fed her from a bottle. I always had someone else do those feedings. This way she only ever associated me with breastfeeding. Even now, I rarely give her a bottle. When I’m home she gets her meals straight from the source.


Starting back to work was tricky. I had to figure out a system and schedule for pumping. I typically pump three times a day, once in the morning, at my lunch break, and again in the afternoon. A pump is not a very good replacement for a baby, and it can be frustrating when you aren’t collecting a lot of milk. I started taking fenugreek, a supplement which helped increase my supply. As she has gotten bigger and hungrier, we added an organic formula (recommended by our Homeopath). I was always nervous that I wasn’t leaving her with enough milk and knowing the formula is there if she needs it has helped me relax.


Navigating the Booby Trap: Breastfeeding & Beyond - Breastfeeding series @ Intoxicatedonlife.com (25 authors, 40+ posts)
Booby Button 2

While she doesn’t mind drinking from the bottle there are times when only mommy will do. I have found that she nurses much more frequently in the evenings and will still wake up a few times a night. It’s more about comfort than anything else, and since we’ve been separated all day, I really don’t mind giving her the extra time and attention at night.


Maintaining a nursing relationship while working full time is not always easy, but with a good support system, it is manageable. It may be a bit more work but knowing my little one is getting the very best keeps me motivated.


*Please note: The majority of this post was written in the middle of the night while nursing the above mentioned very hungry baby.


Kailyn Shippee
Kailyn Shippee

Kailyn Shippee is a wife to Ian and a mommy to Matilda (the baby) and Fenway (the puppy). She loves to crochet, cook from scratch, and dream of the farm they are currently working towards. She blogs about her family, their little homestead and their journey towards a more sustainable lifestyle at A New (England) Life.


Original article and pictures take www.intoxicatedonlife.com site

четверг, 10 сентября 2009 г.

Breakfast Energy Smoothie

Breakfast Energy Smoothie

A delicious and energizing breakfast smoothie that will fill you up and get you through your day!


Breakfast Energy Smoothie, easy smoothie recipe to make!

Are you sick of smoothie recipes, yet!? I hope not, but if you are, I promise this is the last smoothie recipe for awhile.


I saved the best smoothie for last. This delicious Breakfast Energy Smoothie is a quick, nutrient packed and will energize you until lunchtime!


This smoothie is loaded with fresh or frozen fruit, orange juice, and yogurt.It’s a great way to start out your day, knowing you started out your day on a healthy foot {which means I can have one of my Chocolate Chip Cookies for dessert tonight, right!?}


Breakfast Energy Smoothie, easy smoothie recipe to make!
JUST A COUPLE SMOOTHIE MAKING TIPS

USE FROZEN FRUIT: I like to use frozen fruit instead of ice cubes in my smoothies. For this smoothie you want to use mixed berries, like blueberries, raspberries, blackberries….these berries give you energy! And to make it super easy, I just buy the chopped frozen mixed berries in the frozen section of my grocery store, because I’m all about making things quicker and easier!


FILL UP YOUR BLENDER: You always want to layer your ingredients softest to hardest (frozen). First, add the orange juice, vanilla extract, and yogurt. Then, add the fresh or frozen fruit.


STEP-BY-STEP RECIPE GUIDE


Breakfast Energy Smoothie

Print


AND ALSO TRY THESE DELICIOUS SMOOTHIE RECIPES…


Original article and pictures take deliciouslysprinkled.com site

вторник, 8 сентября 2009 г.

Brand Name Score Card For ##smart_domain_name_upword##

Brand Name Score Card For ##smart_domain_name_upword##

The domain name tricksly.com is for sale!


TRICKSLY.COM


What You Get


Start with a single word search and we do the rest. We will find related business names and brands.


Add the most unique business names to your favorites list. Share with friends and start collecting feedback.


Purchase your brandable .com domain name with upfront no haggle pricing and transfer guarantee,


The following scorecard was prepared using our internal metrics based on our

branding experts years of experience naming and designing brand entities.


Any score of B or higher is a lofty benchmark to pass by our branding team.


What Happens After 'Buy Now'?


Our SSL shopping cart accepts all major credit cards. Please inquire about wire transfers.


An agent will contact you with personalized information. Every transfer is unique!


For your security,your payment is held in escrow until you’ve received your name.


Original article and pictures take www.tricksly.com site

пятница, 4 сентября 2009 г.

Boston Cream Cheesecake – Low Carb and Gluten Free

Boston Cream Cheesecake – Low Carb and Gluten Free

This post may be sponsored or contain affiliate links. We may earn money from purchases made through links mentioned in this post, but all opinions are our own. We are a participant in the Amazon Services LLC Associates Program, an affiliate advertising program designed to provide a means for us to earn fees by linking to Amazon.com and affiliates sites.


A fabulous low carb Boston cream cheesecake that bakes up in no time. It’s got a layer of gluten free cake topped with cheesecake then a layer of chocolate!


Gluten free low carb Boston cream cheesecake recipe

Summer is rolling to an end and the kids are getting ready to head back to school. So, I’ve been taking a little time from recipes so I can enjoy the summer before it’s over.


We have been making some Fat Head pizza on the grill. And, I’ve been using my homemade low carb pizza sauce with no sugar added.


I did, however, have some time to make this low carb gluten free Boston cream cheesecake last weekend. It looks a lot more involved than it really is so don’t be afraid to try it because it looks complicated. It’s so easy to put together.


I had a love for Boston cream donuts and I have not yet attempted to make low carb ones, yet. I’m not really sure how you would get the light airy donut that’s needed to fill with the traditional vanilla custard.


gluten free low carb Boston cream cake batter

Donuts have been my only experience with Boston cream as I’ve never eaten the pie or cake. I saw a recipe for Boston cream cheesecake in a Better Homes and Garden cookbook and thought it could easily be made low carb and gluten free. I was right!


For this cheesecake, you will need a springform pan and the sides will have to be greased well if it’s not a good non-stick surface. The sides of my cheesecake did stick a bit to the sides, but running a knife along the inside of the pan prior to expanding the sides did the trick for easy release.


Gluten free low carb Boston cream cake layer

This is a layered cheesecake with a gluten free cake at the bottom rather than a crust. The cake needs to be baked fully before putting the cheesecake layer over the top.


Gluten free low carb Boston cream cheesecake batter

After about 25 minutes in the oven, the cake should be done. Then it’s time to whip up the cheesecake batter which is a creamy mix of cream cheese, sour cream, eggs, vanilla and sweetener.


Gluten free low carb Boston cream cheesecake layer

Some may argue that this really isn’t a Boston cream pie because the famous vanilla cream is missing. Well, that is true because it’s replaced with a vanilla flavored cheesecake instead.


Gluten free low carb Boston cream cheesecake pan

Okay, so it may not have any custard, but it still incorporates all the flavors and idea of the Boston cream pie. And, cheesecake is as delicious if not better than custard, right?


Gluten free low carb Boston cream cheesecake chocolate

I just love a baked cheesecake, don’t you? It may not be as easy as blending up a no-bake mix, but there’s just something extra special in a baked cheesecake that isn’t there in the no-bake versions.


Gluten free low carb Boston cream cheesecake topping

To make the chocolate glaze, I used a whole 3 ounce bar of Lily’s dark chocolate. I find the prepared chocolate works much better than trying to make one with your own low carb sweetener and cocoa or unsweetened chocolate.


Gluten free low carb Boston cream cheesecake sliced

Once the chocolate mixture is completely blended, it needs to cool off a bit before spreading on the cake. You can drip a bit of chocolate down the sides if you wish, but I chose to keep it all on the top.


Gluten free low carb Boston cream cheesecake slice

Since this is a pretty rich cake, cutting the whole thing into 16 slices will keep the portion to a size that keeps calories and carbs within reason. Each thin slice has about 3g net carbs.


Most cheesecakes freeze well, and this one should be no different. If you aren’t taking this to a party to share or have a large family that will eat it, you probably want to freeze the individual slices to enjoy later. It’s easy to overeat this yummy gluten free low carb Boston cream cheesecake!


No time to bake a cheesecake or staying away from dairy? Try this dairy-free coconut custard instead.


How to Make a Keto Boston Cream Cheesecake Video


Low Carb Keto Boston Cream Cheesecake Recipe


Gluten free low carb Boston cream cheesecake bite

Original article and pictures take lowcarbyum.com site

четверг, 3 сентября 2009 г.

Book Review and Recipe from The Alternative Autoimmune Cookbook by Angie Alt

Book Review and Recipe from The Alternative Autoimmune Cookbook by Angie Alt
AIP
Alternative Autoimmune Cookbook by Angie Alt.

There are so many conditions now under the umbrella of autoimmunity. The basic root is inflammation gone unchecked. Diet can have a major impact on inflammation.


There are medications that are used to reduce inflammation, but they are very toxic and dangerous, due to side effects and long term effects. We now know that diet and lifestyle play a huge role in reducing inflammation. You can get help reducing your levels of inflammation whether or not they are autoimmune in nature.


Even if you don’t have autoimmune issues, if you have any health issue at all (most are related to inflammation), you can find a great deal of value in the wide variety of issues addressed by the AIP.


One of my favorite books is The Alternative Autoimmune Cookbook by Angie Alt. Aside from the great recipes, I particularly love how she outlines, stage by stage, how to re-introduce foods that have been removed in the elimination phase. This is a very detailed approach and will help you be successful in identifying offending foods.


This is not a cookie cutter approach – we are all metabolically different. Even if you have the same medical diagnosis as the next person, chances are that you have different food triggers than that person.


Alt also provides a form to make a food journal with – something I always recommend to my patients. Writing down what you eat and any subsequent symptoms, physical or emotional that occur, is a major step forward towards healing.


You would be surprised at how many times patients have told me how valuable the journal is because they are able to go back and see exactly what they ate. This is especially important when there are symptoms that don’t appear for a few days – very common with delayed sensitivities.


Along with the outlined stages, she provides recipes accordingly. This is very helpful when you are still going through the stages and have to keep some foods eliminated. All the recipes look delicious and are simple and easy to prepare! You don’t have to be a gourmet cook here. This is simple every day eating!


For instance there is a recipe for tumeric and ginger roasted cauliflower! Anyone who know me, knows that I hate cauliflower – but I would try this recipes because it looks so good and you know how good ginger and tumeric are for reducing inflammation!


This cookbook, like many others in the bundle, also reflects the author’s own journey with autoimmunity and their success with the diet. It is totally uplifting and provides so much hope to others with autoimmunity, no matter what the diagnosis.


Alt talks about her heart-breaking journey, her despair, her anger and her recovery. This is so important to share with others who are sufferin


Here is a great recipe from her book for Lemon Rosemary Brined Pork Chops! I love that the pork chops are brined!


HYwngFeuZ9ttIjnkS5ePix6_aOm3AFMwrDoYTJQJn6zykG7mCnz-0mSQWKHywGuaL3Dy-afBr6uaHFbOjpWFfWHn9dhIf75PRFI7=w1231-h549

Print


Lemon Rosemary Brined Pork Chops


Ingredients


  • 4 cups filtered water 5 tablespoons salt
  • 1 yellow onion, sliced
  • 4 garlic cloves, crushed 4 sprigs fresh rosemary 3 bay leaves
  • 1 lemon, halved
  • 1/4 cup white wine vinegar 20 ice cubes
  • 4 bone-in pork chops

Instructions


  1. In a medium saucepan, combine water, salt, onion, garlic, rosemary, bay leaves, lemon and vinegar. Bring mixture to boil over high heat, stirring until salt dissolves. Remove from heat, cover and let sit 10 minutes.
  2. Place ice in a large bowl. Pour brine over ice and stir to melt.
  3. Place pork chops in a large freezer bag. Add brine and seal. To avoid spills, place bag in a large bowl and set in refrigerator for 3 hours.
  4. After brining, remove chops from bag. Rinse and pat dry. Discard brine. Grill over high heat for 2–3 minutes per side. Serve and enjoy!

Original article and pictures take realfoodforager.com site

вторник, 1 сентября 2009 г.

Boo Boo Balm

Boo Boo Balm
Boo Boo Balm - all natural first aid ointment with printable labels

This balm is part of a travel set I put together for my kids. They’ve spent much of the summer adventuring and camping their way across the country and I wanted them to be prepared for any first aid needs they might run into.


Boo Boo Balm is a general, all-purpose healing salve (think herbal neosporin), to be used on scrapes, scratches, bug bites, and other minor skin irritations. Tomorrow, I’ll share the recipe for Bug Be Gone Salve and then the day after – Bumps and Bruises Balm.


Summer Travel First Aid Set with Labels

Each recipe also has a corresponding sheet of printable labels. You can print off sheets of one style (Boo Boo Balm’s is HERE) or a combination of the three different types (HERE.)


Boo Boo Balm


  • optional: If you’re worried about the salve melting from the heat of travel, you can add an additional 1/2 teaspoon candelilla wax to the recipe. You can buy candelilla wax from BrambleBerry.com. You also might want to add a pinch of extra beeswax to make a firmer texture.

Step 1: Place the calendula oil and beeswax into a heat proof container. You can use a mason jar, or for easy cleanup, a recycled tin can.


Step 2: Set the container with the oil and beeswax down into a saucepan that contains a few inches of water. Set the pan over a medium-low burner until the beeswax has melted.


Step 3: Remove from heat and stir in the essential oils.Carefully, pour the hot mixture into tins. This recipe fills three of the 2 ounce tins shown. You can buy those from Amazon.com or Mountain Rose Herbs.


boo boo balm label

Step 4: Print out the sheet of Boo Boo Balm labels HERE or the combination sheet of Bug Be Gone, Boo Boo Balm and Bumps & Bruises, HERE.


I like to use sticker paper (like this kind) for labels. If you don’t have sticker paper handy, you can print on regular copy paper and affix with a thin layer of glue. It won’t be as durable, but will work for a while!


sticker lables for boo boo balm

Use on scrapes, cuts, scratches, bug bites, and other boo boos, as needed.


If you enjoyed this DIY project, let’s keep in touch! Subscribe to my newsletter, HERE, to get my best herbal projects, recipes, and soap making ideas sent straight to your inbox each month. (No spam ever, unsubscribe at any time.)


You may also like:


Lavender Salve (with labels)

Calendula Eyewash for Irritated Eyes

cold sore lip balm

Links to Mountain Rose Herbs and Amazon.com are affiliate links. That means that if you click on one and make a purchase, I earn a small commission for sending them a customer. This doesn’t cost you extra, but supplies me a small income that allows me to keep doing what I’m doing. Thank you! :)


Linked to: From the Farm Blog Hop


Original article and pictures take thenerdyfarmwife.com site