среда, 31 октября 2012 г.

Homemade Lavender Monster-Away Spray (How to Talk to a Young Child About Bedtime Fears)

Homemade Lavender Monster-Away Spray (How to Talk to a Young Child About Bedtime Fears)

The day is drawing to a close. Dinnertime is finished, cute little tooshes have been scrubbed clean in the bath, story-time is over, and even One-More-Story-Pleeeease-time is done. Time to snuggle and get into cozy beds when all of a sudden you hear it: a low growl, or heavy breathing. Those darn monsters in the closet again!


For my four-year-old, it’s either monsters, lions, or giants. They come every night, and they’re usually hiding out in the dresser drawers. We dutifully shoe them away every time, but the pesky things just keep coming back.


It can be so difficult to know the best way to deal with these sorts of things as a parent. Do we play in to the imaginative aspect? Do we flat-out deny the possibility? Do we try to just brush it off as being ridiculous?


My husband and I have a range of inner reactions when dealing with these bedtime fears in our preschooler (and now the toddler, who is learning from her older brother!). It can be frustrating when he just won’t listen to “reason”, and it is heart-wrenching to know that your child is experiencing scary feelings that you cannot take away as easily as you used to. In these times, empathy and understanding are your best and most important tools.


It is so much easier to be compassionate when we have a clear understanding of the issue. While there are a few things that can exacerbate the problem (life events and transitions, scary images in his media intake), it is important to remember that nighttime fears are a perfectly normal part of a child’s development. In fact, they are indicative of a healthy cognitive understanding of the world.


Yes, it’s true that there are scary things in the world. It’s also true that mommy and daddy aren’t the all-powerful beings that he believed them to be in his toddlerhood. This is a normal part of growing in understanding as he gets older, but it can be unsettling for him. He is in previously uncharted territory, and is understandably nervous. He is also just learning to separate the real world from his imagination, which is why simply telling him that monsters do not exist is not an effective strategy.


Your job in all of this is to help him to feel safe and secure while also acknowledging and validating his emotional needs. Simple enough, right? Not always! Here are a few ideas of how to accomplish this.


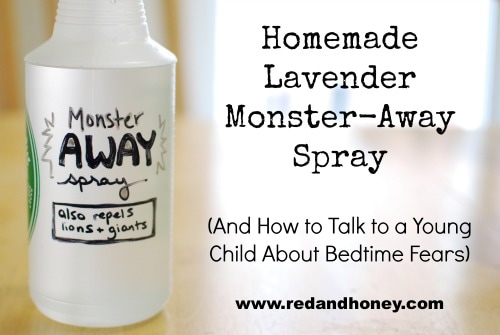
1) Monster-Away Spray


Fill a spray bottle with water and add a few drops of lavender* essential oil (enough to make it smell mildly of lavender – around 5-10 drops). Use permanent marker to make a “label” (or design one on the computer, print it out, and tape it on if you’re the crafty type). Mine says “also repels lions and giants” at the bottom because those are my four-year-old’s current nighttime fears. Each night at bedtime when he says he’s scared use the spray. You can use it preventatively (“this spray will make the monsters scared to come around!”) or reactively (“this spray makes the monsters run away because they’re afraid of getting wet!”), depending on your child’s needs.


* Lavender essential oil has a natural soothing and calming effect.


2) Offer a Protector Role


Parents often try to use stuffed animals or dolls as comfort for their scared child, but sometimes it’s just not enough. A researcher at a Tel Aviv university who conducted a study on childhood fears recommends using what he calls a “Huggy Puppy”.


“…children are presented with a stuffed dog and told that the once happy puppy is now sad. They are given the responsibility of being the puppy’s friend, caring for him, and ensuring that he is not afraid at night. Because this intervention depends on the child’s willingness to believe the puppy’s story and embrace their new compassionate role, it works best for children with stronger imaginations…” (source)


3) Enter the Narrative


Don’t say “Oh my goodness, you’re right, these monsters are terrifying!” Instead, join the narrative in order to steer it in a different direction. “How about Daddy gathers up all of the monsters and throws them in the trash for the trash collector to take away? They’ll try and escape, but they can’t, because they’re all stuck together and dizzy from rolling around in the trash can, so they just look silly!” A little bit of silliness is helpful – the laughter will help release some of those tensions, and your child will feel empowered knowing that you understand “the situation” and have it under control.


4) Role-Playing


In Playful Parenting, Dr. Lawrence J. Cohen talks about play as one of the most basic and effective tools for great parenting. I am reading this book right now and absolutely love it. In one part, he says this when talking about play fighting:


“I like to play bad guys or monsters who are just a little bit scary, but also kind of funny, bumbling, and incompetent, so children can use play to overcome their fears. If the bad guys or monsters are too scary, the play just increases children’s fear.”


Find that fine balance between acknowledging the fear and allowing your child’s imagination to work out a solution (ie. they aren’t really that scary after all because they’re so funny, etc), and you’re well on your way.


5) Things to Avoid


Things that may make the problem worse include forcing a child to stay alone in his room alone when scared, punishing or bribing, or forcing your child to “face his fears” in a way that makes him uncomfortable. These things will likely just harm your connection to your child, and make him feel even more fearful because he now has to deal with the fear on his own. Things to avoid saying:


  • You’re a big kid/don’t be a baby.
  • There’s no need to be scared.
  • There’s no such thing as monsters, don’t be ridiculous.

Further reading from around the web:


Original article and pictures take redandhoney.com site

пятница, 26 октября 2012 г.

Homemade Instant Oatmeal Packets (without the microwave)

Homemade Instant Oatmeal Packets (without the microwave)

A breakfast of oatmeal is fast, easy, nourishing, and filling. Making a pot of it on the stovetop is not hard. So why make Homemade Instant Oatmeal Packets? Are they really that much of a time saver?


oatmeal_packet_10

For my family – yes. I’m working to get my boys more independent in the kitchen. Having a variety of homemade instant oatmeal packets around for them to grab and fix themselves is a great time saver for me. Plus, it’s nice to have a variety of choices for them so that they can make whichever kind sounds good to them. These are great afternoon snacks too!


Inspired by MoneySavingMom to make Homemade Instant Oatmeal packets, I did a little research to discover the easiest and healthiest way to do this. Here are the tricks I learned through my experimenting:


  • Sucanat works just fine in place of sugar
  • Combining a big batch of the instant oatmeal mixture in a big bowl, then scooping out individual sized portions makes this process very easy
  • Blending a portion of the oats in a blender first to create a powder will help the instant oatmeal packets cook faster
  • A microwave is not necessary to cook this – simply boil water, stir in packet, walk away, then come back and eat
  • The add-in options are endless

Instant_Oatmeal_Packets

It took about 20 minutes to mix this and prepare the packets. Not bad for 24 quick breakfasts or snacks!


  1. Measure 7 cups of oats into a large mixing bowl. Blend the remaining 3 cups (1/2 cup at a time) until powdery and stir into the mixing bowl. Add sucanat and sea salt. Mix well.
  2. Measure ½ cup of mix into a small zip baggie, making about 24 Instant Oatmeal Packets.
  3. Be sure to scoop the mix from the bottom of the bowl as the sucanat tries to separate and settle there.
  4. Store in a dry, cool place.
  5. If you'd prefer not to scoop the mix into individual baggies, simply place the entire mix in a large, airtight container, scooping out ½ cup of mix for each serving.
  6. When ready to serve the oatmeal, empty contents of baggie into a cereal-sized bowl.
  7. Add ¾ cup boiling water.
  8. Stir.
  9. Allow the oatmeal and water to sit for about 5 minutes.
  10. Stir and eat.

Skip the Packets!


Want to make this even easier? Since originally coming up with this idea, I switched to simply making the Instant Oatmeal and keeping it in big jars. My kids scoop out 1/2 cup of mix, add 3/4 hot water, and they are good to go!


Instant Oatmeal in a Jar

Instant Oatmeal Varieties


By sprinkling in various fruits, spices, chocolate chips, or nuts – you can create many different types of instant oatmeal packets! I fill my bags with the basic mix, then sprinkle in various add-ins so as to have a variety of packages available for my family to pick from. Here are a few ideas:


Chocolate Swirl


Add a few mini chocolate chips


Blueberries and Cream


Add freeze dried blueberries, then cook oatmeal with milk instead of water


Strawberries and Cream


Add freeze dried strawberries, then cook oatmeal with milk instead of water


Cinnamon Raisin


Add 1/4 teaspoon cinnamon and a few raisins


Apples and Cinnamon


Add 1/4 teaspoon cinnamon and a few dehydrated apple chunks


Banana Nut


Add a few crushed walnuts and some freeze dried bananas


The blender does a great job chopping up the whole oats.

Remember, just do about 1/2 cup at a time to make the process work better.


oameal_packets (1)

Mix the blended oats (3 cups) with the remaining oats (7 cups),

then stir in the sucanat and sea salt. See how easy this is?


oameal_packets (3)

Scoop 1/2 cup of mix into small zip baggies. Add any add-ins you wish. Seal and store.


oameal_packets (9)

To Prepare: Pour contents of baggie into a cereal bowl.


oameal_packets (4)

Add 3/4 cup boiling water. Stir. Let it sit for 5 minutes.


oameal_packets (5)

After 5 minutes, stir again, then eat!


Having these homemade instant oatmeal packets has been so helpful. They are much cheaper than buying pre-made oatmeal packets – plus I can be sure we are only including the ingredients we feel good about eating.


Haven’t decided what to make for our Getting Ahead for Breakfast Challenge? This Instant Oatmeal Packets idea is a great choice. Learn more about this challenge here.


How About Giving the Gift of Instant Oatmeal?


Consider sharing this Instant Oatmeal with new moms, someone who has been sick, or anyone you know would appreciate this thoughtful and practical gift? Get all the directions here for making this happen, and even some cute free printable labels!


Homemade Instant Oatmeal in a Jar Gift Idea

Ever tried making homemade oatmeal packets? What are your favorite ingredients to stir into oatmeal?


Original article and pictures take heavenlyhomemakers.com site

четверг, 25 октября 2012 г.

Homemade elderberry syrup to fight the flu (or just for good eating)

Homemade elderberry syrup to fight the flu (or just for good eating)

If you have access to elderberries, fresh or dried, consider making your own elderberry syrup. Use the elderberry syrup in tea, baking, or eat it right off the spoon for some of its immune-boosting properties. (Read more about elderberry syrup and the flu here.) We are lucky enough to have local access to as many elderberries we could possibly ever process. We use the fresh berries to make syrup, but the process for fresh and dried berries is basically the same, you just add a bit more water if you are using dried berries.


This recipe makes about 3 cups of the syrup. If you are making large batches and canning them, you will want to consult with some canning-ready and tested recipes.


Homemade Elderberry Syrup Ingredients


  • With fresh berries: 1 cups berries, 1/2 cup water
  • With dried berries: 1/2 cup berries, 2 cups water
  • 1/2 cup honey (or more to taste)
  • 1 cinnamon stick
  • 5 cloves
  • 2 tablespoons of chopped fresh ginger

Homemade Elderberry Syrup Steps


  1. Combine berries, water, and spices in a pot.
  2. Bring the mixture to a boil and reduce heat to simmer.
  3. Simmer for about 30 minutes until the liquid is reduced by about half.
  4. Strain mixture through a strainer or sieve.
  5. Add honey and stir until the honey is dissolved.

Elderberry Syrup at FreshBitesDaily.com

Your syrup will keep in your refrigerator for a month or more. If you make it in large batches, consider freezing part of the syrup in smaller freezer containers for easy use.


Original article and pictures take www.freshbitesdaily.com site

понедельник, 22 октября 2012 г.

Homemade Elderberry Syrup for Cold and Flu

Homemade Elderberry Syrup for Cold and Flu

Want to build up your immune system? Here’s a simple and effective elderberry syrup recipe for cold and flu!


Homemade elderberry syrup is a safe, effective natural remedy for colds and flu--or just to boost your immune system all year long!

Guest post by Erin Josefchak


Winter is half over but cold and flu season is most definitely not over (yet)! If your family hasn’t gotten hit with the flu this year, you are blessed! If you have, then you know how horrible it is, especially for our little ones (and big ones!)!


Homemade remedies are better than store bought


Our family has been using this simple elderberry syrup recipe for ages now. We hardly get sick anymore. True story.


When we do get sick, it lasts two to three days max versus the usual week.


I was pleasantly surprised to find out that there was a clinical study out there that concluded what elderberry syrup users already knew. It’s good for you! And, in a more recent study, researchers concluded that elderberries were comparable to common antiviral medications (like Tamiflu) used to treat flu symptoms.


Not only is it easy and inexpensive to make but my kids LOVE the taste. AND, I can control 100% of what goes into my syrup. No dyes, no preservatives, no chemicals.


And…did I mention that it’s cheaper to make yourself? You can easily go broke buying the store bought stuff! Check out the prices online for elderberry syrup and you will see exactly what I mean.


Elderberry, or elder, has been used for centuries to treat influenza, colds, and sinusitis.

More about elderberries


So what are elderberries, anyway?


Elderberry, or elder, has been used for centuries to treat influenza, colds, and sinusitis. Dating back to the fifth century BC, the writings of Hippocrates, Dioscorides, and Pliny describe the use of medicines derived from the elder tree!


Elder is a large bush or shrub that is native to the U.S. and Europe. The berries are ripe enough to harvest between August and September, depending on the variety and your location.


If you are lucky enough to have an elder shrub in your backyard (or nearby), each shrub can yield 12-15 pounds of fruit! If not, they often grow wild along the roadside or pedestrian paths, forest edges, and abandoned fields.


You may also be interested to know that some berry farms grow elderberries as well. Call your local farms to find out.


Take elderberry syrup at the onset of cold or flu symptoms or take as an immunity booster all winter long!

natural cold remedies elderberry
Print

Homemade Elderberry Syrup


Take this syrup at the onset of cold or flu symptoms or take as an immunity booster all winter long!


Ingredients


  • 3 cups of distilled or filtered water

1. Place berries and water in a pot. Bring to a boil, reduce heat, and then simmer over low heat for 45 minutes. If you use cinnamon, cloves, anise, or ginger, add it to the mixture with the berries.


2. Next, strain the mixture through a cheesecloth or mesh strainer while mashing the berries to release remaining juice.


3. When syrup is room temperature, add honey and stir until well combined.


4. Store in glass jars in the refrigerator for up to 3 months.


*you can also use 1 cup fresh elderberries. You get dried elderberries from Amazon or the Bulk Herb Store.


**honey is not recommended for children less than 2 years of age, however, you can easily replace the honey with maple syrup to make this recipe infant and toddler-friendly. Local non-pasteurized honey is best and, if it is in your budget, raw Manuka honey is even better!


Suggested dosage


For prevention:


  • Children: ½ tbsp. a day
  • Adults: 1 tbsp. a day

At the onset of symptoms:


  • Children: ½ tbsp., 4 times daily
  • Adults: 1 tbsp., 4 times daily

Storage


Must be refrigerated. Keeps for 3 months. Can be frozen.


If this is too much for you to make, then I would suggest:


Bonus Recipe


This is a great little remedy for soothing a bad cough and clearing out the sinuses!


It’s great for pregnant mamas since brand-name decongestants are not recommended for those who are pregnant or nursing. In addition, brand-name decongestants contain aspartame, dyes, and added sugar! Yikes!


This hot tea is a great little remedy for soothing a bad cough and clearing out the sinuses!

Want more natural remedies for cold and flu season? Check out these posts!


10 Natural Ways to Prevent Colds and the Flu


How to Avoid a Stomach Virus After Exposure


Our Winter Supplements Regimen: How to Keep Healthy During Cold and Flu Season


Preventing Colds and Flu with an Air Purifier


The Ultimate Guide to Building a Natural Medicine Cabinet


The Ultimate Natural Remedies Round Up


What are your natural remedies for cold and flu?


Disclaimer: I am not a doctor, nurse, or licensed healthcare practitioner. Information obtained from this website is for educational purposes only and has not been evaluated by any health agency (FDA or Health Canada). Products and information are not intended to diagnose, treat, cure, or prevent any disease. Consult your physician before making any health decisions for you and your family. Thank you!


Erin Josefchak
Erin Josefchak is a wife to Marc, mommy to Tyler & Sierra, saved by Jesus Christ, amateur writer, and aspiring herbalist living in rural Quebec, Canada. She is committed to leading a faith-filled, frugal, and chemical-free life.

Erin’s passion is discovering the healing powers of God’s amazing creations – plants! She wants to bring glory to God and bless others with her knowledge of plants to increase their faith, improve their quality of life, and help them heal naturally with plants and prayer. She loves reading the Word, doing research, coffee, writing, baking, and making memories with her family!


Original article and pictures take thehumbledhomemaker.com site

среда, 17 октября 2012 г.

Homemade Cough and Cold Syrup Recipe

Homemade Cough and Cold Syrup Recipe
Don't spend half the night awake coughing. Instead, whip up this cough syrup with everyday ingredients that are safe for most of the family!

I have already shared my nine Natural Homemade Cough and Cold Remedies, and promised to post my recipe for homemade cough and cold syrup. I’ve made this before, and it’s easy-peasy.


I can testify that it works well in soothing a throat that is irritated from coughing. Our whole family has used it throughout the winter months when those dry hacking coughs just won’t quit.


In addition to this cough syrup, I just have to tell you that I discovered the most amazing remedy for the croupy barking kind of cough – the kind that keeps you up all night (cue crazy eyes).


Isaac had a terrible barking cough this past winter and it was so bad that he couldn’t sleep because he couldn’t stop coughing for hours at a time (which meant no sleep for us, too. Ugh). In the middle of the night we bundled him up and took him outside in the cold air for a minute, and it stopped the cough in its tracks.


We paired that method with a spoonful of this cough syrup, and slept peacefully the rest of the night!


The Recipe:


1 large onion, diced

2/3 cup organic raw honey

1 teaspoon dried cloves (a natural pain reliever)

1 teaspoon ginger (helps loosen mucous and relieves pain and nausea)

the juice of half a lemon

a pinch of cayenne pepper* (helps loosen mucous, and raises body temp to kill off germs – can be omitted or reduced for kids)


Combine all ingredients in a small pot and heat on low. Let simmer for 20-30 minutes, covered on lowest possible heat, stirring occasionally. Strain the onion out, and store the syrup in a glass jar in the fridge.


It should last up to a month in the fridge, but be sure to use your common sense. If it looks or smells off, toss it! I would give as much as a spoonful every hour, maybe a little less for a kid. And, of course, this would not be recommended for a baby under one year, as it contains honey.


Disclaimer: I am not a doctor or medical professional, and this post should not be taken as medical advice. Please do your own research. Material on this blog is provided for informational purposes only. It is general information that may not apply to you as an individual, and is not a substitute for your own doctor’s medical care or advice.


Original article and pictures take redandhoney.com site

понедельник, 15 октября 2012 г.

Homemade Cough & Cold Syrup

Homemade Cough & Cold Syrup
Untitled

I tried my hand at making Homemade Cough & Cold Syrup last week.


Untitled

It was really easy to make (ignore the fact that I didn’t use raw honey or fresh lemons — I’m all about using what I have!)


Untitled

The end result was a little less syrup-y than I expected, but I warmed it up a bit and then it looked just perfect.


Overall, I was really happy with how the Homemade Cough & Cold Syrup turned out and am anxious to try using it the next time someone has a bad cough around here!


Subscribe for free email updates from Money Saving Mom® and get my Guide to Freezer Cooking for free!


Original article and pictures take moneysavingmom.com site

четверг, 11 октября 2012 г.

Homemade Corn Dogs and Corn Dog Muffins

Homemade Corn Dogs and Corn Dog Muffins

A few weeks ago, Josette asked if anyone had a healthier, homemade corn dog recipe. Yippee! A recipe challenge. I love me a recipe challenge.


And – all my healthy eating talk aside – I love me a good hot dog. Oh, how I wish I didn’t. The icky ones that are made from 14 different kinds of animal leftovers? I don’t love me that kind of hot dog. A big juicy beef hot dog? I could eat three. (Not that I do of course…)


I’ve found some hot dogs from Azure Standard made by Shelton that are pretty good. They are made with chicken, don’t have any preservatives, etc. If you have access to those, give them a try. We like them just fine.


And – hot dog on a stick with yummy cornbread fried all around it? Hello. I am my kids’ favorite mom on days I make these.


  • 1 cup whole wheat flour
  • ⅔ cup cornmeal
  • 2 T. honey
  • 1½ t. baking powder
  • ½ t. dry mustard
  • 2 T. oil
  • Oil for frying (I use Palm Shortening)
  • 10 lollipop sticks

  1. Whisk together all ingredients (okay, except for the hot dogs of course...and the oil for frying...and the lollipop sticks).
  2. Place one hot dog on each stick. (I find lollipop sticks in the cake decorating section at Walmart.)
  3. For frying the corn dogs...you can immerse them in hot oil if you have a Fry Daddy or something similar. I don't have one, plus I'd rather not use that much oil. Here's what I do:
  4. Heat a small amount of oil in your electric skillet.
  5. Holding onto the stick "roll" the hot dog around in the cornmeal batter to coat.
  6. Place the corn dog down onto the hot oil.
  7. Allow the corn dog to cook quite well on one side before attempting to turn it so that the batter won't pull off.
  8. Turn as necessary to cook on all sides.

corndogs2sm.JPG

corndogs1sm.JPG

corndogs3sm.JPG

My corndogs don’t turn out very lovely. They’re sort of triangular in shape. Ah, but they taste delicious!


corndogs5sm.JPG

NOW.


Wait until you hear THIS idea. When Jennifer heard that I was going to conduct a corn dog experiment…she gave me this idea!!! Thanks Jennifer!


These Corn Dog Muffins are a perfect way to avoid the mess of frying your corn dogs and finding lollipop sticks, etc. I LOVE this!


Easy Corndog Muffins

Corn Dog Muffins


This recipe for cornbread, doubled

8 hot dogs

24 muffin papers to line muffin pans.


Mix up the cornbread. Cut hot dogs into thirds. Scoop cornbread batter into the paper lined muffin cups. Place 1/3 hot dog into each muffin.


corndogmuffinssm.JPG

Bake at 400 ° until golden brown. Serve right away.


corndogmuffins2sm.JPG

Look! You can’t even tell there’s a hot dog in those muffins! You could surprise your kids with these! They’ll think they are only having a cornbread muffin for lunch. Then tada! There’s a hot dog inside!


The best thing about these Corn Dog Muffins is that they freeze well!!! Just thaw and reheat in the oven for a few minutes before serving!


How’s that for an easy lunch idea that you can make ahead of time?!


(Click on our Make Ahead Meals link for more fun ideas of kid friendly, healthy recipes that you can make ahead of time.)


Original article and pictures take heavenlyhomemakers.com site

вторник, 9 октября 2012 г.

Homemade Chocolate Syrup

Homemade Chocolate Syrup

Easy to make homemade chocolate syrup with 5 ingredients that rivals the commercial brands! The HomesteadingHippy #homesteadhippy #fromthefarm #recipes

Mmmmmm….over ice cream, drizzled on pancakes or waffles, mixed in milk for a special treat…who can resist chocolate syrup?


Of course, when you read the list of ingredients, it’s much easier to say “NO”. But why say no to chocolate? Make your own chocolate syrup to pour! It’s simple, easy, and only requires five ingredients! This homemade chocolate syrup will rivals the commercial brands in taste and texture as well. It’ll take less time to make it at home than it will to go to the store, buying it, and going back home. Really.


Homemade Chocolate Syrup


  • 2 cups sugar
  • 1 cup cocoa powder
  • 1 cup cold water
  • 1 tsp. vanilla
  • 1/2 tsp. salt

Start by mixing up the sugar and cocoa powder, to remove any lumps.


Add the cold water and stir. Heat over medium high heat and boil until thick, stirring constantly to avoid boil-overs. Remove from heat and stir in salt and vanilla. When cool, store in covered container. I use approximately 1 Tablespoon for an 8 ounce glass of milk, or 2 teaspoons added to coffee for a “coffee mocha” treat.


Have you made your own chocolate syrup? What do you use it on the most? Be sure to pin this for later.


stocks and broth newsletter

Original article and pictures take thehomesteadinghippy.com site

четверг, 4 октября 2012 г.

Homemade Chicken Nuggets

Homemade Chicken Nuggets
My kids love this homemade chicken nuggets recipe. They're far better than McDonalds, ready in 30 minutes and can be frozen for a quick dinner later! :: DontWastetheCrumbs.com

Over time, I’m slowly re-making some of my family’s favorite “junk food” meals into healthy homemade versions.


So far I’ve done homemade hot pockets, homemade instant oatmeal, homemade spaghetti o’s, homemade lunch meat, homemade peanut butter cups and homemade donuts… just to name a few.


A few weeks ago, I took the one item my kids ALWAYS want to order when we go out to eat and transformed it. Bring on the homemade chicken nuggets!


You might think that homemade chicken nuggets are hard, but here’s the thing: they’re not. They’re nothing more than chicken strips cut up into smaller pieces.


And chicken strips are nothing more than chicken breasts cut into strips.


And chicken breasts come in a package, ready to go (unless you butcher your own chicken first, which you totally can do and I actually recommend doing if you’re really working hard to get your budget down).


These healthy homemade chicken nuggets are PERFECT for mom's trying to feed their kids healthy alternatives to fast food. They taste amazing and are all real food ingredients. And even fried in healthy fat!

Easy Homemade Chicken Nuggets Recipe


The hardest part about making homemade chicken nuggets is two-fold:


First, the cooking technique.


Fast food chicken nuggets are fried. If you’re trying to do more homemade and less drive-thru WITHOUT your kids or spouse noticing, then you can’t just bread chicken and stick it in the oven and call it nuggets.


Oh no.


You’re going to have to fry them, but you can totally do that with coconut oil or avocado oil and you’re not only making a healthier dinner than the drive-thru, but you’re cooking with healthy fats.


Finally – you can fry your dinner without guilt!


Second, the seasoning.


Salt and pepper are your BFF’s for seasoning, but homemade chicken nuggets require a little more oomph if you’re going to pass the test.


Actually, a lot more oomph.


Don’t be scared of the amount of seasoning in the recipe. Your chicken nuggets won’t be overly salty, garlick-y, onion-y or paprika-y. They’re going to be AWESOME, and your kids will beg you to make more.


Which brings me to my next point…


Turning from fast food meals to home cooked meals, doesn't mean you have to give up on your favorites. Homemade chicken nuggets are kid approved and mom endorsed.

Freezer-friendly Homemade Chicken Nuggets


These homemade chicken nuggets are freezer-friendly!


This is a VERY good thing, because I used two chicken breasts and my family ate ALL OF THEM.


Not a single nugget was left and all of us were wishing there were more!


I mean sure, there was still some potato wedges on the table and I could have made a side salad to0…


Or I could have made easy potato skins and stove-top macaroni and cheese and call it an appetizer-style dinner, but c’mon – it’s CHICKEN NUGGETS FOR DINNER!


How often can you tell your family you’re having chicken nuggets for dinner and say it without an ounce of guilt?


Not often, so I let these nuggets be the star of the show for once and this meal was one for the record books. I just made these last week and the kids (and husband) are already asking for more!


Which brings me to my point – they’re freezer friendly!


Freezer friendly meals are a lifesaver when you’re a busy family. It’s one of the core concepts I share in my free course: 5 Days to Getting Dinner on the Table, FAST.


Have you ever had a craving for chicken nuggets but didn't want to go through the drive-thru? Try this homemade version instead! Healthy and guilt free nuggets the whole family will love.

How to Freeze Homemade Chicken Nuggets


First, make as many chicken nuggets as you want (I recommend doubling or tripling the recipe because you’re going to get requests for these often!).


Once you’ve made dinner, set aside all the extra nuggets you made and freeze them on cooling rack (I have these) on a cookie sheet for 30-60 minutes. (If you don’t care if your chicken nuggets stick to each other, and when you try to pull out a handful you end up pulling off the breading from a bunch of them, then you can skip this step. But because my family and I like having the breading actually on the chicken nugget, I do this.)


Move the frozen homemade chicken nuggets from the cooling rack and to a freezer-safe container. At this step, I recommend portioning out enough to cover one meal. That way you’re not thawing more than you need later on.


To reheat, preheat the oven to 375 and bake for 10-15 minutes!


  • ½ - 1 cup flour (I used all-purpose, but you can use whole wheat)
  • 1 – 2 tsp each: salt, paprika, garlic powder, onion powder
  • 2 – 4 Tbsp healthy cooking oil (coconut oil or avocado oil recommended)

  1. Unroll a 12” section of plastic wrap and place it on the cutting board. Place one chicken breast on one end of the plastic wrap and fold the other end over. Using a meat mallet (I have this one) or very heavy spoon or rolling pin, beat the chicken until the entire piece is even in thickness all over. I aim for ½” to ¾” thick. Repeat with the remaining chicken.
  2. Cut the chicken into equal sizes, about 1 ½” in size.
  3. Preheat a cast iron skillet, or another heavy bottomed skillet to medium heat and add 2 Tbsp healthy cooking oil.
  4. In a shallow dish, crack 1 egg and add 1 tsp water, ½ tsp salt and ½ tsp pepper. Use a whisk to mix well.
  5. In another shallow dish, measure 1 cup of breadcrumbs, ½ cup flour and 1 tsp each salt, paprika, garlic powder and onion powder. Mix well.
  6. Working in batches, move the cut chicken pieces into the egg mixture and coat thoroughly.
  7. Then move the chicken to the breadcrumb mixture and coat thoroughly.
  8. Add to the skillet in a single layer and cook until the sides begin to turn golden brown, about 3-5 minutes.
  9. Using tongs, flip each nugget over and cook until finished and both sides are dark golden brown, about 2-4 minutes.
  10. Remove the nuggets to a plate lined with a paper towel or napkin to allow excess oil to drain.
  11. Repeat with the remaining chicken, using additional egg, water, breadcrumbs, flour, spices and cooking oil as necessary. (If you need just a little bit more of the breadcrumbs mixture, use ½ cup breadcrumbs, ¼ cup flour, ½ tsp of each salt, paprika, garlic powder and onion powder.)
  12. Serve warm, or freeze for later.

What’s your favorite junk food that you’d love to see made over into real food?


Original article and pictures take dontwastethecrumbs.com site

вторник, 2 октября 2012 г.

Homemade Baby Yogurt Melts

Homemade Baby Yogurt Melts

Are you visiting after watching TLC’s “Extreme Couponing”? Please read this post first: Realistic Couponing. Be sure to sign up for FREE Email Updates so you never a miss a deal, freebie, or coupon!


HOMEMADE yogurt melts for baby! So much cheaper and healthier than graduates yogurt melts.

Check out this awesome frugal tip that Melissa sent in for how to make your own homemade baby yogurt melts!


“My son LOVES Gerber’s yogurt melts, but they are pretty expensive (around $3 for a small 1-oz bag) and when I read the ingredients, I was shocked to see the second ingredient is sugar. I decided to try making them myself.

All you do is cut up your baby’s favorite fruit – fresh is best, but frozen works too. Puree it in a blender or food processor. Then add about twice as much plain yogurt (whole milk or Greek yogurt works best) and blend them together. Line a cookie sheet with parchment paper. Then make little blobs of yogurt using a small decorating tip or a ziplock bag with the corner cut. Freeze until solid, then peel off the blobs and toss them in a freezer-safe plastic container or baggie.

I don’t have a freeze-dry machine, so I couldn’t replicate the shelf-stability of the Gerber product. But I’m a stay-at-home mom and most of the time, it’s not an issue – I pull a few from the container in the freezer and plop them on his tray. My son eats them so fast, they never have a chance to melt. This is hands down his favorite snack!”


What a fantastic tip! And it’s perfect with summer right around the corner.


Thanks, Melissa!


HOMEMADE yogurt melts for baby! So much cheaper and healthier than graduates yogurt melts.

Do you have a Frugal Tip you’d like to share? Please send me an email!


9 Comments


Original article and pictures take www.couponing101.com site

понедельник, 1 октября 2012 г.

Homemade baby food pouches {how-to and 5 recipes}

Homemade baby food pouches {how-to and 5 recipes}

Portable, squeezable and with lots of flavor options, homemade baby food pouches are easy to make and a great way to serve healthy fruits, vegetables and whole grains to your little ones!


How to make homemade squeeze pouches and 5 easy recipes! | FamilyFoodontheTable.com

I made ALL of the baby food for both of my little ones. Which was no small feat because they were very hearty eaters. A good thing, but whew, kept me busy in the kitchen!


I always made big batches of purees, to knock out a bunch at a time, and inevitably, I’d be left with extras when they were moving onto finger foods and self-feeding.


So I started turning those purees into homemade baby food pouches.


How to make homemade squeeze pouches and 5 easy recipes - great for babies, toddlers and preschool kids! | FamilyFoodontheTable.com

(I also have tons of other ideas of ways to use leftover baby food – I didn’t want to waste a bit!)


You can of course buy squeeze pouches in the store. They have lots of different kinds of applesauce mixes, yogurt squeezies, and fruit and veggie combinations. But you can make your own so quickly, easily and for much less money. Plus, you can customize them to your little one’s liking and feel good that you’re controlling the ingredients.


My kids are older now – M is 5 next week (yikes!) and J is coming up on 3 – but they still love these squeezies. M says she has lots of friends who bring them for lunch, so she’s always asking for me to send them to school.


And I’m happy to. I love that it’s an easy way to ensure they are eating their veggies. They will take down one of these pouches in a matter of minutes but they don’t always dig into a big bowl of peas or a plate full of broccoli. #yet #Iwontgiveup


How to make homemade baby food pouches and 5 easy recipes!

So today I’m giving you the run-down on what I use, how it works and five easy homemade squeezie combinations to get you started.


What I use: The equipment


I have the Infantino Squeeze Station and it’s been great. It’s the only specific baby food equipment I’ve bought and was definitely worth it.


You’ll also need to buy refill pouches (they come in batches of 50 and you will go through them!)


How to make homemade baby food pouches

They have other accessories, but I’ve stuck to these basics so far.


You’ll also need an immersion/hand blender or regular blender to make the purees to put into the squeeze pouches.


You set up the squeeze station by inserting three pouches into the bottom (they fit through some grooves and sort of snap in.) Then you put the empty containers on top and screw them onto the bags.


Note: Be sure to write the contents and date on your bags before you start to fill them. Much easier than after they’re done.


How to make homemade baby food pouches

How to make homemade baby food pouches

Next, you spoon your puree mix into each container, filling it almost to the top. You use the press tool and push the puree down into the pouch. It’s a weirdly gratifying feeling.


If the mixture gets stuck or won’t push, you probably have a small chunk in your puree that got caught in the hole. Just unscrew your tube, dump the contents back into your blender and reblend (or pick out the offending piece if you see it).


After the bags are filled, unscrew the tubes and carefully pull the bags out. Twist on the orange top and voila! You can keep them in the fridge for a couple of days or pop them straight into the freezer to have on hand later.


It’s really easy and actually, really fun!


How to make homemade baby food pouches and 5 easy recipes!

A few notes about these combinations:


  • Add 1 tablespoon lemon juice to all of these to help preserve them. The only exception is the pineapple-broccoli mixture. The citrus from the pineapple is enough on its own.
  • You can keep the peels on the pears and apples, just be sure to puree them very well so pieces don’t get stuck and prevent the mixture from going into the squeezie bags.
  • The vegetables and grains need to be cooked and soft, so plan ahead. Or use leftovers. These can be a great way to use up scraps and reduce food waste.
  • If any of your mixtures seem too thick (because the water content of fruits and veggies can vary), just add a bit of applesauce or a splash of water to the blender until its thin enough.
  • Each pouch holds about 4 ounces. Most of these batches for me make about 3 squeezies worth. You can of course always double up if you want to knock out a bunch. They freeze great, so you might as well!

Check out the recipes below and get to making some baby food pouches! Hope your little one enjoys!


(And let me know if you want to see another round-up like this – we have lots of other flavor combinations we’ve made over the years that I can share!)


XO,


Kathryn


Nutrition Facts
Serving Size
Amount Per Serving As Served
Calories 366kcal Calories from fat 20
% Daily Value
Total Fat 2g
Saturated Fat 0g
Cholesterol 0
Sodium 43mg
Carbohydrate 86g
Dietary Fiber 13g
Sugars 42g
Protein 8g

Calories 2000
Total Fat Less than 65g
Sat Fat Less than 25g
Cholesterol Less than 300mg
Sodium Less than 2,400mg
Total Carbohydrate 300g
Dietary Fiber 25g

Disclaimer: This post contains affiliate links. If you purchase a product through an affiliate link, your cost will be the same but I receive a small commission. Your support is greatly appreciated!


How to make homemade squeeze pouches and 5 easy recipes - great for babies, toddlers and preschool kids! | FamilyFoodontheTable.com

Original article and pictures take www.familyfoodonthetable.com site