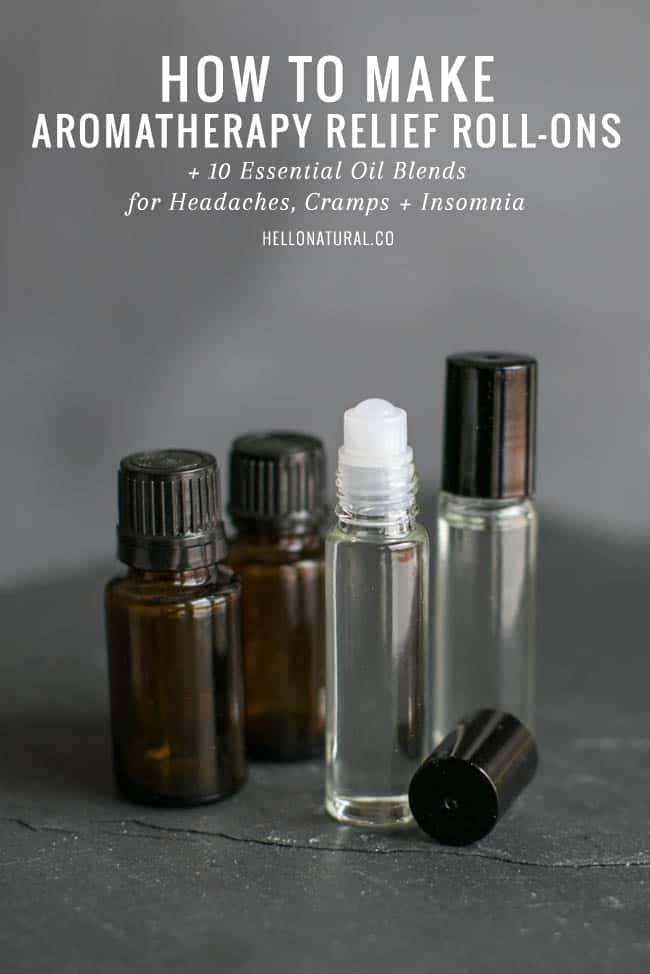
How to Make Aromatherapy Relief Roll-ons for Headaches, Cramps + Insomnia
I love my ever-growing stash of essential oils. Make-up used to be my impulse purchase; now it’s a new essential oil. So one of my goals is to figure out how to use the darn things, whether it’s in green cleaning or staying healthy. Few essential oils can be applied ‘neat’ or straight onto the skin. Most need to be diluted in a carrier oil, and making an aromatherapy roll-on is hands down the easiest and most effective way to apply essential oils for my family (did I mention I have 3 squirmy kids?).
How to make Aromatherapy Roll-ons
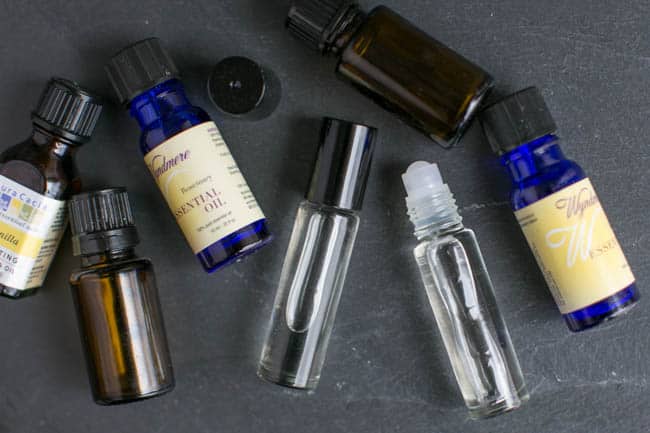
The hardest part of this process is getting your ingredients together. Here’s what you’ll need:
Remove the roller ball from the top of the bottle. Add the appropriate number of drops of each essential oil. Fill the rest of the bottle with carrier oil. Reattach roller ball at the top. Shake well. Store in cool, dark place.
To use, roll the bottle between your hands before each use to ensure the essential oils are properly mixed. Then apply to pressure points on the body, such as the temples, behind the ears, bottoms of the feet, insides of the wrist. Or really anywhere that feels good to you!
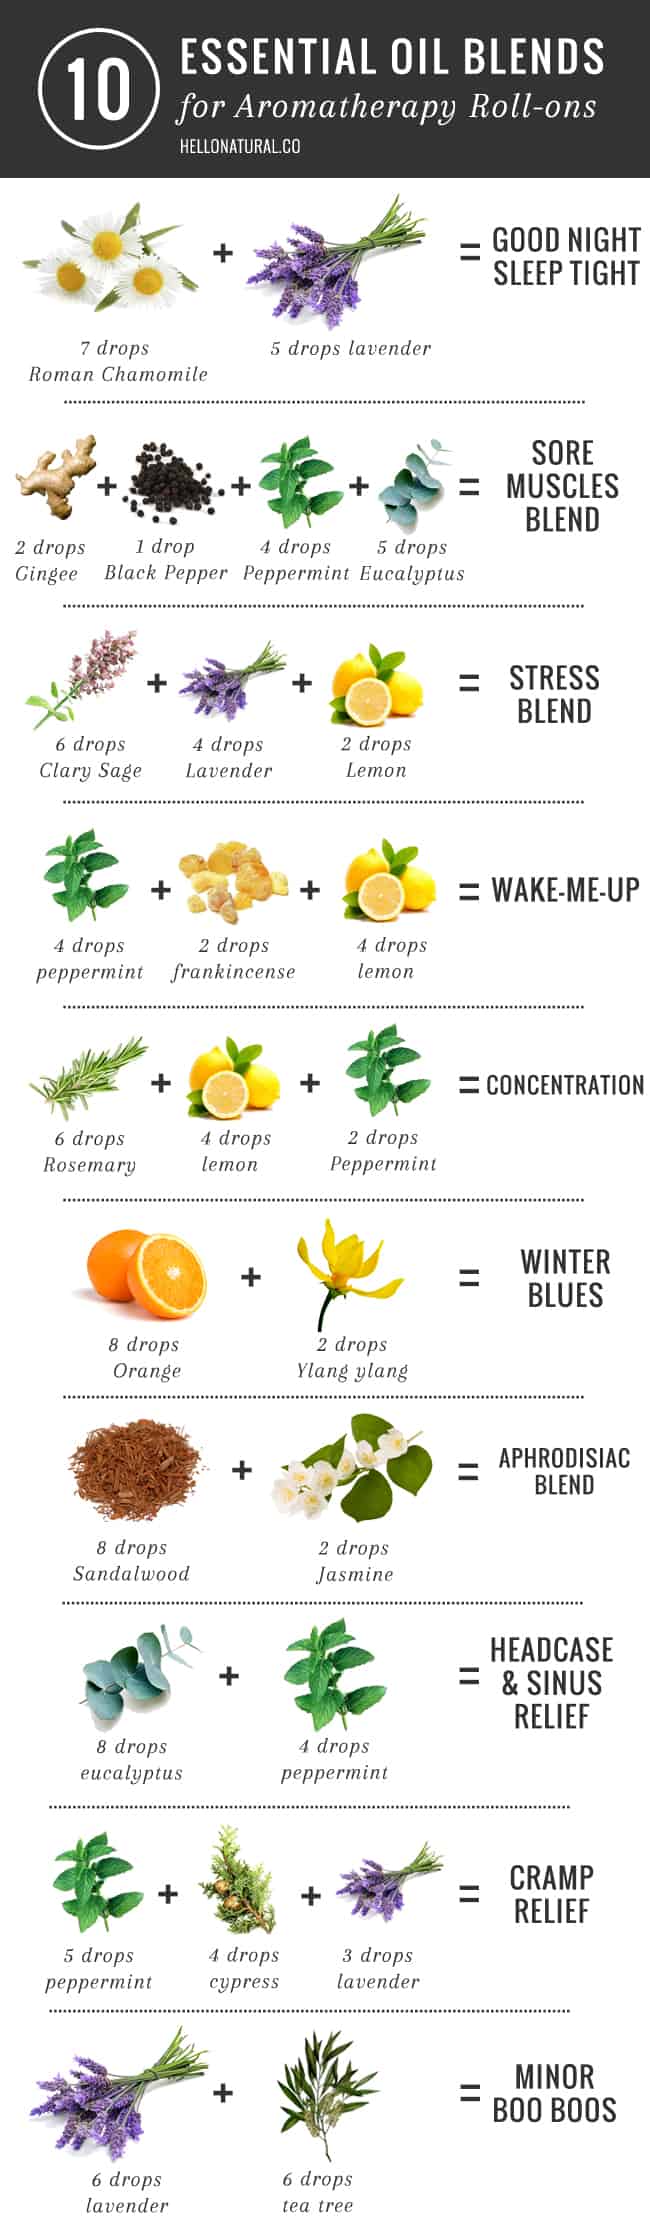
Essential oil blends for Aromatherapy Roll-ons
Original article and pictures take helloglow.co site
I talk about herbs a lot on this site and one of the questions I always get is:
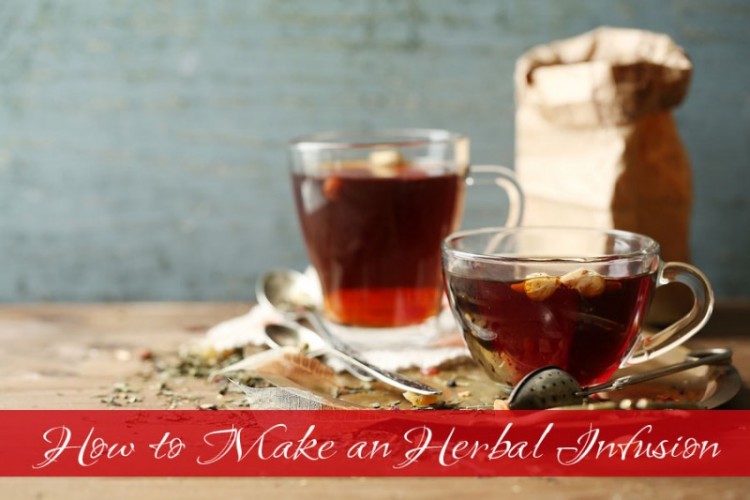
“How do I make an herbal infusion?”
Well, if you can make a cup of tea, you're already making an herbal infusion! It's so easy to do and can provide amazing medicinal benefits when using herbs that support the body's function. I personally drink two quarts of herbal infusions every day to support my own healing journey.
You can hardly turn in any health food store without seeing them on a shelf. The hardest part is knowing how to use them safely. Sure, you are going to get a lot of information on the internet and from reps that sell the oils, but is it TRUTH? My biggest concern with some of the information is that you should put the oils directly on your skin for good benefits. I have some issues with that blanket statement. First, anything you put on your skin gets absorbed in as little as 26 seconds and next, conventional wisdom will tell you that you shouldn’t put ANY oil on your skin “neat”, as in with no dilution or carrier oil. Since I like to error on the side of over-caution, I needed a different way to have the oils and their aromatic benefits without worry of over doing it topically. Not everyone responds to the same oils in the same way, so I needed to make a necklace.
First, get yourself some terra cotta clay.
You can find it online pretty cheap here. This stuff is amazing in that it’s air dry, so you don’t have to worry about baking it! Take about 1/2 fistful of the clay out and place it on some parchment or waxed paper. Roll it out until it’s about 1/2″ thick.
Carefully, using any size or shape object you’d like, cut out some shapes.
I used an old cough syrup measuring cap since I re-purposed the bottle and didn’t want to just toss the cap out. Remove the clay around the shape without disturbing the clay if possible. It’s pretty pliable, so you will have to work slowly with that in order to avoid misshaping the clay. Of course, you could always go for the “rustic” look and make it as misshapen as you’d like.
Using a small object, create a hole in the shape.
I used the end of one of my tools in this kit. It was pretty easy to push through and get the hole in place. You’ll want to make sure to not get it too close to the edge of the necklace shape, or you risk the clay breaking easily. Allow to dry overnight. The next day, carefully clean any rough edges with a clay tool or light sandpaper.
String some cord into the hole.
I am liking the “natural” look of jute twine right now, but you could use any chain, rope, or necklace you already have for this. Tie a necklace clasp at one end, and place a drop of craft glue to keep the knot from coming undone. Personalize it! Add in charms you like as well to make this uniquely your necklace. Once you are finished, tie the other end of the clasp to the other end of the twine and place a drop of glue.
To use, simply add 2-3 drops of your favorite essential oils directly to the terracotta clay.
Then, you can lift and “sniff” as needed, or allow the aromas to drift naturally to your nose. My favorites to add to this are peppermint and orange when I need a boost of energy, lavender when I need to relax, or patchouli when I am wanting a “natural perfume” scent. One word of caution: these can be smelled by others, so be careful with what oils you choose around small children. Not all oils are safe for use for children, even in aromatherapy.
You want to keep your necklace dry.
Don’t get it wet, and just refreshen the oils as needed. I have only had to add 2-3 drops of oil on this for an entire day of use.
Be sure to pin this to your favorite board for later
Original article and pictures take thehomesteadinghippy.com site
Elderberries have been used for many, many years for natural health.
Elderberry wine was traditionally used for influenza and the ill effects of the chills, and the juice of the black elderberry has historically been an invaluable remedy. The elder has often been called the ‘medicine chest” of the country people. [source]
I always have some dried elderberries on hand to make syrups, but I have recently discovered tinctures as well. It’s been my first source of cold and flu prevention in our family for a long time along a good diet, plenty of rest and good hand washing to help as well. I like the tinctures myself, because they are quickly absorbed and since it’s in alcohol, shelf life is nearly indefinite.
Here’s how I make Elderberry Tincture
You will need dried elderberries and alcohol. Best part of making your own medicines? Having lots of different boozes on hand Anyway, I used vodka for mine, but you can use rum, or brandy as well. You want the higher proof alcohol, the 80% kind to get the best extract for this.
In a pint jar, place 1 cup of the dried elderberries and cover with the alcohol. Cap tightly and shake it up. Every day or so for the next 6 weeks, when you think about it, give it another good shake. After 6 weeks, strain the elderberries off and discard to the compost pile. Place your tincture in a glass bottle with a dropper and store in a dark, cool place.
To use
for my hubby, myself and our older teens, I place 3-4 drops directly under the tongue 3 times a day when we are feeling under the weather. During the winter, when the days are shorter and sunlight is at a minimum, I use 3 drops for each of us once a day. For my younger kids, ages 7-10, I use 2 drops under the tongue when feeling under the weather 3 times a day and one drop daily as maintenance.
What are some of your favorite natural cold symptom relievers? Will you make an elderberry tincture this season? Be sure to pin this for later
Original article and pictures take thehomesteadinghippy.com site
How to make all natural lotion – this easy recipe is inexpensive and works very well!
This past year, I’ve become more interested in making my own bath and body products. When I was pregnant for the first time, I started doing a lot of reading about all of the nasty chemicals in a lot of store bought products, and I started reading the labels, and avoiding parabens, phthalates, artificial fragrances, etc.
I have my favorite natural products that I use, but I think it’s fun to make my own products as well. I have had very good luck with my homemade deodorant – it really is the only natural deodorant that works for me! Believe me, I’ve tried them all…they work for a while, and then stop working. Usually at a very inconvenient time. :( This Christmas, I also made homemade lip balm, and that was a big hit! And such an easy and cute present to make and give.
A couple of weeks ago I ran out of lotion, so I decided I would try to make my own. To be honest, the basic ingredients for deodorant, lip balm and lotion are basically the same, so it’s easy to experiment once you make the initial investment in oils, butters, and beeswax. I adapted a recipe from Wellness Mama, and I bought a really tiny jelly jar from Michael’s- I would say it’s about a 2.5 ounce jar. This recipe was the perfect amount to fill that jar.
(The ingredient list does include some Amazon affiliate links).
1. If your beeswax is in chunks or bars, you will need to grate it. I bought a cheap grater from the Dollar Tree to use just for beeswax. Grate it before measuring. If you buy beeswax pellets, you will skip this step.
2. Place the beeswax, almond oil, coconut oil, and shea butter in a glass mason jar (this is just a container for mixing, not a container for storing. It should be a larger jar). Place the glass jar inside of a pan that has a couple of inches of water in it, and turn heat on medium.
3. As the water starts to simmer, the ingredients will melt. Stir occasionally to help them melt. It will take about 7-8 minutes for everything to melt fully.
4. Once everything is melted, remove the pan from the heat and add the Vitamin E Oil by poking a hole into the capsule and squeezing out the oil, and the essential oils of your choice. (Be sure to research your essential oils, not all of them are safe for your skin. Lavender, sweet orange, tangerine, and peppermint are okay for body products. This is a great guide to essential oil use and safety.
5. Carefully pour your lotion into the container that you want to store it in. Be careful, wear oven mitts! The oils are really hot.
6. Let lotion cool completely before using.
This lotion absorbs well into the skin, and is really moisturizing. The texture is a little bit more oily than the kind of lotion you might buy at the store. I really like how it makes my skin feel, and I love the lavender and sweet orange scent.
One of our friends who makes body products suggests using something other than your finger to remove the lotion from the jar, since it does not contain preservatives, and your fingers can introduce bacteria into the jar. However, this makes such a small amount, it really depends on how quickly you think you will use this lotion. A small wooden stick or spoon is a great way to keep your lotion pure.
If you want to read more about essential oils, I wrote about them HERE.
Does sneezing, wheezing, and watery eyes sound familiar?
It’s allergy season, for many that may mean intense suffering for the next several months. For others, it could be a mild irritation.
Often, seasonal allergies are connected to an unhealthy gut. While many (if not most) people who suffer from seasonal allergies could benefit from a gut healing protocol such as GAPS. Not everyone has the time for it, or might not feel quite up to the challenge quite yet.
Thankfully, there are God-given plants in nature that work together to help our bodies fight off allergic responses.
My favorite way to ease allergy symptoms is to use a seasonal allergy tincture with three of my go-to herbs: nettle, dandelion root, and dried rose hips.
All three of these herbs contain bioflavonoids, namely quercetin, (as well as numerous other vitamins and nutrients) that work as natural antihistamines.
When our bodies come in contact with allergens, they produce histamine as a response. Bioflavonoids work to block the release of histamine.
This seasonal allergy tincture uses apple cider vinegar instead of the typical vodka. Raw apple cider vinegar, with the “mother” helps balance your GI track, resulting in your body’s natural defense to battle seasonal allergies. If you prefer to use vodka instead, the tincture will still be effective but will but not as powerful.
If you feel like you need step by step tutorial on how to make an herbal tincture, you can find one here. Or, if you prefer, you can make this in an herbal glycerite instead. Do you need something now to offer relief while you wait for the tincture to be ready? Try our rooibos allergy tea!
Seasonal Allergy Tincture
Mix the herbs together filling a glass jar 3/4 of the way full. Cover with vodka or apple cider vinegar, screw on the lid, and give it a good shake.
Store in a dark place, such as a cabinet for at least four weeks. Shake everyday.
Strain through a cheese cloth or old t-shirt, squeezing out as much liquid as possible. Store in a glass jar. The tincture will retain its potency for at least two years. Store in a dark location.
For ease of use, use keep a small amount in an amber glass dropper bottle.
Have you used a seasonal allergy tincture?
Original article and pictures take modernalternativehealth.com site
How to Make a Roll On Essential Oil Blend for Stress Relief.
This roll on essential oil blend is perfect for keeping in your purse. Just apply whenever you need a little stress relief!
I thought I’d share this easy tutorial to make your own roll on essential oil blend for stress relief. We could all use a little help with stress I think, right?
Sometimes I get in a DIY/healthy/essential oil mood and make my own bath and beauty products. For example: deodorant, lotion, and perfume. When I get in these moods and spread out my essential oils, droppers, carrier oils, and bottles, Darryl likes to refer to me as a “mad scientist.” :)
I love playing around with essential oils and seeing what combinations I like and how they affect my mood. I made a stress relief roll-on last week and I’ve been using it everyday and love it, so I thought I’d share the recipe.
This was so easy to make, and I’ve been enjoying the benefits of these oils so much! If you are new to essential oils, don’t be intimidated, give this roll on essential oil blend a try! It’s very simple to make, and I think you’ll love it.
Add the essential oils. Shake or roll gently to combine.
To use, simply roll on wrists or neck.
I don’t have any special allegiance to any particular brand of essential oils, I usually get the Aura Cacia brand at Whole Foods, or I order from Plant Therapy. You do want to make sure that the bergamot essential oil says “Bergaptene-Free” on it, because bergamot oil is a very phototoxic oil, which means that it can burn your skin if you are wearing it and expose that skin to sunlight. The Bergaptene-Free version has most of the components that cause sunburn removed.
To use this, simply roll on to your wrists, sides of your neck, or even your collarbone. Enjoy the lovely fragrance and feel the stress reducing effects of these oils.
The essential oil diffuser locket pictured above is available in my shop.
Have you made any of your own beauty products before?
How To Make a Red Clover Skin Salve with Calendula and Comfrey
This post may contain affiliate links, which won't cost you extra to purchase but helps support this site. Thank you for your support!
Red clover is amazing!
Besides being a nitrogen fixer in the garden, an edible flower to enjoy, first food for bees, red clover or Trifolium pratense can also help cells regenerage and has anti-imflammatory properties that make it wonderful to have as a salve on hand for minor skin complaints like eczema, psoriasis, and acne. This would also be great for soothing sunburn skin, rashes like poison ivy and even boils. Great to have on hand for the Spring and Summer time for those trips to the park, foraging or when camping!
contributor Amanda Erickson shared a great skin care salve recipe that I am going to share with you, with permission. The original recipe called for equal “parts” of the added herbs, and a different infusion technique than I use, so I will show you both. What you will need for this is calendula flowers, red clover flowers, comfrey leaves, beeswax, and olive oil. According to Erickson, a single herb by itself usually isn’t going to correct the bodily issue, so that’s why you often find blends. Easy enough to understand, right? Calendula and comfrey are both great for the skin with similar properties as red clover and this makes a wonderful herbal combination.
Here’s the recipe you can use to make this salve
All the herbs used are dried herbs, which is very important, because water in the fresh flowers could lead to mold in your salve.
1 part calendula flowers (about 1/4 cup)
1 part red clover flowers (about 1/4 cup)
1 part comfrey leaves (about 1/4 cup)
2/3 cup olive oil
1 Tablespoon beeswax
Amanda’s method of infusing is to add the herbs to a jar, cover with olive oil and set in a warm location for 4-8 weeks, shaking daily. Then, she goes on to have you strain the oil, place in a double boiler and heat over low heat. Add the beeswax and melt. Her method of not giving exact measurements allows you to make the salve as thick or thin as you like, offering a great flexibility. You can add wax if it’s too runny, or oil if it’s to thick. Great option!
I like exact measurements, myself because I am a type A+ personality.
I also use a “quicker” method of infusing the oils that I have learned in my courses at Vintage Remedies. So, here’s what I did that was just a bit different (and still got the same wonderful salve!) Place the herbs in glass jar and cover with the 2/3 cup olive oil. Sit the jar in a 250° oven for 2 hours to allow the herbs to infuse the oil. Your kitchen will smell wonderful by the way.
Allow to cool, then strain the herbs into another glass jar, using an old cloth or cheesecloth.
Squeeze gently to extract all the infused oil from herbs. The herbs can then be tossed in your compost, or you don’t feel comfortable with oil in your compost, toss in the garbage. Add the tablespoon of beeswax and place back in the warm oven. Allow the wax to melt in completely and stir. Once stirred, allow to cool completely. Label with all the ingredients used, date made and when you would expect this to “expire”. I used the expiration date on the olive oil as my guideline.
Do you use red clover? Will you try this salve?
Original article and pictures take thehomesteadinghippy.com site
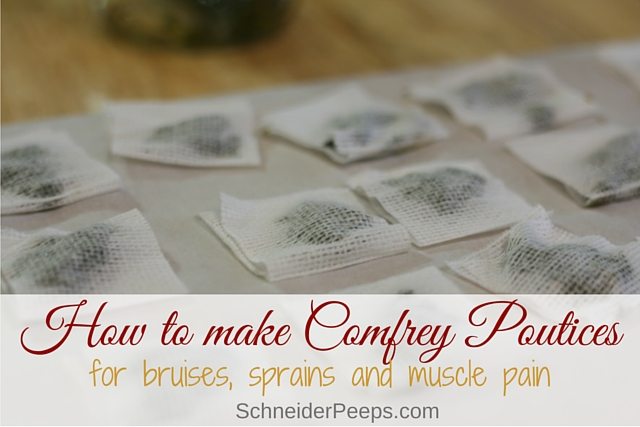
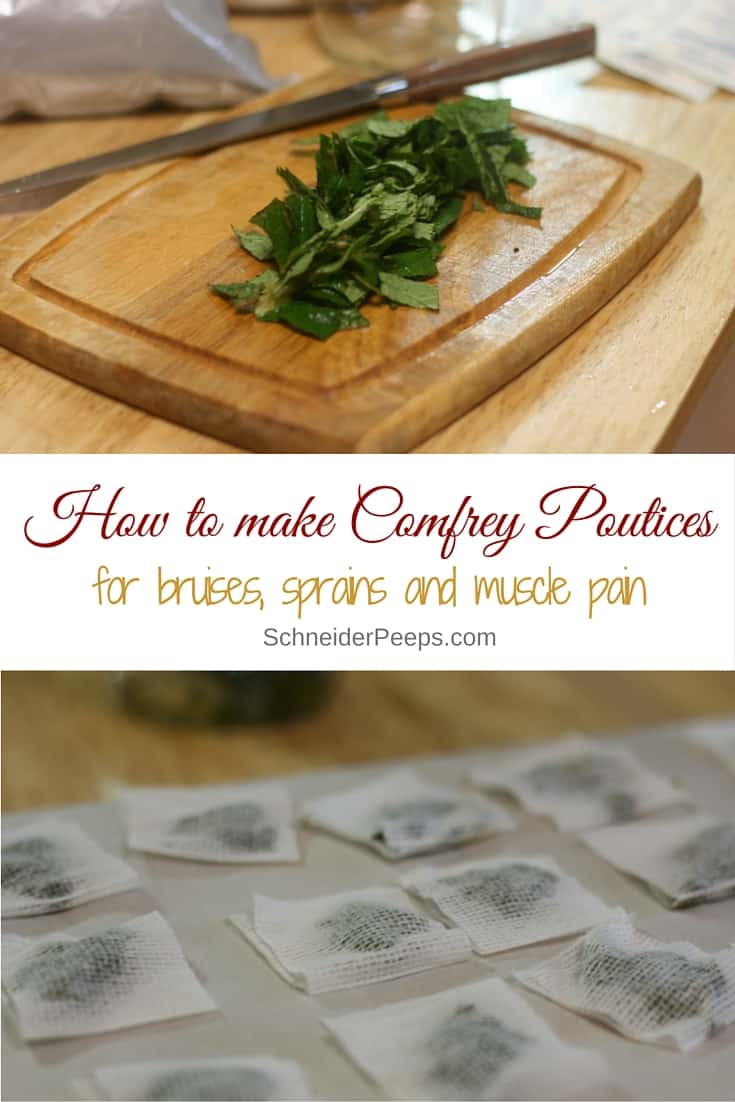
Last week Phoebe bruised one of her big toenails at dance. She has no idea how it happened, it looks like someone dropped something heavy on it, it’s all purple and blue. And it hurts. You know, the kind of hurt that when someone bumps it you start doing that silent cry that just won’t stop. Yep, that kind of hurt.
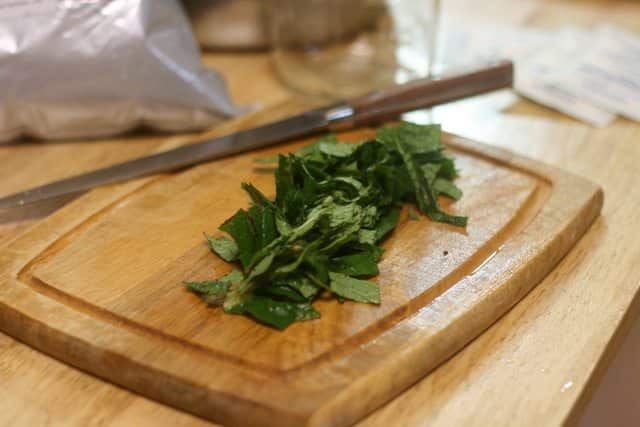
I headed out to the garden and picked four comfrey leaves and then got to work. I knew that Phoebe would need to keep up the comfrey treatment for a few days but I didn’t want to make it each time she needed it. I decided I would make some small poultices and freeze them.
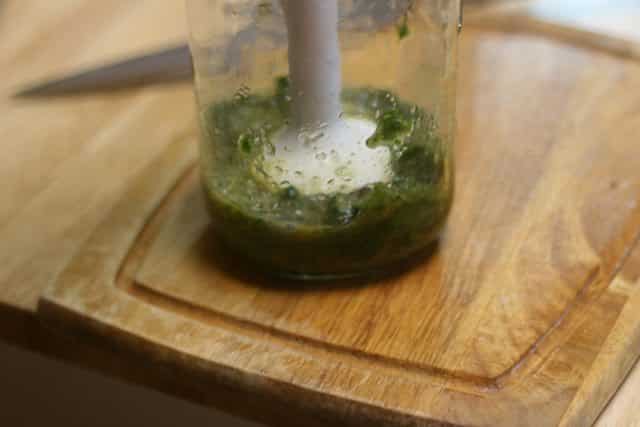
I chopped the leaves, put them in a wide mouth mason jar and added enough water to just barely cover them. I also added about a tsp of psyllium husks to thicken it up so that it doesn’t just slide all over the place.
I used an immersion blender to blend it all up and make a paste.
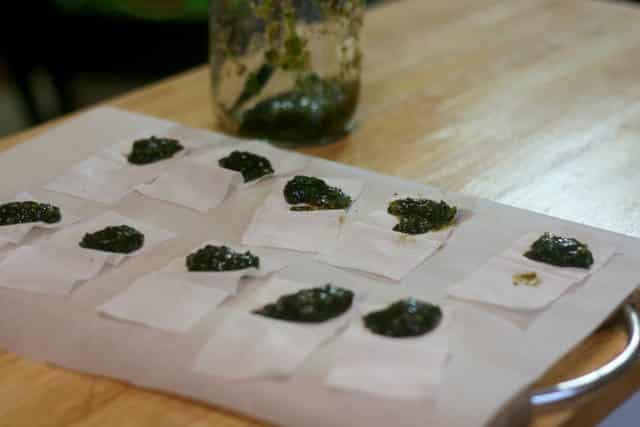
Then I opened up some gauze pads and put a small spoonful of the comfrey poultice on each one. Once they were all full I closed them up and put them in the freezer for an hour or so. When they were frozen, I put them in a ziplock bag and put them back in the freezer. When one is needed, we can just pull it out and let the body heat thaw it out.
Comfrey Safety Precautions
Comfrey has been used for hundreds of years both internally and externally. However, it’s been found that comfrey can cause liver damage when used internally, so don’t take comfrey internally. That also means, don’t use comfrey on an open wound as it can more easily seep into your blood stream.
Don’t use comfrey on small children. Their bodies have a much harder time processing toxins than larger bodies.
It’s best to only use comfrey for 4-6 weeks in one calendar year.
It’s also best to also take some liver supporting herbs while using comfrey, like drinking moringa tea or adding moringa to smoothies. Other liver supporting herbs include valarian, dandelion, burdock root, lemon balm, milk thistle, turmeric, and yellow dock.
Of course, I think the best place to get your comfrey is to grow it yourself. It’s a super fast growing plant but if you just can’t wait you can order it.
If you’re interested in studying herbs in depth, I highly recommend the courses from The Herbal Academy.
Tell me, do you use herbal poultices? If so, what do you use and for what?
Original article and pictures take www.schneiderpeeps.com site
Losing weight doesn’t have to be hard. We’ve put together easy tips and tricks that will help you trim up quickly and easily …
It’s a great post filled with information and insights so be sure to read all the way to the end. We’ve included lots of great Infographics for you to Pin too.
There are so many fad diets and exercises out there that by the time we’re two days into trying them, we’re burnt out.
All of the motivation we felt after our New Years resolution to lose weight has dissipated and those chocolate doughnuts are starting to look really good right about now.
But there are ways you can lose weight without stretching yourself to the limit. There’s no need to eat boring meals and exhaust your body from gym classes. You can find ways to take things at your pace, oh and did I mention?
You can eat real food that tastes really good. We put together some helpful tips on ways to lose weight through simple methods as well as a seven day meal plan that gives you “cheat days.” That’s right, your cravings aren’t completely cut out.
You can still indulge while watching your waistline shrink. Sometimes when we’re trying to lose weight, we’ll wish that there was someone with us helping us to meal plan. Someone that could show us dishes that tasted good and helped us lose weight (without having to pay them money).
But Woman’s Day has done just this! They’ve created a seven day meal plan that gives a great variety of dishes for breakfast, lunch, and dinner. They also include snacks and sweets so you aren’t going without.
We picked and chose some of their recipes that we thought you’d like, and added a few bonus recipes from us too!
6. Couscous with chickpeas: ⅓ cup* whole-wheat couscous, cooked + ¾ cup chickpeas + ½ cup diced tomato + ½ cup diced cucumber + 1 Tbsp chopped fresh basil + 2 Tbsp crumbled feta
7. Cheese quesadilla: two 8″ whole-wheat tortillas + ¼ cup reduced-fat shredded Cheddar, cooked in nonfat cooking spray; ¼ cup salsa; 2 Tbsp nonfat plain Greek yogurt; 5 grape tomatoes
8. Asian spinach salad: 3 cups baby spinach + ½ cup skinless rotisserie chicken breast + ½ chopped apple + ¼ cup shelled edamame + ½ cup grated carrots + 2 Tbsp Asian vinaigrette
Bonus WHOot Recipes!
9. Lettuce Tacos: 2-3 whole lettuce leaves + 1 cup of lean ground beef or turkey + 1/2 cup garbanzo beans (chickpeas) + 1 tsp. salt + 1 tsp. garlic powder + any other spice you want to add
10. Avocado Chicken Salad: 1 avocado mashed and salted mixed with 1 diced chicken breast
Dinner
Calories for Each Meal: 500
1. 4 oz lean sirloin steak; ½ baked potato with 2 Tbsp nonfat plain Greek yogurt; 2 cups mushrooms sautéed in 2 tsp olive oil
2. Mexican burrito bowl: ⅓ cup* brown rice, cooked + ½ cup pinto beans + ½ cup grilled vegetables cooked with 2 spritzes of olive oil cooking spray + ½ cup shredded lettuce + ¼ cup corn salsa + ¼ cup guacamole
3. Takeout! 3 oz ginger chicken with broccoli + 6 oz brown rice
4. Italian tilapia: 6 oz tilapia baked with 1 cup canned diced tomatoes + 4 chopped green olives + 1 tsp olive oil + pinch Italian seasoning; ⅓ cup whole-wheat couscous, cooked
5. Chicken stir-fry: 4 oz boneless, skinless chicken breast strips + 2 cups broccoli florets + 1 sliced scallion + 2 tsp peanut oil; ½ cup brown rice, cooked
6. Pasta with cannellini and feta: 2 oz whole-wheat pasta, cooked + ¾ cup cannellini beans + 1 cup chopped fresh tomatoes + 2 tsp olive oil + 1 Tbsp chopped fresh basil + 1 Tbsp crumbled feta
7. Spaghetti and meatballs: 2 oz whole-wheat spaghetti, cooked + 3 turkey meatballs (1 oz each) + ½ cup marinara sauce; 2 cups tossed salad + 1 Tbsp Italian vinaigrette
8. Portobello burger parmigiana: 1 portobello mushroom cap, misted lightly with olive oil spray and broiled or grilled + ¼ cup marinara sauce + 1-oz slice part-skim mozzarella + fresh basil + whole-wheat hamburger bun; ½ romaine lettuce heart + 1 large sliced tomato + 1 Tbsp balsamic vinaigrette
9. 1 cup summer chili: ¼ cup chopped onion + 2 oz lean ground turkey breast sautéed in 1 tsp olive oil + ½ cup canned white beans + ½ cup corn niblets + ½ cup canned diced tomatoes + hot sauce to taste; ½ cup brown rice, cooked
10. Pasta with chicken and spinach: 2 oz whole-wheat pasta (or mix 1 oz whole-wheat pasta with 1 oz regular), cooked + ½ cup shredded skinless rotisserie chicken breast + 1 cup baby spinach + 1 clove garlic, sliced and sautéed in 1 Tbsp olive oil + 1 Tbsp Parmesan
11.BBQ! Grill 4 oz skinless chicken breast, then baste with 1 Tbsp barbecue sauce; 1 ear corn; ½ cup potato salad
Bonus WHOot Recipes!
12. Acorn Squash with Brown Sugar Bacon: 1 or both acorn squash halves + 2 tbs. of butter halved + 2 tbs. of brown sugar halved + 3 bacon strips cooked and diced.
13. Flat Bread Pizza: 1 pre-made whole grain pita/flat bread + 1/4 cup of pasta sauce + 1/4 cup of skim milk mozerella cheese + 1/4 cup of spinach leaves
It’s great to have meals planned out for you when you’re trying to lose weight. But what’s even better is knowing the better cooking and baking substitutes for when you start to create healthier meals for yourself. There are plenty of ways to take out unhealthy ingredients for things that will benefit your weight and your health overall. And you probably won’t even notice the difference when you try out these great options!
First off, we’ll start with baking! When you go to the bakery or look in a cookbook, many of the ingredients aren’t healthy at all. A lot of baked goods are filled with processed ingredients that will ruin your weight and health. But thankfully there are experts out there who have found great substitutes for when you bake your favorite goodies!
via Real House Moms Report
This beautifully done infographic was done by Real HouseMoms who goes into detail as to why these ingredients are so much better than what the cookbooks call for. She also tells readers how much you need when subbing out the unhealthy ingredients.
An example of one of her substitutions are the eggs for water and flax seed. Eggs can raise your cholesterol, that’s why she suggests that you combine 1 tbs. of ground flax seeds with 2 tbs. of water for every egg you need. Then you’ll let it sit for around 10-15 minutes, or until its become gelatinous.
Another example of one of her healthy substitutes would be the coconut oil for the vegetable oil. Coconut oil melts down quickly in the microwave and can be used in equal amount to the suggested oil. It’s a much healthier option when you bake because vegetable oils are processes and when heated to a certain temperature, anything that’s beneficial in them, gets damaged.
Coconut oil can stand the heat and keeps all of its amazing beneficial vitamins and minerals. And if you’re not a coconut fan, then there’s no need to worry. Coconut oil tastes nothing like artificial coconut and you can even buy unflavored coconut oil at the store.
And of course when you cook dinner, the recipes aren’t always that much better. A lot of the time, the directions call for a high amount of simple carbs that will make you gain instead of lose weight. But this handy infographic, that was created by Skinny Mom and shows the different ingredients you can sub simple carbs out for.
via Skinny Mom Report
Sometimes it can be hard to eat healthy, even when we have all the right ingredients for cooking. But knowing what you’re craving and why you’re craving can help you think about healthier alternatives.
via Fitness Republic Report
This infographic that highlights 15 fruits that you might like to incorporate in your daily menu. These will assist with your weight loss. There are a number of stone fruits, dry fruits and even bananas and avocado’s have made the list.
via Booktable Report
Now one thing you should really look out for are drinks when trying to lose weight. Why? Well, a lot of the things we like to drink are high in sugar and calories. And because they’re basically liquid sugar, you end taking in more of it because it’s easier to drink than eat your calories.
But there are plenty of healthy and tasty drinks out there that you can make yourself. It’s so much better when you can see what’s going into it and know that the ingredients are benefiting your body, not destroying it.
We found a list of delicious smoothies you could make to help you lose weight and stay healthy.
There are also easier and healthier drinks that will detox your system and help you lose weight. I’ve created quite a few detox drinks before and had them first thing in the morning. When I did this regularly, I could definitely see and feel the difference.
A couple of my favorites are green tea + mint + lime, and the cucumber + lemon + lime. Both are rich in antioxidants which help fight against aging and speed up your metabolism. Be sure to view our post on Fruit Infused Water
Now many of us don’t always have the time to lose weight or we don’t always have the drive. But there are easier and smaller ways to drop a few pounds without exhausting ourselves at the gym or sticking to a strict diet regiment.
It’s so important to remember that it only takes a few small steps to see progress, and when you see progress, you’ll want to take it a step further and do more for your health and weight.
So for instance, you could cut just one thing out of your diet or daily habits. Because we all know that if we start a diet and cut out everything, we’ll be miserable and quit. Or if we join some intense fitness class at the very beginning of our weight loss journey, we’ll give up once we’re burned out (which usually happens the very next morning).
So sub out that doughnut or chips or that triple shot mocha latte from Starbucks, that you have every day, for something healthier. Instead of taking the elevator, take the stairs.
Infographic via Spotebi Report
This 10 Minute Metabolism Work Out will really help to get your body pumping! Do this every day and watch your body shape change dramatically.
Urbane Women have put together 10 ways to get your metabolism working correctly.
Infographic via Health Beckon Report
Find just one thing that will get you started on a healthier lifestyle and help you lose weight – Metabolism Booster
via Chasing Foxes Report
Now if you are someone who plans on creating a workout regiment and setting bit (or small) weight loss goals, then there are some awesome ways to optimize the time you spend working out. One of them would be pre and post workout meals and snacks. Because if you eat the right thing before working out, it will give you more energy to burn even more calories. Seriously a great way to lose weight!
And if you eat after, your body will burn more calories (from the food) and you won’t gain a thing. Also, it’s just good to replenish your body with nutritious (protein packed) foods after working so hard.
Infographic Health You Beauty Report
If you’re looking for an easy workout to do every day to get in shape, then try this simple morning exercise routine. You will feel some burn, but it won’t be intense enough to discourage you from doing it again.
– Exercise Ideas via ‘Diary of a Fit Mommy’ Report
We all know that we shouldn’t eat chips or drink that soda; they make us gain instead of lose weight and destroy our health. But there are foods that are packaged as a healthy (or healthier) option, that we shouldn’t be eating at all.
Strange to say, but foods like granola and rice cakes are snacks and meals we should stay away from. Granola is seen to be a healthy option for breakfast, but it turns out that granola (unless you make it yourself) is filled with sugars and fats, making it quite the opposite.
And rice cakes, the snack that’s suppose to be low on calorie and no fat? Yeah, that’s high on the glycemic index. The glycemic index measures how much a food impacts your blood sugar. Sugar is rated as 100 with rice cakes being 82. Definitely not something you want to take in if you want to blood sugar down.
source — Skinny Mom Report
If you’re overweight for your height and looking to lose weight quickly, then this diet is for you. Called the “Shock Diet,” it will help you lose pounds in a healthy way, detox your body, and reduce our cholesterol fast. In just 15 days, you can lose 30 pounds; now that’s incredible!
The diet includes a meal plan for 5 days that will get you to your weight loss goal. All you have to do is repeat it two more time until you reach 15 days. So if you want to get ready for summer or start off the New Year in a healthy way, then try the Shock Diet.
It’s easy to follow; nothing complex. Just simple meals and snacks meant to help your body shed the pounds. So for instance, on Day 1, they’ll have you eating 1 orange, 1 toast, and 1 cup of tea or coffee without sugar. Then for lunch you’ll eat 1 orange, 1 boiled egg, and 1 yogurt. Finally, for dinner you’ll have 2 tomatoes, 2 boiled eggs, and 1 bowl of green salad.
Throughout the days, they vary it, but usually keep it the same and very simple. Nothing too hard to follow and no expensive ingredients that will make you go over your grocery budget.
Source — Shock Diet Report
If you’re looking to find more ways to lose weight, then you’re in luck. There are plenty of ways to motivate yourself and get on track to meet your goal weight.
So for instance, you need to develop healthy habits. One of the only ways you’re going to stay consistent with your weight loss is to do this. So to keep off the pounds, you need to gradually change any bad habits (such as eating and sedentary habits), then set a small and concise rule for keeping the new good habits. Then build a ritual around your new habit and stick to it for at least 30 days. The reason for this? Well habits are usually formed after a month.
For example, if you want to eat healthier, then sub out half of the carbs in your meals for three pieces of veggies or fruits (or a healthier complex carb).
Another way to lose weight is to lift weights. You can lose weight fast if you start doing three lift weight sessions (you can start small) a week. It helps to build muscle and muscle burns body fat. And it’s easy, all you have to do is start lifting dumbbells while you watch your favorite show on Netflix.
Or if you want to do something a bit more intense, then look into taking burpee classes or throwing in some deadlifts and squats into your weight lifting regiment.
Now if you want to lose weight faster, then you need to exercise in the morning. Apparently, people who exercise in the morning are more consistent with their workout routine and workout harder than those who chose to do it later in the day. This helps them to lose even more weight in the long run and stay fit.
So set up a time to wake up in the morning and do a simple or more intense workout routine to get your metabolism going for the day
Next, you want to set realistic goals. If you set goals that are high, such as losing ten pounds in a week, and then only lose two, you’re going to feel defeated. Instead, set a low goal such as losing two pounds, and if you lose four, you’ll feel encouraged and continue in your weight loss.
The Shock Diet – what you eat
“Shock Diet” Program:
Day 1:
Breakfast: 1 orange, 1 toast, 1 cup of tea or coffee without sugar
Lunch: 1 orange, 1 boiled egg, 1 yogurt
Dinner: 2 tomatoes, 2 boiled eggs, 1 bowl of green salad
Breakfast: 1 orange, 1 toast, 1 cup of tea or coffee without sugar
Lunch: 1 orange, 1 boiled egg, 1 yogurt, 1 cup of tea or coffee without sugar
Breakfast: 1 orange, 1 toast, 1 cup of tea or coffee without sugar
Lunch: 200 g boiled meat or fish, 1 tomato, 1 toast
Dinner: 500 g of cooked vegetables (carrots, cauliflower), 1 egg
According to ‘Today Fit News’ “This “shock” diet plan with the offered 5 days is repeated 2 more times for a total 15 days. For the first 5 days you will lose 6 to 10 pounds and then the other days weight will rapidly decrease. If you want to achieve the expected results, it is necessary to fully comply with the offered diet plan and no part of the diet should be left out”
And lastly, if you’ve been struggling from sugar cravings, you might be dealing with something more medical. It could be stress or an addiction, but it could also be a parasite.
Parasites feed off of the excess mucus in your body which can be produced by the consumption of sugar. And if you have body fat, the parasites will thrive even more from that.
So how do you get rid of them? Well, it’s simple, you only need 2 ingredients, flax seeds and cloves. Just grind about a 1/2 cup of flax seeds and 2 teaspoons of cloves in a coffee grinder, then take in 2 tbs. of the powder and put it into a glass of warm water, and drink it for three days. Then stop for three days and continue the same process. Do this for a whole 30 days until the parasites have left your body. Pretty soon you’ll start to feel the energy, that the parasites had taken from you, come back.
Losing weight isn’t always easy, but it doesn’t have to be defeating. If we’re able to find a meal plan, a diet, a workout regimen, or metabolism booster that meets our needs, then reaching our weight loss goal isn’t so far away. Just remember to start small, and once you start to see small changes, you’ll be encouraged to try bigger things and get bigger results.
Thanks to Grace MoserfromChasing Foxes for contributing this great post that is filled with lots of helpful information. We hope you have gained some great insights.
If you’d like to work out what body shape you are and how to fire up your metabolism and melt pounds, you are going to love our post that has been very popular on our site.
See How To Lose Weight For Your Body Shape. You will love this article. Read it here
Original article and pictures take thewhoot.com.au site