Congratulations, you’re pregnant! Unfortunately, that first trimester usually brings morning sickness. Not exactly the happiest symptom of pregnancy. I’m on baby #5 right now and I have to say it’s been my easiest in terms of morning sickness. Now of course there are probably a hundred reasons why this time is easier but using natural morning sickness remedies have helped a lot! To help YOU get through those moments of queasiness and nausea, I’ve created a list of some great natural morning sickness remedies.
Natural Morning Sickness Remedies
Magnesium oil is the new remedy on the block. As it turns out, a magnesium deficiency can cause morning sickness. As most people are deficient in magnesium, many women suffer from morning sickness. This is a topical oil as magnesium oil is best absorbed by the body that way. For best results it’s good to use magnesium oil before getting pregnant to increase your levels but if you don’t get a head start that’s ok. I found that applying magnesium oil to my feet once before bed and once before getting out of bed, did the trick.
Anti-Nausea Lollipops
Odds are you’ve heard of the well known Preggie Pops and many women swear by them. However, sometimes they can have not so natural ingredients and all those lollipops can cost you a bit of money! As an alternative, I have created homemade anti-nausea lollipops and they really take the edge of nausea.
Ginger
Ginger is a popular morning sickness remedy. You can use it in all forms but the popular methods seem to be ginger candies and ginger ale.
Vitamin B6
Much like magnesium, a deficiency in vitamin B6 seems related to morning sickness. In fact, I’ve heard that it’s a deficiency in magnesium that makes our bodies not hold enough vitamin B6… all very interesting stuff. Many doctors just prescribe vitamin B6 supplements and that’s an alright route to go. You can also try to increase your vitamin B6 by eating foods that are rich in this vitamin such as beans, bananas, avocados, and nuts.
Red Raspberry Leaf Tea
This tea is the tea to be drinking if you are pregnant. It’s most popular for it’s ability to tone the uterus and shorten labor time. However, it is also great at relieving morning sickness! You can drink this tea hot or cold, it’s up to you!
Snacking
Eating small amounts of food throughout the day will help your stomach stay full and your blood sugar levels stay more constant. Even if it’s just a few nibbles every few hours you’ll feel better than if you held off and only ate during the three main meal times.
Acupressure Bands
These bands are worn on your wrists and apply pressure to key points which help relieve nausea. Two of the popular brands are Psi Bands and Sea-Bands.
Lemon
A bit of lemon water can help keep the nausea away. Others find that if they pop a lemon wedge in their mouth when they feel queasy that they start to feel better. Another way to harness lemon’s benefits is to simply smell lemon essential oil!
Peppermint
Peppermint has long been known as a tummy calming herb. Make a cup of peppermint tea to help settle your stomach. Alternatively, you can also smell peppermint essential oil whenever you feel nauseous.
Apple Cider Vinegar
Yes, I know that vinegar sounds like the last thing on earth that you would want to have when you are feeling nauseous but as it turns out apple cider vinegar can help relieve nausea. So if you can stomach it, try drinking a bit of apple cider vinegar (I like to take 1tbs ACV mixed in 1tbs of water and then chase it down with water as quick as possible) As an added bonus, ACV also helps relieve heartburn!
Prenatals
All pregnant mamas are told to take their prenatal vitamins but that can be tough to do during that first trimester. Most prenatals do not taste (or smell!) good and some prenatal vitamins are just harder on your stomach. That’s why I recommend taking a gentle prenatal vitamin; one designed with morning sickness in mind. If you are looking for a good natural prenatal, I’ve written a post that offers a few choices. A few other prenatal tips are to take them at night and/or to take it with food.
FTC DISCLOSURE: In order for me to support my blogging and social media activities, I may receive monetary compensation for my endorsement, recommendation, reviews and/or link to any products or services from this article. However, I only recommend products or services I feel are up to my standards. The Pistachio Project’s a participant in the Amazon Services LLC Associates Program, an affiliate advertising program designed to provide a means for sites to earn advertising fees by advertising and linking to Amazon.com.
All information on The Pistachio Project is meant for educational and informational purposes only. The statements on this website have not been evaluated by the Food and Drug Administration. Products and/or information are not intended to diagnose, cure, treat, or prevent any disease. Readers are advised to do their own research and make decisions in partnership with their health care provider. If you are pregnant, nursing, have a medical condition or are taking any medication, please consult your physician.
Original article and pictures take djyap9dtmy29a.cloudfront.net site
Lice stink. There’s just not two ways about that. If you’re finding this post *before* there’s a problem, then try these 5 tips to prevent lice, in hopes that you’ll never need it. If it’s already “too late,” then save that one for after the treatment. Keep reading to learn how to treat safely, effectively, and without chemicals using this natural lice killing hair mask!
School is back in session and your child gets sent home with lice…
It happens. You are not a bad mom, you don’t have a dirty house or poor hygiene, it is just a fact of life. There are not many kids that get through childhood without having lice at least once. Don’t believe the myths people try to tell you.
It’s awesome when you have a natural arsenal on hand to prevent lice from the get go but sometimes life just happens and you forget. In that case, you are probably wanting to get those nasty boogers lice gone as soon as possible, so your house and kiddo is lice free and not miss any more school or activities.
There are several effective things that you can/should do to treat lice naturally. A good place to start is a natural lice killing hair mask that is a cinch to whip up!
Why is a natural lice killing hair mask is so important?
It’s simple, lice can hold their breath for up to 8 hours. (Source) Nasty bonus tip, they can also swim! I’ve seen them with my own eyes. A natural lice killing hair mask of coconut oil, with specific essential oils, will suffocate lice overnight while you sleep!
Lice can live up to 30 days. After mating, female lice can lay up to 10 nits per day. (Source) Lice generally lay nits 1/4 inch away from the scalp, but they can be found anywhere on the hair. (Believe me, I have found lice down to the ends of the hair shaft before.)
Natural Lice Killing Hair Mask
Ingredients:
Instructions:
If the coconut oil is solid, gently heat on the stove. Mix the coconut oil, melaleuca essential oil, and lavender essential oil in a small glass jar. Allow to cool if needed, or place in the refrigerator until slightly firm.
Directions for Use:
Carefully massage the lice killing hair mask into the entire scalp, covering all the hair. The length of hair will determine how much of the oil you will need. You may need to double or triple the lice killing hair mask recipe if you are working with very thick, long hair. Alternatively, you may need to use less if you are treating short or fine hair.
Cover the head with a shower or swim cap, wrapping with a towel if desired to prevent oil from seeping out and go to bed. Leave the oil in the hair for at least 8 hours.
In the morning shampoo, to remove the lice killing hair mask. You will need to shampoo more than once as the coconut oil can be difficult to get out of the hair. Some people find it beneficial to add a degreasing dish soap to the shampoo to aid in removing the hair mask.
Comb any dead lice and the nits out with a lice comb. This can take a few hours if there are a large number of nits.
Blow dry the hair. Heat is effective in killing lice that may have survived (though this is very unlikely) and helps loosen the “glue” that attaches the nits to the hair shaft.
For more tips on treating lice naturally, check out this article.
The Players in the Natural Lice Killing Hair Mask
Coconut Oil
Coconut oil coats the hair, preventing the lice from moving up and down the hair shaft. This makes it much easier comb the lice out. It also, when left on for enough time, suffocates the lice. (Source)This does not kill the nits. You will need to treat again in about 7- 10 days when the nits (eggs) hatch. I prefer to comb out the nits, along with the dead lice as a preventative measure. Even if you think you have combed all of the nits out, it is still wise to treat again in case you missed even a few, remember that they can lay up to 10 eggs a day.
I prefer to comb out the nits, along with the dead lice as a preventative measure. Even if you think you have combed all of the nits out, it is still wise to treat again in case you missed even a few. Remember that they can lay up to 10 eggs a day.
Melaleuca essential oil, also widely know as Tea Tree is a natural insecticide that also contains antibacterial, antifungal, antiseptic, and antiviral properties. This article offers an in-depth look at the use of melaleuca essential oil being used to treat lice.
I have personally used melaleuca essential oil to treat and prevent lice for over 8 years. It was the first things I added to my natural lice treating arsenal. It can be added to shampoo to aid in the ridding and prevention of lice.
If the person being treated experiences itchiness from the tea tree oil, rinse out immediately. I have never personally experienced this with my family.
Lavender, like melaleuca, it is a natural insecticide. It also repels lice. If you are sensitive melaleuca, lavender can be used on its own, though of the two, melaleuca is the more effective.
This study showed that a lotion containing 10% Tea Tree oil and 1% lavender oil were 97.6% effective in eliminating lice while, while insecticides such as piperonyl butoxide and pyrethrins where only 25% effective.
Other Essential Oil Beneficial for Treating Lice:
*If you are treating children under the age of two, consider using only coconut oil, or coconut oil with one or two drops of lavender essential oil.*
Have you tried a natural lice killing hair mask?
Original article and pictures take www.modernalternativehealth.com site
Awhile back, I was on the hunt for a salve with soothing vapors that I could make at home. Besides, I have been on the hunt for non-toxic recipes or products to replace the ones that were in my cabinets! I found lots of recipes online so I figured it was something I should try out.
Does the task of sorting through your products seem overwhelming? No worries, we've got you covered. We created this awesome PDF just for YOU!
Anyway, for my family, I put this homemade vapor rub on our feet at night, covered with socks. Love it!
Good luck and enjoy the benefits of a restful sleep with our homemade vapor rub.
I became a mother at 3:35pm on a warm September afternoon in 2008. Minutes later I nursed him for the first time, and that was the beginning.
It was a sacred beginning of an intimate relationship which simply does not compare to anything else I’ve ever experienced. I was quite literally his source of sustenance and life. I continually marvelled at that fact.
Starting when he was 4 months old, we were in and out of the Newman Breastfeeding Clinic in Toronto with breastfeeding difficulties. After a horrific experience with attempted “sleep-training” (before I finally realized the beauty of some of the principles of attachment parenting), I struggled to maintain a proper supply. I took lactation-inducing herbs for months before finally succumbing to a prescription that upped my milk supply enough to keep going until just a couple weeks shy of my one year goal.
(Why one year? Just because that was what everyone seemed to be doing. I was pretty well not “crunchy” at all back then, and had no concept of swimming against the tide in parenting or health issues. Going beyond a year never occurred to me.)
Two months later I became pregnant with our daughter. When she was born, we enjoyed an easy, long, and mutually beneficial nursing relationship until I was 31 weeks pregnant with our third, her little brother. She was 21 months old.
I then breastfed him for more than two lovely years before gently weaning last fall at the age of 2 years, 4 months.
I had been breastfeeding or pregnant – or both – for the entirety of the last six years, save for the odd month or two. I was ready to be finished with that chapter (for now or forever, I’m not sure), but I look back at those years with much humor, much nostalgia, and much gratitude.
Today I want to share with you a list of the tools that I found most indispensable to a long and successful breastfeeding relationship with all three of my little ones.
My Top 10 Breastfeeding Essentials
1. Bamboobies
Nursing pads. Oh. My. Gosh. I was a really heavy leaker, and I tried them all. Nothing worked, until I met bamboobies. I don’t think I can adequately express to you just how much milk my body continually produced. I think it was confused and was under the impression that I had birthed quintuplets and needed to sustain them. Yikes.
Anyway, I tried disposable nursing pads in every brand, cloth nursing pads in every type of material, and even those silicone lilypads ones that stick right on. NOTHING WORKED. Except the bamboobies. I cannot rave about these enough, y’all. If you’re a heavy leaker… try these ones first.
2. Nursing Pillow
I didn’t always use this when nursing during the day, but it was indispensable to me at night when I would sit up in bed for night feedings and lean my head back (and fall asleep despite my best efforts). The nursing pillow helped to support my exhausted arms as they cradled the baby at my breast. (I never could get the hang of nursing while lying down, sadly.)
I used one similar to this one. There are brands that cost three times as much, and some mamas love them, but the basic type worked well for me.
3. Rocking Chair
We did a lot of rocking and nursing in the early months, and a comfortable rocking chair was a total necessity. More often than not, the rocking chair would put *us* to sleep, too. Tired parents of babies deserve a comfy chair! This means soft sides so that legs can be crossed or arranged as desired without putting dents in them – that was a must for me.
We used a very old rocker recliner for the first two kids, but when we moved across the country and had to sell most of our belongings, we splurged on a new cushy lazy-boy chair that lived in our third baby’s bedroom for the first year. It’s now in the living room, and hubs and I fight over it every night after the kids are in bed. It’s the best.
4. Good Nursing Bras
I say “good” nursing bras because not all nursing bras are created equally! I found that out the hard way. Because of my oversupply/heavy leaking, I had to wash them frequently, which wore them out faster, which let me see which ones lasted better.
My favorites ended up being the Bravado nursing bras that I got to try as a “test-wearer” with my third baby. They were amazing, and so very clearly better quality than the ones I had gotten from the maternity clothing stores.
5. Nice Water Bottle
This isn’t an absolute essential, I suppose (but taking care of yourself and staying hydrated certainly is!). You could drink from a boring old cup, or an ugly water bottle. But it’s approximately 96% more fun to have a nice water bottle that will catch your eye and remind you to keep hydrated – which is so important for a nursing mama! I love this brand of stainless steel water bottles, personally. (Our kids have their sippy cups and kid-sized bottles too.)
It’s also important to have the support of those around you. If there are people in your life that have negative things to say about breastfeeding, be sure to find someone to be in your corner. Hopefully, that is your spouse, but if not, then find a friend who can cheer you on.
7. Nursing tanks/cover
I tried some nursing shirts with my first baby. They are essentially over-priced shirts with cut-outs in the front (and material over top that you lift). They were just ok. I didn’t end up using them beyond my first baby because they weren’t my favourite style, they were expensive, and the material sometimes got in the way.
I ended up preferring a simple nursing tank top or stretchy tank that I could just pull down. I usually layered a tank under a regular shirt so that I could keep the sexy post-partum muffin top hidden.
I never bothered with a cover for a variety of reasons (I’m passionate about normalizing breastfeeding and not necessarily hiding it away unless that’s what mama and baby want).
8. Receiving blankets
These were absolutely vital to my successful breastfeeding sessions. I never left the house without several in the diaper bag! My babies are all summer-ish babes (June, July, and September) and nursing was a hot and sweaty mess sometimes. I had to have a receiving blanket between their head and the crook of my arm before nursing or else they would refuse to latch! My faves are the organic cotton muslin kind.
They were also indispensable to me when dealing with those embarrassing spray leaks (the joys of oversupply) as well as any spit up or dribbling milk situations.
9. Phone or e-reader
I know that a lot has been said (judged) about moms with cell phones, distracted parents, etc. I can’t deny that it isn’t a concern in some situations and for some people. HOWEVER… technology can most certainly be used for good.
In my case, it wasn’t until my third child that I had an ipod touch (then an e-reader, and finally an iphone) that I could use during those long nursing sessions in a room by myself. I nursed around people at first, but when they hit a certain age I had to be alone so they wouldn’t get distracted. And when nursing them to sleep I was sitting alone in the dark.
I believe with all of my heart that if I had possessed a device like that during my first’s babyhood, I would certainly have prevented some of those most intense feelings of loneliness and isolation. I was probably on the cusp of post-partum depression, thoroughly exhausted from a high-needs baby that never slept, and dealing with the upheaval that had come to my life through this tiny little creature that I would bleed and die for. It was dizzying.
10. Breast Pump
I used an electric pump the most with my first child. He took the occasional bottle of breastmilk so that hubs and I could have a date. Then I used it a fair bit when my daughter was born as well (my sister adopted our niece just weeks after our daughter was born, so I pumped a bit for her). I don’t think I used it once when my third was a baby, but I was still glad that I owned it, just in case.
If you’re a nursing mama who plans to return to work, a good breast pump (hands-free is supposedly the best if you pump regularly) is a must-have, but it totally comes in handy for any mama, regardless.
One note about pumping that every breastfeeding mother needs to hear comes from Rebekah Hoffer, author of an ebook called “Why Does My Breast Milk Taste Bad?” I asked for her best advice to new moms who want to pump and store their breastmilk, and here’s what she said:
“My best advice for all breastfeeding mothers is to taste your breast milk before you build up a large supply I pumped milk. Why? There is a rare problem called excess lipase activity that can cause your expressed breast milk to develop a bad taste over time.
Leave a small amount of pumped milk in your refrigerator and taste it every couple of hours. If the milk develops an offensive taste then you probably have excess lipase activity. If a week passes and your milk tastes fine, then you are likely in the clear.”
Bonus Tips!
One of the things that I didn’t put on the list is herbs for inducing lactation, but that should not be a regular occurrence unless you’ve spoken to your midwife, doula, lactation consultant, naturopath, etc. The herbs I took are Fenugreek and Blessed Thistle. You can find more info about these at the sites I linked above in the resources section of the list.
Mastitis: I’ve had it 4 times. Once so badly that my doctor sent me immediately to the ER for intravenous antibiotics – she said that the infection was close to getting into my bloodstream. Mastitis comes on really fast and strong, and can have you lying on the couch with a burning fever just an hour after you felt the first twinge of un-wellness.
Try to be aware of any warm and tender spots in your breasts that seem to be “lumpy”. There may be a clogged duct, which can lead to mastitis. The best preventative treatment I found was cold cabbage leaves on the breast. (Stick ’em right in your bra. Yes, it really does work – it reduces engorgement incredibly well… so well, in fact, that you should never do this unless necessary as it will reduce your supply.)
My midwives also recommended taking lecithin capsules for the same purpose, but I never tried it because I got the advice after my very last round of mastitis and was already on antibiotics (darn).
I never had babies with serious weight-gaining issues (thankfully), but I’ve heard many friends saying how helpful a good set of scales can be to keep tabs on the baby’s weight while trying to figure out the breastfeeding relationship and the source of the struggles.
And lastly, my friend Erin has a recipe for Lactation Cookies on her site. They are full of ingredients that are known to help boost your milk supply. I’ve never tried them, but I’d never say no to an excuse to eat cookies!
What’s your fave breastfeeding essential? What was your biggest breastfeeding challenge?
*Affiliate links used*
Original article and pictures take redandhoney.com site
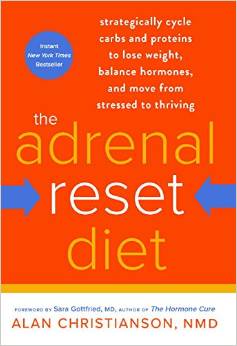
Last week, I shared with you my journey to adrenal fatigue. Today I’m sharing my personal plan for adrenal fatigue recovery.
This post is long, and it gives a pretty big glimpse into my personal life. I hope you will find it helpful and encouraging if you are working through adrenal fatigue or burnout as well.
Adrenal fatigue has been like many things in my life: I have known that I needed to make a plan for recovery for a long time now, but it wasn’t until I crashed in January (after the flu!) that I had the initiative to actually do something about it.
A few months before my flu incident, I had another good friend–also a work-at-home mama–who crashed with adrenal fatigue. (In fact, she is the one who recommended the book The Adrenal Reset Diet.) I thought that was a wake-up call for me, but getting sick was the last straw to finally propel me to change.
Over the past few weeks, I’ve been putting together an adrenal fatigue recovery plan for myself. This plan is simple and does not include anything especially scientific or medical (I am not a healthcare professional!), and the key ingredient to my plan is rest.
It’s a plan that anyone dealing with low energy or fatigue of any sort can begin to implement today!
I’ve always been a natural night owl. But for the past several years, especially, I’ve been accustomed to working on the computer at night, up until bedtime. In my mind, this was the right thing to do since it ensured I was spending most of my daylight hours, even as a work-at-home mom, with my children.
However, once I went to bed (usually around midnight), I noticed that I had a hard time falling and staying asleep.
In addition to turning the computer off by 9:00 p.m., I am also no longer using my Kindle Fire–which also uses a blue light–to read at night. For Valentine’s Day, my husband gave me a Kindle Paperwhite, which will satisfy my reading-before-bed needs without killing my sleep.
I’ve also installed the flux app on my laptop. This app regulates the color of the computer screen, making it darker (and harder to work on) at night. I’m looking for a similar app for my iPhone.
In addition to turning the computer off earlier than I’ve been doing at night, I’m also avoiding it first thing in the morning. According to Dr. Alan Christianson, the author of The Adrenal Reset Diet, TV and computer screens are not good in the early morning because they speed up brain waves.
2. I’m sticking to my office hours.
Most of the time I’m not even turning on my computer at night. Yes, there are instances when I do have to–like when I need to place a Vitacost order or use a meal planning service after the girls have gone to bed, but, as a general rule, especially when it comes to working, I’m keeping it shut.
Instead, I’m sticking to my office hours. For years, I completed my work-at-home mom job during nap times or at night.
This was a necessity at the time, and I do not regret it.
But working so many years at night has worn on my health.
Last semester, for the first time ever, I actually began to have “real” work hours.
My firstborn is now in kindergarten three days per week at a university model school (she is homeschooled the other two days). My two littles attend a church preschool two mornings per week while their big sister is at school. In addition, my husband, a high school Spanish teacher, is now home on Fridays. And sometimes, during really busy seasons, we have a mother’s helper come in for a few hours per week.
This affords me the equivalent to part-time hours to earn the income we need through my work-at-home mom jobs. It allows me to be present when I am home with the girls, and it gives me the time for adequate rest at night.
But realizing I actually have these office hours now has been a huge adjustment for me. My habit has been to continue to pull the computer out to keep working at night.
I’ve decided that has got to stop.
What I don’t get done during my office hours just doesn’t get done.
For my particular work, that might mean working with fewer sponsors and affiliates, writing fewer eBooks, and taking a bit longer to respond to emails, but I’m OK with that. My primary goal in this work-at-home mom gig is to make enough income that we don’t have to go back on government aid, and my passion is in writing and connecting with you all. The rest can all go on the back burner.
I know this is not possible or even ideal for all moms, but it is working for my family.
Not all of those struggling with adrenal fatigue even need office hours because not everyone works, but what might it be for you?
Do you need to cut back on your homeschool plans for the time being and just do the bare necessities? Perhaps you need to limit nighttime extracurriculars?
Evaluate your life and your particular situation and see what sticking to “office hours” means for you.
3. I’m doing something fun every day.
I love to read. I don’t get to read as much in this season of life as I would like, but reading a bit before bed has become part of my nighttime routine.
I’m sticking to print books (or my new Kindle Paperwhite!) to not strain my eyes, though!
For you, it might be a walk, sewing, crafting, baking, etc.
What is it that makes your soul come alive but you don’t usually make time for because of a busy schedule?
I’m learning that sticking to my office hours, closing the computer by 9:00 p.m. and going to bed earlier affords me the 15 to 30 minutes per day I need to unwind with a good book. This is relaxing and soul building.
Back in the summer, I participated in an intense exercise program. There is a time and place and season for exercise programs like this, but from my recent research on adrenal fatigue, I have learned that super intense exercise programs can do more harm than good.
Adrenal fatigue is a result of your body being in a state of near constant stress, and that can be mental, emotional, or physical stress. The physical stress of these programs can actually cause someone with adrenal fatigue to hold onto weight!
“Prolonged and frequent high-intensity aerobic exercise will only make things worse. Anything above half your maximum effort will cause substantial elevations in cortisol levels. As a consequence, this will block fat loss, even though you might be burning more calories.” ~Dr. Alan Christianson, The Adrenal Reset Diet
For now, I’m sticking to very, very light exercise and putting intense weight loss on the back burner. Fit2B is my exercise program of choice because the routines are low intensity and tummy safe.
As soon as the weather warms up, I also want to begin walking more regularly again. The author of The Adrenal Reset Dietpoints to the many benefits of light outdoor exercise, including the natural vitamin D and the sunlight balancing one’s circadian rhythm, aiding in sounder sleep at night.
Dr. Christianson also recommends avoiding prolonged bouts of being sedentary. Because I can tend to be an all-or-nothing person, I am going to have to be very intentional about balance in exercise over the next few months.
5. I’m going to bed by 10 p.m. at night and am sleeping for 9-10 hours per night.
This might sound crazy for some, but this is actually a true challenge for me! Midnight has been my average bedtime for many years now (and I’ve often stayed up much later while working on big projects, and, of course, I’ve been in the constant cycle of night-waking babies and toddlers for the past 6 1/2 years as well).
But I’ve made it to bed by 10 p.m. for most of the past three weeks.
I can tell a world of difference when I go to bed at 10 p.m. as opposed to midnight! I am not falling asleep right away, but I usually do within thirty minutes or so.
For right now, I am letting myself naturally wake up without an alarm–until I feel I have healed from sleep deprivation. Dr. Christianson suggests allowing yourself to wake naturally instead of relying on an alarm clock:
“Loud noises trigger a startle response that wakes you up certainly, but they also set off your internal alarm, which makes the day’s stressors more intense.” ~Dr. Alan Christianson, The Adrenal Reset Diet
I’m finding that I naturally wake up between 7:30 and 8:00 a.m. when I go to bed around 10 p.m.
Because my girls have started sleeping in later themselves (hallelujah!), and because my oldest is only in school three mornings per week and the school doesn’t start until 9:00 a.m., I am able to do this. (I know this isn’t the case with everyone, so some people might have to go to bed even earlier!)
Eventually, I hope to start waking earlier again, but, for now, I do not feel guilty about the amount of time I am sleeping each night. It is definitely making my days better. I think I will be able to start waking up earlier within the next few weeks. Dr. Christianson suggests:
“Give yourself two weeks during which you make sleep a priority, and see how much better you can feel.” ~Dr. Alan Christianson, The Adrenal Reset Diet
Dr. Christianson actually suggests that those who are severely sleep deprived take a “sleepcation.” He recommends going somewhere for three days to sleep as much as possible. This is not feasible for everyone, but if you are taking a personal retreat anytime soon, working sleep into it might be a good idea!
We recently began attending a different church than the one we had been members of for over five years. The church we are now attending (and will most likely join soon) is much closer to our home. But it wasn’t a move of convenience as much as a move to our own community.
Before, we were in a church family with members scattered all over a five-town suburban radius–and those in our town were in the minority. Now, we worship alongside those who live right down the street. We are looking forward to the community-building this will organically bring to our lives.
Real-life, face-t0-face community is a basic human need–especially for extroverts like me! Dr. Christianson even addresses this in his book:
“Humans are social animals; having no contact with others can be among the most traumatic experiences. Not only does isolation cause early death, but it also has been shown to lead to obesity.” ~Dr. Alan Christianson, The Adrenal Reset Diet
7. I’m tweaking my diet.
The Adrenal Reset Dietlays out an entire eating plan for how to heal your adrenals through food.
The basic premise is to start the day with protein and to ease into more healthy carbs with each meal, ending with the most carb-heavy meal of the day.
The protein will help wake you up, and the carbs will help prepare your body for sleep at night–when it’s supposed to be sleeping!
8. I’m exploring supplements.
I do not feel qualified to give you a detailed supplements plan. I’m actually still forming my plan as well. I’ll be seeing an integrative MD at the beginning of March, and I hope to discuss supplements further with her.
The Adrenal Reset Dietactually gives specific supplement recommendations for the various stages of adrenal fatigue–stressed, wired but tired, crashed, and thriving.
For now, in addition to my regular winter supplements regimen, I’m focusing on making sure I have adequate Vitamin D3 and magnesium, and I’m drinking lemon balm tea during the day and a chamomile blend before bed at night. I’m also taking 1,000 mg of Vitamin C per day, as this vitamin is essential for adrenal fatigue recovery.
Katie at Wellness Mama recently wrote a great post on natural sleep aids. One of her suggestions that I have tried is taking honey with a bit of salt before bed at night. In addition, I’m using some calming essential oils topically at night, and I sometimes take the Snooze Ezee tincture from Trilight Health.
Resources
I’ve found the following books helpful in my journey to adrenal fatigue recovery. Some of them are specifically about adrenal fatigue and others are just about slowing down and giving yourself time to breathe!
Have you ever dealt with adrenal fatigue? What are your suggestions for adrenal fatigue recovery?
Disclaimer: I am not a healthcare professional. I am just a mom who loves to research about health and wellness. The sources for this post are the books listed above, as well as adrenalfatigue.org. Please consult your trusted healthcare professional before making any decisions about your health!
Original article and pictures take thehumbledhomemaker.com site
My love of BendSoap and 30 reasons I use it in my “NEW” Natural Home
Stephanie’s note: I’m pleased to introduce you today to Jennifer, who works on our Keeper of the Home team, connecting naturally-minded companies and products with our conscientious readers! I’ll let her share her story with you…
A few years ago I had a life altering experience that changed my life forever.
I was exposed to Toxic Black Mold in a previous home I lived in. Needless to say it’s been an uphill climb for my family and I, as we’ve struggled with our health and have recently moved and changed our current home to a “New” Natural Home.
You can read my crazy mold story HERE on my modest little website about the dangers of Toxic Mold and how I survived a near fatal experience. Perhaps I’ll share my experience and answer more questions on the topic in the future, but for now I’d love to talk about my natural home and one product in particular that I’ve replaced: soap.
Through this 5-year journey, I’ve been excited about converting my home into a Natural Home. I’m constantly educating myself on the dangers of pollutants, molds, chemicals and the control of these “ugly monsters” in and around my home.
One of the many products I had to convert in my “NEW” Natural Home was soap. In my past “toxic” home, I had every brand and type of body soap imaginable. I had some of the most toxic body washes, body scrubs and bar soaps on the market. After we moved, I decided that anything from here on out that touched my family’s skin needed to be natural and toxin-free.
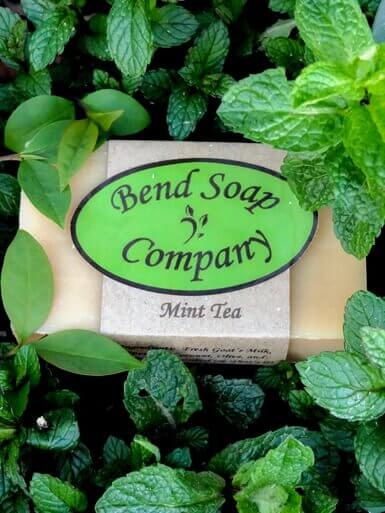
I am constantly looking for great, all-natural soaps and couldn’t wait to share my review and love of a very particular, all-natural bar soap — BendSoap.
First of all, I have to say they have an amazing family business. (For extra smiles, I thought I’d include a picture of their family)
Let’s talk about what’s in their soap
What makes BendSoap different than any other “goats-milk soap” is that they use fresh goat milk from their own goats that they milk twice a day throughout the year.
Each bar of soap has over 26% fresh goat milk in it – making it a truly creamy moisturizing experience. This can be compared to other “goat milk soaps” that use only smaller amounts of goat milk powder, goat milk extract, or a pre-made goat milk base (which most likely used goat milk powder).
I am personally drawn to the fact that they do not use any dyes, synthetic preservatives, alcohols, parabens, sodium lauryl sulfate, etc. No junk! If you shop “natural” or “organic” soaps in the stores, you’ll find many of them contain quite a few good ingredients, but often still include a bunch of the bad ones we want to avoid.
In my collection here, I have both unscented and essential oil-scented soaps. I need to stick with the unscented and essential oil-scented varieties because of an extreme sensitivity to anything synthetic since our health crisis. These are 100% natural! Wahoo!
They have sixteen different 100% all-natural scents to choose from – with their newest scent being “Sweet Orange” which was introduced just in time for Mother’s Day.
I use the Milk Bath in a bag as it contains 100% all natural goat milk soaps. They shred the soap, which can be added a handful at a time to the bath for a luxurious soak from head to toe. This is especially beneficial to those with skin sensitivities and other topical issues that need extra nourishment.
If you have family members that have eczema you can also use the Milk Bath to soak in and relieve eczema. (They in no way claim to cure or “treat” eczema or other skin issues, but their soaps do seem to be doing their own talking.)
The Goat Milk unscented lotion was perfect!! It absorbed quickly into my skin and I noticed a softness in my skin even 12-24 hours after, so I can honestly say you’ll have that soft skin feeling all the time if you use it daily. Another item they sell is their wooden brush which is wonderful for exfoliating those dead skin cells after soaking. This product looks like it’s only available if you buy a basket though. I then apply the “Goats Milk” lotion after my bath and voila!
This past Christmas we introduced BendSoap to you in our Christmas Gift Guide as an awesome idea for gift giving around the holidays. Although this is a super neat idea for a Christmas Gift, I couldn’t help but let you know it’s more than a gift, it’s a lifestyle and there are tons of ways you can use BendSoap around your home all year long.
Let me share with you all the amazing benefits and uses of BendSoap’s product line. Here are 30 ways I use it in my natural home.
I like to put my health before practicality, so let’s start with the health benefits first:
1. They are non-toxic.
This was the biggest reason I started using them. Because of my “NEW” Natural Home and lifestyle, this was a no-brainer so I doubt I need to explain the great benefits of using something non-toxic. These are made by hand and contain absolutely no harsh detergents or any harmful chemicals.
2. Cleans gently but cleans down DEEP to detox.
Pure goat milk contains “lactic acid” which is known to play a key role in the detoxifying process of removing impurities. Another fun fact about goat’s milk is that it contains alpha hydroxy acids that break down the bonds between dead cells and remove the dull surface layer of the skin to give the skin a super clean appearance. BendSoap is rich in natural ingredients, which work gently without causing excessive dryness.
3. Actually gives you “REAL” healthy skin.
Did you know that goat’s milk has an abundance of vitamins, such as A, B1, B6, B12, C, D, E, etc., and minerals, such as zinc, copper, iron, and selenium? In addition to vitamins, it also contains fatty acids, amino acids, citric acid, antioxidants and enzymes. Everything I’ve mentioned is needed not just for the inside of our body, but are also very important for our skin health as well. After doing my research I’ve come to the conclusion that the regular use of goat milk soap, more specifically BendSoap’s unique formula with more added goat milk, can feed the skin and nourish it from within.
4. It kept my skin soft and moisturized.
Goats Milk is a natural moisturizer and easily absorbed through the skin, but the amazing part is that it creates a moisture barrier that kept my skin soft and smooth for a longer period of time than other “natural” soaps I was previously using. I wanted to find out why and to my surprise learned that goat milk is loaded with good proteins, fatty acids and glycerin. Yes, glycerin! Glycerin has super-hydrating and moisturizing properties. The soap itself has a creamy-like texture that makes you feel pampered with a luxurious softness that penetrates the upper layer of your skin and reaches cracks that can sometimes form with dryer skin types.
5. It can prevent premature aging!!
I’m not going to reveal my age here, but I am not getting any younger and if there is a natural product that can help me look younger, I’m all for it! I found out that goat milk is super-rich in antioxidants like Vitamin A, Vitamin C and Vitamin E. These vitamins can actually help our body fight against oxidative damage caused by free radicals. The goat milk aspect of the soap also removes layers of dead cells from the surface of our skin which reveals new healthier cell layers underneath. Both the presence of vitamins and removal of dead skin cells prevent aging or premature signs of aging.
6. Helps fight acne.
In recent comparisons, goat milk soap was very competitive against other anti-bacterial soaps and acne washes. Goat’s milk contains a milk protein that has anti-microbial properties that can prevent acne-causing bacteria
7. Helps irritated and inflamed skin.
Ongoing/daily-use of BendSoap’s goat milk soap can help to relieve inflammation of the skin. Goat’s milk has some pretty strong anti-inflammatory properties due to the presence of fat molecules in it.
8. Heals skin infections faster.
Goat’s milk offers effective anti-microbial properties. BendSoap’s bars can easily be used to assist the body’s natural healing process by clearing up skin infections, such as rosacea, eczema, psoriasis, and contact dermatitis faster.
9. It can help maintain the pH balance of your skin.
BendSoap’s proprietary goat milk soap can help to balance the pH of your body perfectly. Goat’s milk contains a certain fatty acid named caprylic acid, which lowers the pH balance of the soap and makes it almost similar to that of the human body.
10 Protects from skin cancer.
Now let me start with a disclaimer on this one. I am not saying that BendSoap or Goat Milk Soap can cure or treat skin cancer. In my research, I found that selenium was found and proven by scientists to protect the skin from damaging ultraviolet rays of sunlight and goat’s milk contains a TON of selenium, so you be the judge.
Now here are some practical uses for BendSoap:
11. Help sewing pins insert easier.
Insert your sewing pins into a bar of this amazing goat milk soap and your pins will penetrate your fabric with ease.
12. Marking hemlines when sewing.
Use Goat Milk soap instead of chalks or pens that may have harmful chemicals in them. Using the soap to mark is a non-toxic and easy to wash out alternative.
13. Keep my glasses from fogging over.
This is an awesome but useful trick. Simply rub the lenses with the Goat Milk soap (dry). With a wash cloth or clean dry cotton material rub off the soap until the glasses are clear. This will prevent them from fogging up around humidity.
14. Check to see if gas pipes might be leaking.
You can find a gas leak in your gas pipes by smearing a little Goat Milk soap mixed with a few teaspoons of water in a small dish. Mix the soap and water and apply the soap/water mixture to seals in pipes. If you see soap bubbles then you potentially have a gas leak that needs to be addressed by your gas company. (A word of caution: always have a professional fix gas related leaks, never try this on your own).
15. Put a little soap under my nails before gardening.
Scratch your nails over the Goat Milk soap before you go out to work in the garden or do lawn work to prevent getting dirt under your fingernails. After you are finished just rinse.
16. To keep deer out of your yard or garden.
In a study done at the University of Vermont, they found that using Goat Milk soap as a deer deterrent can be very effective. It’s a common first line of defense of gardeners against unwanted deer in their gardens because it’s easy and inexpensive. Goat milk soap can interfere with a deer’s sensitive sense of smell. Since deer feed from ground level to about six feet high (that’s six feet above the snow line in winter), this is the area where your soap should be hanging. In the category of scents, this is one of the easiest controls — hanging bars of smelly (especially the minty kinds) of goat milk soap in the garden, the stronger the scent the better. You can easily cut them in half and hang in burlap or cheesecloth stapled to stakes in the garden in early spring.
The repellent factor seems to be the part derived from animal “goat” fatty acids. Some pleasant scents that BendSoap offer that also interfere with deer noses include mint oil-based soaps like their Mint Tea, Eucalyptus Spearmint, Mint Scrub, Double Mint, Peppermint, and Citrus Mint, (often combined with pepper and garlic), cloves and cinnamon, or citrus based soaps also have somewhat of an effect but not as much as the mint-based varieties.
17. Unstick zippers.
Rub BendSoap over zippers when some of the teeth get out of their track. Once the zipper is fixed you can easily wash the item of clothing and the soap disappears.
18. Stop squeaky door hinges.
Use Goat Milk soap around the home or on autos and RV’s by rubbing it over door hinges. Make sure that you don’t add water or you could cause your hinges to start to rust.
19. Unstick wooden drawers.
Remove hardwood drawers from dressers and chests and rub Goat Milk soap on the tracks of both the drawer itself and the track attached to the dresser/chest to create a smooth sliding drawer.
20. Stop floorboards from squeaking.
Rub Goat Milk soap over cracks to create a buffer between wood slats to prevent squeaking.
21. Use as a shaving cream substitute.
Regular soap doesn’t work well for shaving, but Goat Milk soap is very gentle and actually creates a barrier between the razor and your skin. The added benefit of this is that your face (for men) and legs (for women) are super soft after using Goat Milk soap.
22. Drawer deodorizer.
Place a wrapped bar of “scented” or the “essential oil” Goat Milk soap in drawers and clothes will pick up the scent of the bars. *Tip: You can use just one bar for an entire dresser or chest by cutting the bar into many slices.
23. Use it as a natural pesticide for both plant and vegetable gardens.
Shave off some of your Goat Milk soap and place it in a bottle and shake it until the soap dissolves. Put the liquid in a garden sprayer and spray “under” the leaves of plants and vegetables to prevent bugs from climbing up onto the leaves of your plants.
24. Protect the bottom of your cast iron pans from soot.If you ever use your cast iron pots or pans over an open flame you can rub a bar of “non-scented” BendSoap over the bottom of the pot/pan before you set it over the open flame. The soap will make it easier to cleanup, as the soap will prevent the soot from accumulating on the bottom.
25. Loosen a tight ring.
Rub Goat Milk soap over your finger and the ring will slide off when you wash your hands.
26. Smelly sneakers, boots or shoes.
You can place a wrapped bar of Goat Milk soap in your shoes, sneakers or boots and leave it overnight. They will smell fresh by the morning.
27. Make sliding glass doors and windows slide easier.
Rub Goat Milk soap on the bottom track of sliding glass doors and windows and watch them open and close with ease.
28. Mouse trap bait.
For whatever reason, mice love bar soap and especially Goat Milk soap. Put a little piece on the other side and “SNAP!!” They apparently love it…which is good for us, just not so good for them.
29. Quiets squeaky belts on cars.
Apply Goat Milk soap to belts to prevent that squeaking noise that can sometimes happen when it rains or snows outside.
30. Prevent scratches on your wood floors.
Prevent furniture scratches by applying Goat Milk soap to the bottom of chairs or couch legs to create a protective barrier.
I gave BendSoap’s goat milk soap a try and you should, too!
Let us know what you think: Have you ever thought of using natural goat milk soap? Did you notice any visible difference on your skin after using the goat milk soap? Do you have any other uses for Goat Milk soap that we haven’t shared here? Share your experiences with us in the comments section below.
Disclosure: This post was generously sponsored by Bend Soap Company. All opinions expressed are my own.
Original article and pictures take keeperofthehome.org site
My Kids Have the Sniffles…This is What I’m Doing About It
My oldest started back at school this week. It is bitter sweet for me because I miss her while she's away from me but I know she has a blast with her friends and her teacher at school. Being back at school can also mean there are more opportunities for illness – which in the long run does strengthen their immune systems – but can be tough to deal with in the short term. After one week of school everyone in my house (except me) has the sniffles.
There are a lot of things I do as preventative measures and there are a number of remedies that I use. The biggest part of prevention is diet along with some superfoods and some supplements. This post details all of my tips on prevention. In addition, some of the preventatives also work as remedies in higher and more frequent dosages.
At the first sign of the sniffles, this is what I do…
Elderberry Syrup
Elderberry syrup is my daughter's favorite remedy because it tastes really good. It's easy to make and it only requires 3 ingredients (one being water). There are many different recipes for Elderberry Syrup. It can be as simple as elderberries, water, and honey or other herbs and essential oils can be added to give it even more power (here is my basic recipe). A friend of mine likes to add ginger to her syrup and I thought that was a great idea because of the warming effect of ginger. Warming herbs and spices help to break up congestion and help the nasal passages to drain. Sometimes I add rose hips to my concoction because it is very high in vitamin C. Also, essential oils like lemon or thieves (a Young Living blend) can be added once the syrup is made to enhance it even further.
Garlic Oil
Garlic is really one of my go to herbs for a lot. It has so many anti-microbial properties that it helps get rid of a lot of nasty stuff. Garlic oil is simple to make and you only need two ingredients – garlic and olive oil. I talk about making it in this post where I used it as an ear oil remedy. Garlic oil can be used as ear oil as explained in that post or it can be rubbed on the skin or taken internally. This is a good one for small children since it can be used topically. I am using this one on my 1 year old now. Whenever I change his diaper I rub some garlic oil on his feet and put socks on (which he loves to pull off).
Diffusing Essential Oils
I love to diffuse essential oils even when no one is sick. It's a natural way to freshen the air and also provides health benefits. I often diffuse lavender because it smells great and it calms my children (and me). I use a diffuser similar to this one found on Amazon (I think the one I have is discontinued now). Once I notice the sniffles I make sure to run a diffuser in my children's bedroom while they sleep. The oils fill the air and as they breathe them in it soothes their symptoms and assists the body in healing. Some oils I use for colds and congestion include eucalyptus, thieves, R.C. (a Young Living blend), and lavender.
Epsom Salt Bath
Epsom salt is one of my detox tools. Adding some epsom salt to the children's bath is an easy thing to do since I am already bathing them anyway. I am not scientific about it I just add a handful or two. Espom salts help to pull toxins out of the body through the skin. One thing to note is that it's important to drink water afterwards to help replenish the body.
Herbal Tea
Herbal tea is so soothing when you feel a cold coming on. There is something about the warm feeling it creates that instantly makes me feel better. My daughter loves to drink tea with me so it's another easy way to get some herbs into her when she needs it. If you need help enticing your children to drink tea try getting a kids tea set and make it a tea party. Some herbs I use for tea are chamomile, echinecea, and elder flower.
I use a combination of all of these remedies when I notice the first signs of a cold and it usually helps knock things out pretty quickly. It addition to all of these things its important to keep in mind that a healthy diet is top priority. I make sure not to allow sweets and to offer lots of warm broths and soups to help the body get rid of all the nasty bugs.
Want to learn more things you can do to help your children when they get a cold? Check out the online course I've created with my friend Wendi (who's also been a pediatric nurse for 20 years), it's called A Parent's Guide to Natural Remedies. If you enjoyed these tips, you'll LOVE this course!
What is your protocol at the first signs of a cold? Please share in the comments below.
Original article and pictures take theholisticmama.com site
My Favorite Ways to Get Kids Involved in the Kitchen
One of the absolute best ways to get kids interested in eating healthy food is to get kids cooking and getting them involved in the process. Before I was a Mom, I read about this and learned about it the Institute for Integrative Nutrition, but a few years ago I saw it in action. My daughter did something that reminded me of this concept I learned years earlier. The simple act of growing a pea plant got her interested in eating salads, something she was not open to previously. In this post, I shared the story about how growing plants from seeds completely changed her attitude.
In the same way, that growing a plant got her interested in salad, getting kids cooking or involved in the kitchen can do the same thing. Of course the level at which your child can get involved depends upon their age and maturity level. Even for the littles there are ways they can get involved that doesn't require a using a knife or getting close to a hot stove.
My children have been helping me in the kitchen since a very early age – both before even turning 2 years old. As they get older they are eager to move on to more difficult tasks and more “grown-up” things they can help with in the kitchen. If you have toddlers at home, here are some of the things they can start helping with now.
Ways to Get Toddlers Helping Out
Grocery shopping. Take the children along and allow them to pick out a vegetable that they would like to try.
Help unload the groceries from the bags.
Wash fruits and vegetables. I give my son a small bowl of water and a kitchen towel and let him wash and dry the fruits or vegetables.
Pour ingredients into the bowl. You measure it out, let them pour it in.
Ask them to tell you when the timer goes off.
Carry recyclables to the recycle bin.
These are all very simple things but they love to help! I love to see the look of accomplishment on their faces when I thank them for helping me make dinner.
If you have older children or if your children are very capable at a younger age, graduate them to more difficult tasks and make a big deal about it. My daughter loves when I tell her I think she is ready for something new. Some things you can ask your older children to help with might be:
Tasks for Older Children to Learn
Set the table.
Retrieve items from the pantry or refrigerator.
Peel carrots or potatoes.
Tear lettuce into small pieces.
Put spreads on crackers.
Flip pancakes.
Cut up vegetables. I know this sounds crazy but you can start them with one of these children's chopping knives and then graduate them to a butter knife when you think they have it down. I usually give the children softer things to cut such as zucchini, mushroom, greens, etc. They can get frustrated with harder veggies sometimes.
Getting kids cooking and into the kitchen will help in so many ways. They get interested in food preparation, healthy eating, and helping out. It's also a time of day when children can get cranky because they are hungry and tired. I find if you give them a “job” to do it can eliminate that tough time of day.
How are your own cooking skills?
One thing that may be preventing you from getting your kids cooking and involved in the kitchen is your confidence in your own cooking skills. I was lucky to grow up in a family that revolved around cooking. My sisters and I cooked regularly from a very young age alongside our Mother and both Grandmothers. With this background, I am very confident in my skills in the kitchen which made cooking an easy thing for me to demonstrate in my family.
I know this is not the case for everyone. If you don't know how to cook or you are not confident in your ability to show your children what to do in the kitchen this can be a real hindrance to getting them involved in the process. If you can relate to this, it might be time to learn a few cooking skills! If you have a friend who is a pro in the kitchen, ask them to come over and have a cooking play date. You'll learn a thing or two and it will be fun for everyone.
If you don't have a friend or relative that can give you a lesson, this might be something for you. Katie Kimball from Kitchen Stewardship has created an online course called, Kids Cook Real Food. The beauty of this course is that it can work for both kids and adults because you do it together. She even has a free knife skills class that she is giving away for free until January 11. Sign up for the free knife skills class here.
Original article and pictures take theholisticmama.com site