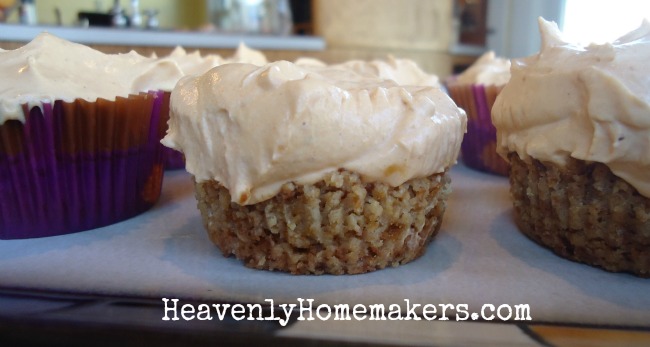
Who even cares about a cheesecake crust? I’ve always been in it for the cheesecake filling anyway. Therefore, I have been making Pumpkin Cheesecake Filling and eating it with a spoon right out of a bowl.
For breakfast.
The way I see it, I’m eating a vegetable for breakfast, so I’m getting nourishment. I’m also eating good fat, so I stay full for longer than five minutes.
What else? Well, there’s hardly any sugar in this, so I feel no guilt that way, nor do I experience a mid-morning sugar crash. I should add to all of the above that this Pumpkin Cheesecake Whip tastes like spoonfuls of holiday happiness.
So between the vegetable thing, the good fats, the low sugar content, and the fact that this tastes wonderful – I think our holiday season will continue to get better by the bowlful.
Also, it only takes five minutes to make. This is what every Christmas recipe should be like.
2 8-ounce packages softened cream cheese
½ teaspoon ground nutmeg
½ teaspoon ground cloves
2 Tablespoons real maple syrup plus liquid stevia to taste (I used 2 droppers full of stevia)
Now let’s just say you’re a “gotta have a cheesecake crust” sort of a person. This is no problem. I have a crust recipe that is also low in sugar and incredibly delicious. You’ll find this recipe here.
Or say you want a cheesecake crust, but you also want your cheesecakes to be cute and little and ready to serve to individuals. This is also no problem. I have Pumpkin Cheesecake Cups for you. You’ll find that recipe here.
Now, it doesn’t take too much reading to realize that these are all the same recipe, just tweaked slightly to make them crustless, regular crust, or individual cup-sized crusts. We aim to please, and also we are suggesting that you eat cheesecake for breakfast, so now’s who’s your best friend?
No need to answer that. I mean, go ahead, though, if you want to.
Original article and pictures take heavenlyhomemakers.com site
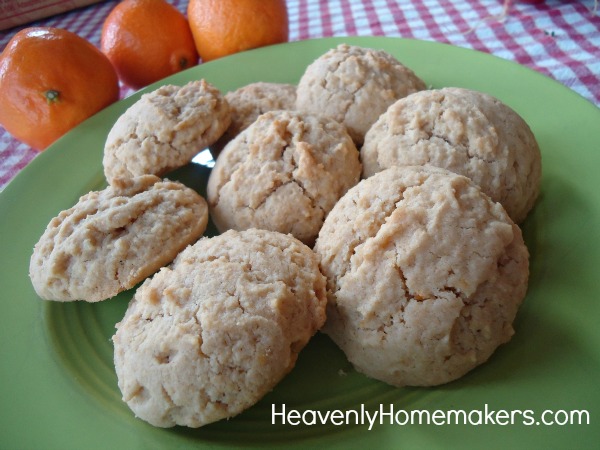
In case by now you’re wondering if I’m obsessed with creating these Low Sugar Melt-Away Cookie varieties, the answer is obvious that of course I am obsessed. After two attempts at creating this here orange flavored variety, I have definitely decided that of all the flavors – orange is my new favorite.
Why two attempts, you ask? Oh well. I just burned the first batch, that’s all. Guys, it is so weird what happens to cookies when you put them in the oven, walk away, and then forget that there is actual life going on outside your office door. So weird. Someone should have warned me about this. We can’t even leave cookies unattended in a 350° oven for 27 minutes. Did you know that???
Set a timer much, Laura?
You know what? Just…I know, okay? I should have set a timer. I used to have one of those clicky, clicky, clicky timers but it got dropped four too many times so its spinner stopped spinning. Then Matt got me a digital timer that was persnickety and sometimes decided to shut itself off because it was selfish and couldn’t care less about the company coming over to eat in exactly 52 minutes. After a few months of this behavior, I declared it to be faulty and went to the store to purchase another one just like it. It, however, had the same exact issues as its brother and that is what tipped me off that maybe that brand couldn’t be trusted.
After that, I decided I could just use the timer app on my phone. This is a great idea except that it takes so many difficult and tedious steps to get to the point of actually setting the timer (find phone, turn phone on, unlock screen, find timer app, open timer app, think about how much time has elapsed since I started this whole process so I can figure out how long to set the timer at this point, so on and so forth). Also, I really hate to touch my phone when I have egg white on my fingers.
I think you can all see now how challenging it has been to accurately time my baked goods. I have mostly resorted to trusting my nose to be my timer. Typically, cookies and casseroles smell “just right” when they are ready to come out of the oven. What more do I need?
Oh yeah, just someone to remind me that I am actually baking cookies in the first place.
So the first batch burned. They were edible, just really, really crispy and not at all picture worthy. Over the weekend, I tried again. Oh my goodness, I will (go to the trouble to) set a timer from now on. It is worth it to pull the perfect cookies out of the oven when they are perfectly perfect in every way.
Easy Low Sugar Orange Melt-Away Cookies
½ cup sucanat or raw sugar
The juice of one medium-sized orange
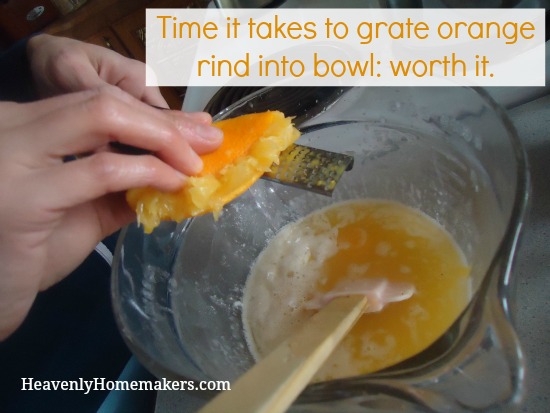
grated orange rind
3 cups of whole wheat pastry flour (give or take)
Stir together melted butter and sugar.
Add eggs, vanilla, orange juice, and baking powder.
Grate orange rind into the mix for extra flavor.
Stir in flour until a solid ball of dough forms.
Drop teaspoon-sized balls of dough onto a cookie sheet, about an inch apart.
Bake in a 350° oven for 10-12 minutes or until cookies are lightly browned.
In other scatterbrained related news – the second time I made these cookies, I was talking to a friend and didn’t realize until later (like 9 hours later) that I hadn’t put eggs into the mixing bowl. These still turned out to be my favorite cookies. So eggs in this recipe? Take ’em or leave ’em. These turn out fine either way. This is further proof that I can’t talk and cook at the same time. Like you needed more proof.
Want to try the other varieties of these cookies?
Hey, just curious. What kind of timer do you use??
~~~~~~~~~~~~~~~~~~~~~~~~~~~~~~~
Pyrex Storage Set Deal Alert!!
Christine emailed to tell me of this great deal on a 10-Piece Pyrex Storage Set. Get the entire set right now for just $12.63. No guarantees on how long this price will last. I have these, love them, and use them all the time!!
Original article and pictures take heavenlyhomemakers.com site
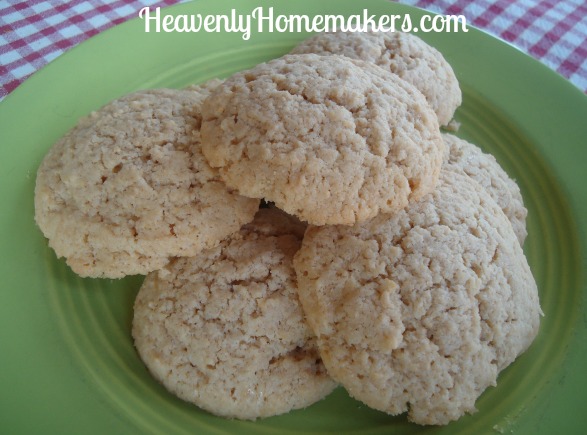
I actually have no idea what makes something key lime rather than simply lime. I’d look it up, but there are fresh lime cookies to eat and also there is a lot of laundry to do since we have been gone all weekend. I would have just called these lime cookies, but key lime sounds more exciting.
Oh wait. I just looked it up. Did you know there are actually Key Limes? You probably did, so before you tease you have to remember that I am from Nebraska where there are no lime trees. Nebraska limes grow on trucks and in grocery stores.
Key limes are apparently great for cooking and baking because they are extra juicy and full of aroma and flavor. I will admit that I don’t know what kind of limes I used in these cookies. Therefore, maybe we should call these Easy Low Sugar On-SaleLime Melt Away Cookies?
Either way, add these cookies to the collection of Low Sugar Cookies we’ve been enjoying here. These cookies are so much fun since all we have to do is use the base recipe, then add different flavors! Lime is just as amazing as the others.
Want to try the other varieties of these cookies?
½ cup sucanat or raw sugar
The juice of two limes
3 cups of whole wheat pastry flour (give or take)
Stir together melted butter and sugar.
Add eggs, vanilla, lime juice, and baking powder.
Grate lime rind into the mix for extra flavor.
Stir in flour until a solid ball of dough forms.
Drop teaspoon-sized balls of dough onto a cookie sheet, about an inch apart.
Bake in a 350° oven for 10-12 minutes or until cookies are lightly browned.
If you’d like to learn a cool trick to make your lime squeezing easier, grab your limes and some tongs and read this handy information.
Do you live in an area where limes grow in your backyard? If so, I’m happy for you and not even jealous. After all, I live in a state where the wind blows so hard we don’t have to bother fixing our hair. Now who’s jealous?
Original article and pictures take heavenlyhomemakers.com site
Never made a tincture before? This Easy Immune Support Tincture is a great place to start! And your immune system will thank you…
This post contains affiliate links, FYI.
This post contains affiliate links, FYI, and is sponsored by Infinity Jars. All thoughts are my own, though.
The beginning.
Ever since my first pregnancy, when my hippie midwife gave me a tincture of red raspberry leave to take, I’ve been intrigued by the use of tinctures for health. When she told me she had made it herself, images of elaborate moonshine-esque chemistry sets popped up in my mind.
Those images stayed there for a few years, making me think that it either took a scientific nerd or someone really crazy to make their own tinctures.
But guess what, neither of those things matter.
Making tinctures might sound a little daunting, but it’s really quite simple. If you’ve ever made your own homemade vanilla extract, then you basically have all the knowledge you need! And if you haven’t tried DIY vanilla, don’t worry, you’ll be rockin’ and rollin’ in no time flat!
Getting started.
You need three basic things to make a tincture:
a dark glass jar or bottle with an air-tight lid
some vodka, brandy, or vegetable glycerin
herbs, roots, and/or berries of your choice
I like to use vodka to make my tinctures, because it’s cheap and easy to get my hands on. If you’re alcohol-free, you can go ahead and use vegetable glycerin instead. I’ve even heard that apple cider vinegar works, but I’ve not ever tried it.
For storage, it’s important to use a dark glass bottle, as the UV rays from the sun can damage the healing properties of the herbs. I’ve been loving these light optimized, glass cosmetic bottles from Infinity Jars. They’re made with a unique ultraviolet light filtering technology that makes them a great choice for tinctures, essential oil blends, and DIY cosmetic storage. Infinity Jars’ light-blocking and air/watertight jars have been shown to preserve herbs for months, and even years, longer than ordinary jars!
Easy Immune Support Tincture
For this tincture I chose herbs that are great at stimulating your immune system. Whether it’s that lovely time of year when everyone and their mom is coming down with something, or you just feel like your immune system could use a little boost, these herbs are a great option.
Thyme
Thyme leaves are packed with immune-boosting vitamins C, A, K & E, as well as calcium, magnesium, and selenium. They also contain antioxidant-rich flavonoids and antibacterial properties that are said to fight off bacteria and fungi as strong as E-coli. Thyme also has a relaxing effect on muscles, making it helpful for relieving asthma, whooping cough, laryngitis, bronchitis, and even regular ol’ dry coughs.
Echinacea
This pretty little flowerstimulates the cells that are responsible for fighting infections, helping our immune system be more effective at attacking viruses and bacteria. Please note that, if you have Th1 dominant Hashimoto’s, echinacea also stimulates the Th1 system, so use with care.
Elderberries
These have got to be one of my favorite berries of all time! Their bioflavonoids are so strong, they can even destroy the ability of cold and flu viruses to infect a cell! They’re filled with amino acids, carotenoids, flavonoids, vitamins A & B and more vitamin C than oranges! Elderberries are an anti-viral, antibacterial, immune-boosting powerhouse.
Using your tincture.
One of the wonderful things about this immune-boosting tincture is that it will help you out whether you’re sick or not. If you’ve been hanging around someone with the sniffles or a cough, or you just want to make sure you’re keeping your immune system up, take the tincture.
If you’ve already come down with something, this tincture will still help you by building up your immune system and giving it ammunition against the virus or bacteria your’re battling.
Generally, if I’m just trying to fortify my family’s systems during the winter months, I give them 1 dropperful, or 1/4 teaspoon, of the tincture per day (half for littles). If they’ve already caught something, I’ll double the dosage, as well as give them a cupful of my Immune Boosting Sore Throat Tea or my Honey Ginger Allergy Relief Tea.
Here’s a helpful tip from a registered herbalist, Carol Little: “At first sign of symptoms, or if you have been exposed to family/friend with sniffles and want to take precautions, adults should take 1 dropperful every 15-20 minutes for the first few hours. Cold virus replicates every 20 minutes, so the constant repeating of the dose is essential for the formula to kill the virus.”
Now that you know everything you need to make a tincture, what are you waiting for? Get going and make your own! Your immune system will thank you. ��
In the recipe card I’ve linked to some of the products from my affiliate partners that I like to use. Purchasing through these links won’t cost you anything extra. Thanks!
These easy Lacto-Fermented Pickle Chips are a favorite snack and side dish at my house. They’re packed with delicious nutrition, so I don’t mind. ��
This post contains affiliate links, FYI.
Lacto what?
The first time I heard the term ‘lacto-fermented’ I was a tad confused. How could lactose ferment anything? Where those pickles really made with cheese?
Silly me.
After a little research I learned the truth: there’s no lactose in lacto-fermentation. That means I could continue my dairy-free lifestyle and still enjoy lacto-fermented veggies!
If you’ve been confused by the terminology too, let me do some ‘splaining.
Meet my friend Lactobacillus.
“Lacto” is short for a specific species of bacteria, Lactobacillus. So named because it was first studied in milk ferments, different strains of these bacteria are all over the place. They live on plants, especially those low-growing ones, and also live in human gastrointestinal tracts, mouths, and other places on our bodies, as well as on animals.
Definitely sounds like something you wanna put in your food, yes? Of course, yes. But why? Lactobacillus helps convert sugar into lactic acid, which is a natural preservative that stifles the growth of harmful bacteria. It also increases and preserves vitamin and enzyme levels of fermented food, making it easier to digest!
Pretty good for little bugs… Kidding.
How it works.
Lacto-fermenting works by creating an anaerobic (meaning oxygen-free), acidic environment with the use of a brine. The acidity of the brine protects agains toxins growing in the ferment, and the lack of oxygen makes it impossible for bad bacteria to grow, as well.
This form of fermentation is just about as old as fermentation itself, and is pretty much the easiest and safest form of food preservation out there. The brine is just a simple mix of sea salt and water, poured over whatever you want to preserve and let sit for a few days.
That’s pretty much all there is to it!
Lacto-Fermented Pickle Chips
Now on to the pickle chips! Until my 5th pregnancy I was never a fan of pickles. During those 9 months I practically lived on pickles. And I’m pretty sure my now-2-year old could live on pickles, too. ��
Though pickles are pretty cheap in the grocery store, they’re also usually pretty packed with unnecessary and unhealthy ingredients. Just look at the ingredient list in these common Vlasic pickle chips sold at Walmart:
As opposed to the ingredient list of these homemade lacto-fermented pickle chips:
Cucumbers, onions, garlic, water, sea salt, dill, black tea (optional, just helps them stay crispier).
Which one do you want to be putting in your body?
In the recipe card I’ve linked to some of the products from my affiliate partners that I like to use. Purchasing through these links won’t cost you anything extra. Thanks! ��
Easy Lacto-Fermented Pickle Chips
Free of grain, gluten, eggs, dairy, and sugar.
Ingredients
3-6 whole, fresh, organic cucumbers (amount depending on the size of your cukes)
1/2 yellow onion
2-4 cloves garlic
filtered water
Instructions
Wash cucumbers and slice into chips. Peel and slice onion into rings. Crush and peel garlic cloves.
Layer cucumbers, onions and garlic in a clean quart-sized canning jar, packing tightly up to about 2 inches below the rim of the jar. Sprinkle with dill and black tea.
In a separate jar, combine the salt and water. Cover tightly and shake vigorously to dissolve the salt.
Pour the salt over the cucumber mixture, topping off with water until the jar is filled about 1 inch below the rim. Make sure all the veggies are completely covered. If your veggies are having a hard time staying below the water (sometimes they will float) fold a clean cabbage leaf into the top of the jar, pressing it below the waterline to hold down the veggies.
Cap the jar tightly and set it out of direct sunlight for 3 days. (I place mine in a bottom cabinet.) After three days transfer to the fridge for longer storage, or uncap and enjoy!
Pin these Easy Lacto-Fermented Pickle Chips for later!
Today I'm sharing with you one of my favorite tools for healthy living — Homemade Elderberry Syrup — and I've made it low-carb so even those on low carb diets can enjoy it.
When I was young, I got sick a lot. And I do mean, a lot.
It was during that time that antibiotics were all the rage, and I was sadly the victim of that kind of thinking.
Everything is connected. And when you mess with your gut, you mess with everything particularly since it is the core of your health.
Since I found out the horrible effect that antibiotics can have on gut health, in addition to learning how they can lead to antibiotic resistance, I have tried my best to keep my family healthy without leaning on antibiotics for things like ear infections, goopy eye, and the sort.
I also think it's important to avoid over the counter meds as much as possible due to them having unwanted side effects. For example, for years I took Benadryl for allergy issues, only now to find out that it is an anti-cholergenic drug that can lead to Alzheimer's and brain shrinkage.
YIKES!
All the more reason to lean on healthy natural remedies whenever possible.
Brain Shrinkage and Alzheimer's?
No thanks!
I have a whole post on DIY Cold and Flu Remedies which includes this fabulous recipe for Elderberry Jam, but I started making Elderberry Syrup this year when my youngest got a very bad virus, as in a terrible terrible sore throat, a fever, and was feeling completely out of it.
We thought he had strep since his throat was so sore and we even ended up going to Urgent Care due to some odd symptoms, but we were sent home with no special treatment recommendations.
So I went to work nursing my son back to health.
I gave him Echinacea Tea, a mixture of garlic, cayenne, and honey, and this fabulous Elderberry Syrup.
The Homemade Elderberry Syrup was his favorite part of the regimen. I think he would have eaten it all day if I had let him :).
He sat and watched Lone Ranger reruns all day long, and I actually sacked out and watched them with him. I never really got sick, but my body sure was working overtime fighting the germs off. At one point I even slept through a bunch of the The Long Ranger's shooting, “Hi Ho, Silver!”calling, and more.
Elderberry Syrup Benefits
Simply getting more fruits and vegetables into your diet is always a good thing, but when you are adding in produce that is dark colored, the benefits typically run deeper. The dark color is an indication of more nutrition and more detox capabilities as the antioxidants in the foods scoop up all of the junk that is best removed from your body.
For centuries, elderberries were a standard folk remedy in Europe, North America, Western Asia and North Africa, so now their health benefits are being examined and studies.
Elderberries (Sambucus Nigra) are full of antioxidants which have many health benefits. They also have tannin, flavanoids (including quercetin, which is often used for helping mitigate allergy symptoms and anthocyanins), carotenoids, amino acids, vitamins, and more.
They have been shown to lower cholesterol (Source), and boost the immune system (Source), including giving relief of Influenza Symptoms (Source) and the duration of colds (Source)
The benefits of Elderberry Syrup for Kids is the same and kids LOVE the yummy flavor too!
Dried Elderberry Caution
Just so you know, when you buy Dried Elderberries for making your Homemade Elderberry Syrup, don't go a snackin' on them, MK?
Elderberries are not to be eaten raw as they are toxic in that form.
Actually it isn't the berries themselves that are toxic — the seeds, stems, leaves, and roots of the plant are toxic, and of course, the berries have seeds in them.
I knew about this, but found out just how bad it could be.
Those parts of the plant contain a cyanide-inducing glycoside. Eating a sufficient quantity of these cyanide-inducing glycosides can cause a toxic buildup of cyanide in the body and make you quite ill. Symptoms include nausea, vomiting, diarrhea, and even coma. Most people recover quickly, although hospitalization may be required. The fruit of the elderberry is a tiny berry, about 1/8 to ¼ inch in diameter, and about 50% of the berry is seed. Cooking the berries destroys the glycosides present in the seeds, making the berries with their seeds safe to eat. As such, the fruit of the Black Elderberry should always be cooked before consumption. Interestingly, research indicates that exposing elderberry to heat actually concentrates the polyphenols and anthocyanin’s.
See, I had dried elderberries around for the purpose of making Homemade Elderberry Syrup and one day was craving berries. I figured that the elderberries had most likely been dried at a high enough temperature so as not to be raw, and I sat and snacked on some.
And some more.
Bad idea.
I ended up awake almost all night with, let's just say, serious digestive upset. Upset to the nth degree.
The moral of this story is that friends don't let friends snack on dried elderberries.
Ever.
This post may contain affiliate links from which I will earn a commission.
Don't Feel Like Making Homemade Elderberry Syrup?
This recipe is super simple, but if you really are in need of the syrup and don't have time to make it, then you can buy quality Elderberry Syrup as well.
This brand has an organic version, but it isn't low-carb.
Following is the recipe for Homemade Elderberry Syrup that I used. I make mine low carb but the honey-sweetened version adds extra health benefits.
Note: If you are on the Trim Health Mama (THM) plan, you can use the honey if you like as the recommendation is that using honey for medicinal purposes is fine.
Have you had Elderberry Syrup before?
Original article and pictures take wholenewmom-wu160izso06zk4amiyc.stackpathdns.com site
I couldn’t very well make homemade pita bread last week without making Chicken Salad, now could I?
Matt happened to be out of town for two days last week on a soccer trip. The poor guy. All I talked about when he came home was how good the new pita bread recipe ended up and how I’d made chicken salad to go in it and served it all with fresh tomatoes from our garden. And how all four boys scarfed it up and came back for more.
And then I had to tell him that all of it was gone – that we’d saved none at all for him.
Yeah. Welcome home, Dad. ;)
Not to worry. I’ll make him more soon. Have you tried the Whole Wheat Pita Bread recipe yet?
2 cups cooked, shredded chicken
½ cup mayonnaise (I use Hain Safflower)
2 Tablespoons pickle relish (I use either homemade pickle relish or an organic variety from Amazon or Vitacost)
2 hard boiled eggs, chopped (optional)
Mix all ingredients together and serve on crackers, on bread, or in pita pockets.
Shucks, get out a fork and eat it plain if you want. It’s good stuff. :)
Recipes and links you might need for your Chicken Salad:
I’m not a fan of hard boiled eggs in my meat salads. You? And you know, if you all leave a comment answering that question, this will make for one of the most exciting blog conversations – ever. :)
You can also use this recipe to make Turkey Salad with turkey leftovers after a holiday meal. This is one of my favorite ways to use up chicken or turkey leftovers! Chicken or turkey salad makes a wonderful convenience food!
Original article and pictures take heavenlyhomemakers.com site
Easy Healthy Recipe – Clean Eating Apple Avocado Salad
Thanks again for visiting Clean Eating Recipes Blog!
Today’s recipe was easy, healthy and delicious. It has the sweet crunch of apples, wholesomeness of avocado, and fresh taste of spring greens. It took less than five minutes to whip up, and made a fantastic clean eating dinner.
It’s also a versatile salad, because you can add more ingredients to it. Whatever your heart desires.
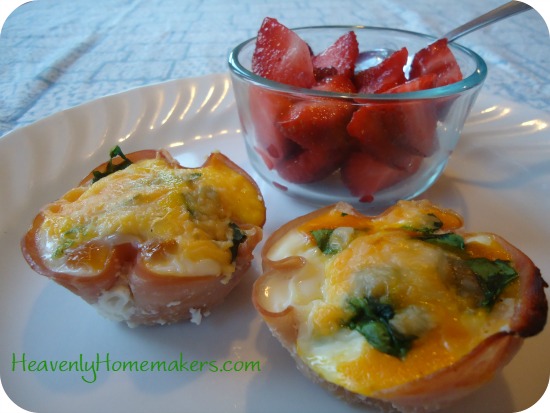
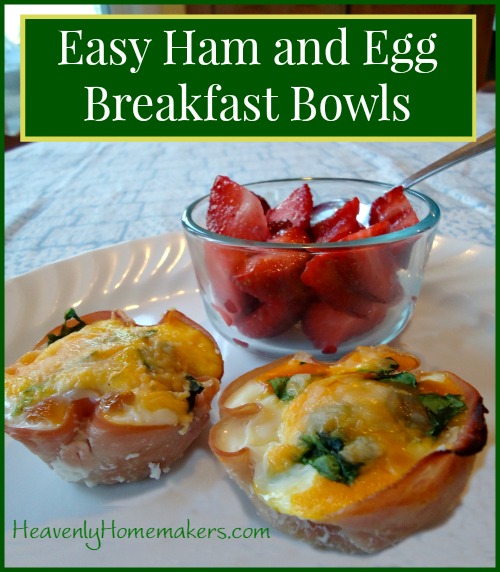
Easy Ham and Egg Breakfast Bowls – a Quick and Filling Breakfast To-Go!
Oh man (lady – whatever). You are going to love this idea! Unless you don’t like eggs. But for those of you who love eggs, and for everyone who wants an easy, real food meal that will pack a punch with nutrition and keep you full until the next meal…
Please allow me to introduce you to these delightful little Ham and Egg Breakfast Bowls:
See that? The ham is the bowl. Isn’t that clever? I didn’t think of this myself, but was enlightened by my friend who was excited to tell me about her fun breakfast of the day. She knew I’d need to know about this idea. She knows me (and my hungry crew) well, don’t you think?
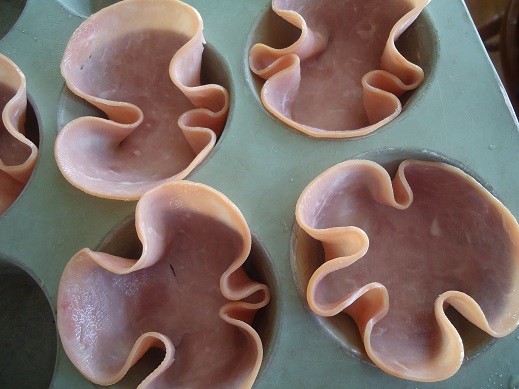
Everyone get out your muffin tins and get ready to have some fun.
You will need:
Muffin Tins
Thin Slices of Ham
Eggs
Shredded Cheese
Sea Salt
Garnish like Fresh Spinach, Green Chilies, Mushrooms, Peppers, Onion, Broccoli, or Salsa
Push a piece of thinly sliced ham down into each muffin cup.
Crack an egg into each “ham bowl.” Poke each egg yolk with a fork and carefully scrambled it around inside the bowl. Sprinkle with salt, top with cheese, and garnish however you like. Bake in a 350° oven for 10-20 minutes or until the eggs are cooked through.
You can make these ahead of time, then rewarm them for a quick, ready-made breakfast or lunch! (That’s my favorite part, of course.)
You can also scrambled up your eggs in a dish, and then scoop some out into each ham bowl if you prefer. My kids like the texture of these better if I do it that way.
Push a piece of thinly sliced ham down into each muffin cup.
Crack an egg into each "ham bowl."
Poke each egg yolk with a fork and carefully scrambled it around inside the bowl.
Sprinkle with salt, top with cheese, and garnish however you like.
Bake in a 350° oven for 10-20 minutes or until the eggs are cooked through.
Is this idea genius, or what? You must try this! :)
Original article and pictures take heavenlyhomemakers.com site
Easy Grab-and-GO Snacks Find some easy grab-and-go snacks that are perfect for a busy schedule!
We all know the feeling…you have have exactly 14.5 minutes from the time they get off the bus until you need to be in the car on your way to practice or a game. It’s only about 30 seconds before they walk in the door you start to even think about what your evening will entail and a little bit of panic sets in. YOU ARE NOT ALONE (at least I hope I’M not alone)!!
Kids need to eat small meals often. And almost all kids are hungry the second they get home from school, so we need to be prepared with some quick and easy grab-and-go snacks.
One way I try to make it easier on everyone, is to keep a designated basket of snacks in the pantry and a drawer in the refrigerator. This consists of things that my kids know they can have without asking and that they can prepare themselves. Most of the items are already prepackaged and are easy to grab and take with us. Plastic utensils are also great to keep handy.
Since “snacking” happens often around here, I like to TRY and buy things that are healthier. Here are some of the things you will find in our snack basket and refrigerator.
Craisins
dried fruit
apple sauce
fruit cups
nuts
granola and granola bars
sausage sticks (OK, not the healthiest but my kids love them!)
crackers
carrots
apples
clementines
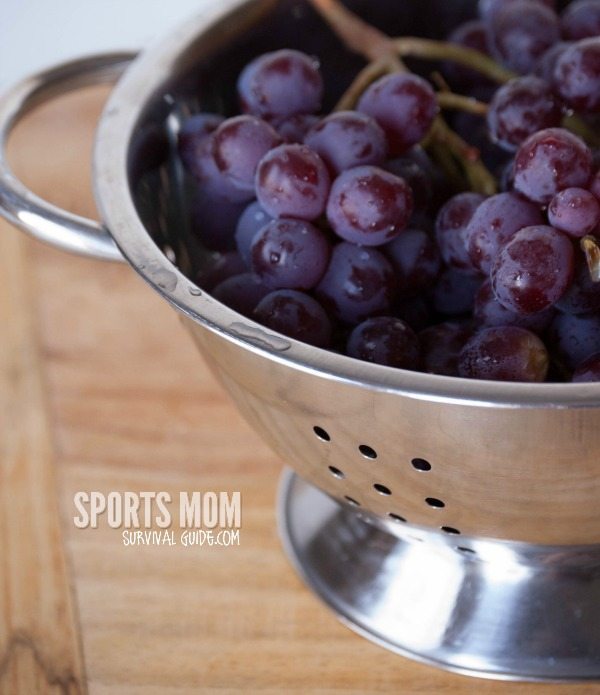
grapes
cheese
I find it helpful to wash any fruits and vegetables that need to be cleaned right when I get home from the store.
For things like grapes, I pull them apart and put them in a freezer bag so my girls can easily grab a handful.
One of our favorite snacks is Greek yogurt mixed with crushed pineapple. I usually buy a large container of yogurt and a can of crushed pineapples for a large batch that’s ready to eat. It goes fast in our house!
I top it with granola and it’s delicious!!
If we need to take it with us, I put the yogurt and granola in two separate containers and combine them when we are ready to eat.
If you missed my post about containers, be sure to check it out!
What snacks do you keep on hand?
Original article and pictures take www.sportsmomsurvivalguide.com site