пятница, 31 января 2014 г.

How to Start Solids with baby on the GAPS Diet {and what we do in our family}

How to Start Solids with baby on the GAPS Diet {and what we do in our family}
GAPS Diet - when to start solids and what to start

Starting babies on solids is something all mothers think about, some wonder when the soonest they can introduce a baby to solids is, others want to put it off as long as possible. Every family needs to choose a method that works for them; it’s my belief that not only are all babies different, but all families are different as well. Here’s what we did, as well as what Sally Fallon of Nourishing Traditions advises and Dr Natasha Campbell McBride of Gut and Psychology Syndrome.


I was super relaxed about feeding solids to my kids. With my two older children, I waited until they met the ‘baby led weaning’ (could sit up unassisted, were at least 6 months old, had at least one tooth) and then offered some whole single-ingredient foods to them.


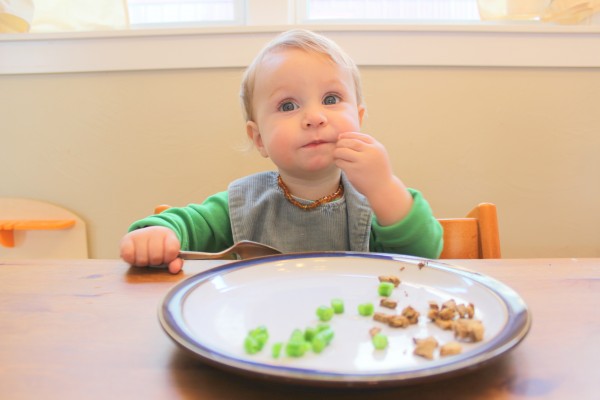
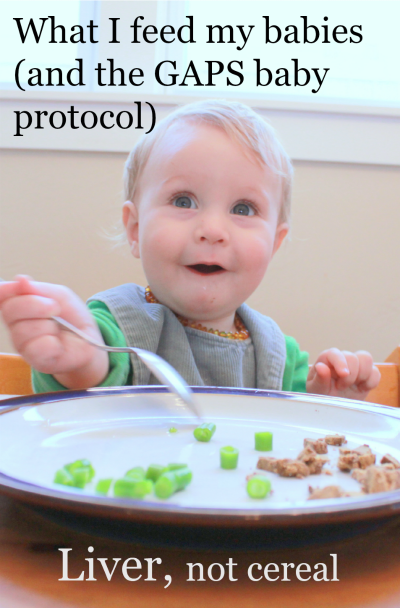
My third child showed a huge interest in solids early, and he was on the small side so I started chicken liver (cooked and salted) with him at 5 months, which he still loves now at 12 months.


When introducing first foods, I offered a bite off my plate, as baby usually sat with me at meal time anyway. As they


Both of my older children had no interest in swallowing solids until about a year. I would offer a couple times a week (it’s messy! I’m lazy and don’t want to clean mashed squash from the ears of a baby who isn’t actually eating anything!) and see when they started swallowing food.


We avoid grains for the babies, and for our whole family really as much as possible as other foods are much more nutrient-dense. My second child started solids just as we were starting GAPS (his first birthday ‘cake’ was whipped butternut squash with some salt and a candle!) so he was primarily grain free until he was a preschooler and we went off the GAPS diet.


I breastfed my babies on demand; my daughter nursed all.the.time. and my son often went 4-5 hours between feedings from birth. My children were totally different sizes; my first being about 6.5 lbs at birth, and my second 11 lbs (yes, 11), and then my third was a nice easy 8.5 pounds. Different babies are different, that’s why it’s so important to research things like feeding, but then watch your individual baby and do what is working for them. On my children’s totally different feeding schedules they both grew, and both were happy, so it worked.


Once solids were introduced, I watched for reactions and then pretty much just fed my young toddlers table food. Nursing continues in our family until at least 2 years, but after a year I start nursing less on demand and scheduling breastfeeding sessions more.


.


Some things that worked for me:


  • Don’t stress if they don’t eat, they will eventually (I questioned this a lot around 11-12 months with my daughter!)
  • If your baby is still hungry and is breastfed, look up block feeding to encourage them to get the fatty hind milk out
  • Salt their food! Use real salt to taste. Babies need salt.
  • Hold off on sweet foods like cooked fruit until baby is eating proteins and veggies.
  • Smile, nod, and do what you were previously doing when given well meaning advice about feeding your child.
  • Watch your baby like a hawk when you think someone might slip them some unauthorized food. Don’t be afraid of offending them, nobody needs to be giving your infant a lick of a lolly pop or bite of ice cream and it’s your job as a parent to protect them.
  • Don’t stress if your baby is ready for solids early, some babies are. Trust their bodies. Introducing solids as late as possible isn’t the goal any more than introducing them as early as possible.
  • Introduce fish, cod liver oil, egg yolks, and liver early, most babies like these.
  • Tea tree oil topically relieved mastitis for me.
  • Fenugreek tea boosted my supply, but I also think it made my milk more sugary, make sure baby is getting enough hind milk.

Starting babies on nutrient dense foods - not cereal

babys first foods the empowered mothers guide

Original article and pictures take healthhomeandhappiness.com site

вторник, 28 января 2014 г.

How to Start a Successful Backyard Compost

How to Start a Successful Backyard Compost
compost

Coffee filters, egg shells, banana peels, cardboard! Dryer lint, apple cores, dog hair, tea bags!

Grimy bits and peels and scraps…


Garbage, right? Nope! Not at all! These grubby morsels are actually food for food!


Much of the waste found in the home, particularly in the kitchen, holds a wealth of nourishment for our gardens and, in turn, our families! It’s likely that 50% (or more!) of your household ‘garbage’ can be redirected towards a much more nourishing and fruitful end.


Less waste and more food? Yes please!


With the gardening season sprouting over the horizon, now is the time to begin thinking of a composting system that will work for your family.


First, a bit of a disclaimer: There is a wealth of information, ideas, and opinions on composting. Soak it up! Read and research and experiment and discover what works for your household. Until then, use this post as a summary and starting point as you dig into your own home ecosystem.


1. The Basics


A balanced and thriving compost system is much more than a pile of rotting produce. Instead, it’s a living micro-system filled with teeny living organisms, busily breaking down all that ‘garbage’ into easily accessible minerals and nutrients for your plants to take back up and prepare for your food use.


A well-composted garden is going to grow more vigorously while producing food with much higher levels of nutrients for your family.


2. The Key Ingredients


Dry and wet matter (green/brown organic waste)

Oxygen (cuz the little microbes need to breathe, otherwise things get stinky)

Moisture (from water you add as well as natural humidity of the material)

Heat (from the sun as well as the energy of the decomposition)

Space (in the home and yard)


3. The Inside Setup


First, choose an interior container and location. Much of your composting material originates in the home. Choose a location near your main food prep’ area to encourage regular use.


In our home, we have a simple bucket with a lid. It’s kept under the kitchen sink, next to the trash can. Some families with a smaller volume of organic waste keep their container on the counter. Old clay crocks or pots are often an aesthetically pleasing option. Be sure that your container can be easily transported to your exterior site and rinsed out to avoid odours.


What do you put into it?


All plant and simple-paper waste, including: vegetable/fruit peels, eggs shells, coffee grounds/filters, hair, lint, newspaper, and on and on and…


What should you NOT put into it?


Meat and fat (fish bones/innards are alright!)


4. The Outside Setup


First, choose an exterior dumping/decomposing site. The primary work of composting occurs outside of your home when the microorganisms present in your local ecosystem interact with (ie. eating and breaking down) the products you provide.


While there are several models of composters you can purchase, save the cash and use something around your yard! Your home composting systems (HCS) is as simple as tying four old wooden pallets together, or making a circular ‘cage’ out of large mesh wire, or adding some vents to an old garbage can, or even just designating a certain corner of the garden.


Points to remember when choosing your exterior site:


  • Ease of access. Keep it convenient enough to use; even during inclement weather or busy days when you might feel it’s easier to just ‘trash’ it.
  • Also, be sure you can get to it with a wheelbarrow if you want to add a load of grass or leaves, or if you’re ready to shovel it out for garden application.
  • Give it some sunshine and air. While that damp spot behind the garage might be out of sight, it’s not going to give you as much zesty decomposition.

This is the site of your chosen bin. Set it up and you’re ready!


5. How to Build Your Pile


You have your indoor bucket, your outdoor zone/bin, now begin!


First, layer it!


The simplest approach is to start off with layers of dry and wet {ie. green and brown}. Find as many bags of dry materials (dry leaves, straw, newspaper, brown grass, small branches) and as many bags of green materials (green grass, manure, peels, your indoor bucket contents) and layer them in with each layer about 4 inches deep, soaking each layer with water before adding the next one.


{Note: Nature is far more forgiving then we give her credit for, so work with what you have and retain the principle: green and brown make composting go ‘round!


And don’t be scared to ask the neighbors for their old leaves or grass—they’ll be surprisingly thankful! Just avoid materials which have had chemicals applied as they could harm the living system of decomposition}.


A Tip: One of the best kick-off meals you can give your compost pile (exterior) is a good dose of Nitrogen, Phosphorous, Potassium (NPK).


While there are some great commercial brands out there, mixing some good ol’ blackstrap molasses into a liter of warm water and pouring it deep into the center of your pile works great! For those who are a bit more adventuresome in their composting, human urine (particularly of males) provides the perfect ratio of NPK…just don’t tell the neighbours!


6. How to Maintain Your Pile


Finally, maintain.


As your indoor bucket fills, dump it on until it looks like a layer, then add some dry materials. If the season is particularly dry, add some water on occasion.


creating our home composting systems

Once a week (give or take), use a garden fork to do some lifting or turning to add some air for those busy microbes. Depending on the amount of materials, the weather, and the health of your local microbes, you could have beautifully balanced compost within eight weeks!


Note: Depending on space, begin a second pile once the first is about four feet square. By the time the second pile is filled, the first will be ready to apply to your garden!


***


So there you have it: a summary and start for you own personal composting adventure!


Try it out and see what happens! In the end, you’ll have less waste, a richer garden, and greater bounty on the table (not to mention some great science lessons for the kids!)


Do you have a backyard compost at your house?


Dea’ Daniels is a mom, wife, student, freelancer, and Seeker way out in Three Hills Alberta. Her days are filled with the color and energy of her three wildling boys, her pre-midwifery studies, and her paramedic husband. Dea’ writes weekly Life reflections at wholedei.com, as well as sharing research and information on natural living at speronaturals.wordpress.com.


Original article and pictures take redandhoney.com site

понедельник, 27 января 2014 г.

How to Serve Festive Holiday Food Without Food Coloring

How to Serve Festive Holiday Food Without Food Coloring

I have all kinds of ideas for serving festive holiday food without food coloring, and it’s likely much simpler than you think!


no food dye2

I’m not opposed to someone going out of their way to make real food dye with natural colors that won’t turn our insides purple and our teeth blue. I just don’t personally have the time to do that during this season in my life. There are actually fun options for purchasing natural food coloring, the ingredients of which are made with vegetables. They are pricey, but worth it if you enjoy frosting your Christmas cookies different colors. Check them out here!


But if you want to have fun with food and avoid the trouble and expense of natural food dye, here are some great ways to serve festive food without any food dye at all!


How to serve festive holiday food without food coloring


1. Use real food with real, natural color


It’s too simple, right? If you want something red on your holiday treat, use red food (pomegranates, strawberries, raspberries).


no food dye5

Add a little bit of 100% juice to Cream Cheese Frosting to naturally and easily turn your frosting into pretty colors. Garnish with fresh fruit if you can find some in season!


no food dye12

2. Serve your holiday food on pretty, festive dishes or on a pretty holiday table cloth


It doesn’t even matter if the plates are made of paper and the tablecloth is made of plastic. These items make serving holiday food so much fun! Or save up and add a few real holiday dishes to your collection each year when they go on sale after the holiday.


no food dye11

3. Use ribbon


It’s amazing how a bit of fabric or colored ribbon will change the look of a food gift!


Sweet gingerbread cookies on the wooden background,selective focus

4. Use cookie cutters


Don’t just limit your use of cookie cutters to cookies! Use small festive cookie cutters for your pie crust too. Here’s our favorite Whole Wheat Pie Crust recipe.


no food dye4

5. Use special holiday muffin and cupcake liners and toppers


It is ridiculous how much fun these are! Cupcake and muffin liners are such a simple way to dress up holiday treats. I watch for them to go on sale after a holiday and I stock up for the next year. (Here are 23 Muffin Recipes, by the way.)


no food dye10

We had a little bit of fun with this idea and made some printable Muffin and Cupcake Toppers for you. Print them in color to cut and use, OR print them in black and white and let your kids color them before you cut them and put them together!


Get this fun, FREE Muffin and Cupcake Topper Printable when you join our Learning Zone. Membership is entirely free and will give you access to this and many more printable family learning resources!


Christmas Muffin and Cupcake Topper Printable

6. Decorate with candy canes


Fine. These have food coloring. But you can buy plastic ones OR you can buy the actual candy canes and use them entirely for decoration. We use them to brighten our table and living room, but we hardly ever actually eat them. They are a perfect way to make your holiday table more festive!


White and red peppermint candy canes in bucket on white background.

7. Serve festive drinks in special mugs and teacups


Somehow they just taste better this way. :) Here’s a link to share 7 holiday drinks that include all real food ingredients. But even my good ol’ Javita coffee tastes better in a holiday mug!


Cup of hot cocoa and heart shape cookies on wooden background

What fun ways do you serve festive food without using food coloring?


How to Serve Festive Holiday Food Without Food Coloring

Some of these links are affiliate links.


Original article and pictures take heavenlyhomemakers.com site

вторник, 21 января 2014 г.

How to Select the Perfect Essential Oil Diffuser

How to Select the Perfect Essential Oil Diffuser

Since the day I started using essential oils, diffusing has been my favorite way to use them.


I don’t want you to miss out on diffusing, so I’ve put together these tips for how to select the perfect essential oil diffuser by knowing what you need and how you want to use it.


Why use a diffuser?


I diffuse in my kitchen to get me going in the morning.


I diffuse in my office to calm me.


I diffuse next to my desk to motivate myself.


AND I diffuse every night to help me fall asleep.


If you are not familiar with essential oils or aromatherapy, this might sound like a foreign language to you.


Here’s some basic information on diffusing therapeutic grade essential oils and a short guide to help you select the perfect essential oil diffuser.


One of the reasons I love diffusing is how simple it is.


  1. You buy a diffuser designed for essential oils
  2. Add water (in most cases)
  3. Add 2-6 drops of essential oils

You can mix and match and find blends for all types of situations. Everyone loves to have options to make their room/office/classroom smell good. This provides natural, non-toxic, and therapeutic benefits! It’s a win-win all the way around.


Do you love to diffuse? Just getting started? Here are some great tips to help you get started and even to find the perfect essential oil diffuser for your needs.
Can diffusing actually impact your mood, your physical state, or your body functions?

Definitely!


Research has shown when you sit near a diffuser, 70% of the essential oil gets into your bloodstream. That is a huge impact!


If you still are not sure, spend a minute and imagine the smell of:


  • Home baked cookies.
  • Your grandmother’s perfume.
  • The scent of an orange orchard.

Do any of those things impact your mood?


Our olfactory nerves are highly linked to our emotional centers and so smell can be powerful. Also, the frequencies and resonances of the essential oils molecule can change our body.


Diffusing is an amazing way to get started using essential oils in your home, and there are endless applications.


Which diffuser is right for you?


There are lots of different types/brands of diffusers out there with many different features. Here are a few points to consider.


Types of diffusers:


Ultrasonic diffusers use water to disperse the oils in a fine mist.


  • Pros: lighter concentration can be less irritating, uses less oil, and quieter.
  • Cons: might not cover large spaces and needs regular cleaning.

Nebulizing diffusers are considered the most powerful, because they do not use water. The atomizer pulls the oil directly from the bottle.


  • Pros: strong concentration and covers large areas.
  • Cons: expensive, noisy, and uses oil more quickly.

Heat diffusers are similar to wax heaters but designed for essential oils.


  • Pros: economical and quiet.
  • Cons: oils evaporate quickly, heat can break down therapeutic qualities, and there is more opportunity for accidents.

Evaporative diffusers have a fan that blows air over a cotton pad infused with the oils.


  • Pros: simple, inexpensive, and good for travel.
  • Cons: does not distribute oils evenly, pads need changing regularly, and does not deliver as much therapeutic benefit.

Do you love to diffuse? Just getting started? Here are some great tips to help you get started and even to find the perfect essential oil diffuser for your needs.
How long do you want the diffuser to run?

Most of the ultrasonic and nebulizing diffusers have timers to run from 1 to 16 hours. Some run constantly and then shut off. Others have an intermittent option.


What space do you need it to cover?


Have a very large room? Consider a larger diffuser or use two in different corners.


What’s your budget?


Price can vary widely based on brand and features. I recommend reading reviews before purchasing a diffuser, as I have had to replace many.


Take a Chill Diffuser Blend - Keeper of the Home

If you would like to know more about the diffusers I use in my home (and in every room of my home), email me! I have three different diffusers I really like and a few others I tried that did not work so well for me.


If you would like more information, including a list of diffuser recipes, please contact me by email or on Facebook. (We also include a new essential oil recipe in each Keeper of the Home weekly newsletter, so make sure you’re subscribed!) I love to help others find their perfect mix and also learn from others by hearing about your experiences!


Do you use an essential oil diffuser? What’s your favorite way to use it?


Original article and pictures take keeperofthehome.org site

четверг, 16 января 2014 г.

How To Save Money on Real Maple Syrup

How To Save Money on Real Maple Syrup
How to save money on real maple syrup ~The Homesteading Hippy #homesteadhippy #fromthefarm #frugallife #maplesyrup

REAL maple syrup isn’t cheap. To the tune of $41 a gallon not cheap.


We are fortunate enough that we are able to buy it directly from a maple supplier as well, but it’s still a strain on the budget to waste. But, I would rather spend a bit more money on the real stuff, and then ration it out than to spend $3 on a bottle of high-fructose corn syrup with some odd additives to put on pancakes.


Here’s a couple of ways we make our real maple syrup stretch a bit further. One, we melt equal amounts of butter and add it to the syrup when putting it on pancakes. Two birds with one stone, as I no longer have to butter my youngest’s pancakes for him. This also makes it nearly double the volume and we wind up using less when there is butter added. I would also like to try this with coconut oil to get a different flavor profile in the syrup. The only thing is that real maple syrup should be refrigerated, and the added butter or oil makes it rock hard. When that happens, I just stick it in a pot of warm water while the pancakes or waffles are cooking. This also makes it pleasantly warm when eating.


Another way to save money on maple syrup is to portion it out for each child. Each one gets 1/4 cup of the butter/syrup mixture in their own little cup to pour what they would like on their pancakes. They can pour as much or as little as they want. This has helped us reduce portions, as well as waste. For some reason, when the huge bottle is out, they pour a ton of syrup everywhere but don’t want it all. With just a little bit at a time, they are much more careful with it. I have found that hubby and I don’t use nearly as much, either, and are just as satisfied.


Easy to do, and much easier for the kids to use with less waste makes for a win-win-win!


stocks and broth newsletter

Original article and pictures take thehomesteadinghippy.com site

вторник, 14 января 2014 г.

How to Reverse Periodontal Disease Naturally without Surgery

How to Reverse Periodontal Disease Naturally without Surgery

After being diagnosed with periodontal disease – and trying to avoid surgery – one mom has found it’s possible to reverse periodontal disease naturally.


After being diagnosed with periodontal disease - and trying to avoid surgery - I found it's possible to reverse periodontal disease naturally.

Guest post by Erin Josefchak


Millions of North Americans are affected by periodontal (gum) disease. Periodontal diseases range from simple gum inflammation to a more a serious disease that results in major damage to gums and the bones that support teeth.


About Gum Disease


Our mouths are full of bacteria. These bacteria form “plaque” on our teeth. Plaque that is not removed can harden and form “tartar that brushing can’t always get rid of.


The longer plaque and tartar are on teeth, the more harmful they become. With time, this bacteria buildup causes inflammation, called “gingivitis,” which causes gums to become red, swollen, and can bleed easily. Gingivitis is a mild form of gum disease that can usually be reversed.


When gingivitis is not treated, it can advance to “periodontitis” where gums pull away from the teeth and form spaces (called “pockets”) that become infected. Our immune system fights the bacteria as the plaque spreads and grows below the gum line and starts to break down the bone and connective tissue that hold teeth in place. Not cool.


To make matters worse, if you are pregnant or nursing you are more susceptible to gum disease! As if you didn’t already have enough to think and worry about! Due to hormonal changes, 40 percent of women will develop gingivitis sometime during their pregnancy, a condition called pregnancy gingivitis (source).


Some studies have shown that there is a relationship between periodontitis and pregnancy complications like preterm delivery, low birth weight, etc. (study, study), and even cardiovascular disease and diabetes (study, source).


After being diagnosed with periodontal disease - and trying to avoid surgery - one mom has found it's possible to reverse periodontal disease naturally.


My Story


I have always had dental issues. When I was a teenager, I wore braces top and bottom for four years, complete with metal headgear (good times!). I had teeth growing in my palate that had to be removed, teeth that had to be turned 90 degrees, the works. Today, I still have permanent braces behind my bottom front teeth and two impacted wisdom teeth that I still have not removed because the roots are wrapped around a major nerve. Yes, wow! Honestly, I thought my problems were behind me in my twenties.


Then I got pregnant. Followed by nursing for a year. Then I got pregnant a few weeks after I stopped nursing baby #1. Followed by nursing for another year. Four years of raging hormones!


Sometime during that period my gums started bleeding. Then it got worse. I went to see my dentist and was told that it was normal because I was pregnant and it would go away once I gave birth. Well, it didn’t get much better after I gave birth – in fact, from then on it only got worse.


Fast forward to a few years later, my gums were still inflamed and bleeding. I was nursing baby #2 and I had a new dentist since we had recently moved. That is when I was diagnosed with early periodontal disease!


They referred me to a periodontal specialist and said I would need grafting. Gum grafting basically involves removing healthy tissue from elsewhere in your mouth (usually the palate) to repair the diseased gums.


After being diagnosed with periodontal disease - and trying to avoid surgery - one mom has found it's possible to reverse periodontal disease naturally.


Alternative Methods to Treating Periodontitis


I made an appointment with the specialist but did my own research into costs and alternative methods. A friend who had already had grafting done confirmed the estimate of my dentist – $5,000 to $8,000! I have dental insurance but STILL…!


So what did I decide?


I decided to opt out of traditional gum grafting and take my chances with alternative methods. First, my dentist performed a deep cleaning procedure called “scaling and root planning (SRP)” which involves pulling the gums slightly away from the tooth to remove plaque and tartar below the gum line. A few months later after my gums healed from the SRP, I started laser periodontal therapy (great information video here) which involves removing the diseased gum tissue (up to 1mm) using a fiber optic laser. I had four treatments in all.


A few months after I finished the final treatment, my dentist measured the gum pockets again and there was significant improvement! Pockets that were 5mm or 6mm before were now measured 3mm or 4mm. The treatment had worked and damage was reversed – no more bleeding and inflamed gums! In fact, studies show that in 80% of cases, pocket depth can be restored to 3mm using this method (source).


The best part is that the total cost was a lot less than I expected to pay, compared to traditional methods. Total cost of my treatments was about $1000 vs $5000-$8000 (before insurance refund)! Happy dance!


Prevention


At home I continue with my regular oral hygiene routine. Even after strong suggestion from my dentist, I continue to use non fluoridated toothpaste for myself and my family. This was a personal choice, but it may not be the right choice for your family. Here is why we cut out the fluoride (article).


In addition to flossing, I also use interdental brushes to brush in between each tooth near the gum line. Studies prove that interdental brushes remove more plaque compared to flossing and brushing alone (study). And, of course, tea tree oil has been proven to prevent plaque and gingivitis (study). I add one drop of Tea Tree oil to the bristles before each use.


I also added a homemade mouthwash to my routine. (See recipe below.) It contains xylitol, honey, baking soda, and essential oils. All are excellent natural ingredients for our teeth! Studies show that xylitol, a sugar alcohol derived from birch, prevents cavities (study). The toothpaste we buy also contains xylitol. We love xylitol so much that we also use it as a sugar replacement at home (coffee sweetener, baking, etc.).


Another study showed that honey can also be used to prevent cavities (study). And yet another study showed that mouthwashes containing essential oils (particularly tea tree, clove and basil) showed effectiveness against plaque and gingivitis (study). Baking soda has also proved effective as a tooth whitener (study) and prevents enamel erosion (study).


Two years later, I am still using these preventative methods and no gingivitis in sight!


After being diagnosed with periodontal disease - and trying to avoid surgery - one mom has found it's possible to reverse periodontal disease naturally.

Print

Homemade Mouthwash Recipe

  • 1 cup hot filtered water

After being diagnosed with periodontal disease - and trying to avoid surgery - one mom has found it's possible to reverse periodontal disease naturally.


What are your natural remedies to prevent gum disease?


Disclaimer: I am not a doctor, dentist, nurse, or licensed healthcare practitioner. Information obtained from this website is for educational purposes only and has not been evaluated by any health agency (FDA or Health Canada). Products and information are not intended to diagnose, treat, cure, or prevent any disease. Consult your physician before making any health decisions for you and your family. Thank you!


Erin Josefchak
Erin Josefchak is a wife to Marc, mommy to Tyler & Sierra, saved by Jesus Christ, amateur writer, and aspiring herbalist living in rural Quebec, Canada. She is committed to leading a faith-filled, frugal, and chemical-free life.

Erin’s passion is discovering the healing powers of God’s amazing creations – plants! She wants to bring glory to God and bless others with her knowledge of plants to increase their faith, improve their quality of life, and help them heal naturally with plants and prayer. She loves reading the Word, doing research, coffee, writing, baking, and making memories with her family!


Original article and pictures take thehumbledhomemaker.com site

пятница, 10 января 2014 г.

How to Remove a Mole with Apple Cider Vinegar

How to Remove a Mole with Apple Cider Vinegar
Apple cider vinegar mole removal tutorial with pictures and follow-up photos. A safe method without side effects and reviews showing it works with no scars! :: DontWastethCrumbs.com

(Updated 5/18/2017)


This is our personal story of how we removed a mole. We are not medical professionals, nor should this post be construed as medical advice.


Mrs. Crumbs and I have come to really like using apple cider vinegar (ACV) for a variety of reasons, including a daily detox drink and as a homemade produce wash. We even figured out how to make our own homemade apple cider vinegar!


We’re all about using homemade remedies whenever possible. We’ve healed spider bites using a potato, healed acne with bentonite clay, created flea and tick dog collars with essential oils, made our own homemade bug repellents and even figured out how to heal gum disease naturally.


Today, we’re documenting an apple cider vinegar mole removal tutorial.


THE MOLE (before)


Did you know you can remove moles with apple cider vinegar? Learn how we did it in this photo tutorial!

If you can’t tell by the look on my face, I’m not exactly thrilled to have these “epic” photos on the internet. But it is important to display the magnitude of how large this mole grew over the years. I’m also willing to suffer for the greater good of everyone else removing moles with apple cider vinegar at home.


For as long as I can remember, this mole started out as a tiny speck near my ear. Obviously it has grown substantially over my 30+ years on earth.


This mole constantly got in the way of haircuts and would ALWAYS get nicked by clippers. It also caused my hair to grow sideways – yes, parallel with the ground (which was very annoying). Just a few days after a haircut, there would be 3 or 4 hairs sticking far out of my head because of this mole!


To make matters worse, every year I went to the doctor for a physical, the doctor would always say “let me remove that for you” or “let me zap it!” No, thank you. It wasn’t changing color and having it frozen off my head didn’t sound fun.


“No,” I replied. “It’s not hurting anything.”


Wanting the doctor to leave “the mole” alone, I set out to find a more natural or holistic way to remove this guy. “How to remove moles naturally” led to all sorts of Google generated responses, from expensive topical creams to using alcohol. Apple cider vinegar mole removal is a pretty common one too.


Plus we had some high quality apple cider vinegar in the kitchen cabinet. It seemed to be the least painful method, so Mrs. Crumbs and I thought it was worth a shot.


A Quick Side Note on the Quality of Apple Cider Vinegar…


When it comes to natural remedies, it’s good practice to use the highest quality ingredients you can find, and afford. As the level of processing goes up, the benefits of ingredients goes down. So ideally, you want your ingredients to be raw and unprocessed whenever possible.


Adding factors like non-GMO and organic are good, but they’re not necessary and they make the price tag go up.


For this apple cider vinegar mole removal, it means using vinegar that is raw AND contains the mother. It’s available locally in most areas, but I’ve found the best prices online. As of this posting:


Various sites returned different protocols and instructions on how to implement the apple cider vinegar method. Not wanting a band aid on my head at work, we decided that the apple cider vinegar mole removal process could be done at night while sleeping.


Apple Cider Vinegar Mole Removal Tutorial


How to Remove Moles with Apple Cider Vinegar: Supplies


How to Remove Moles with Apple Cider Vinegar: Method


  1. Dip half a cotton ball in apple cider vinegar, saturating yet squeezing out excess.
  2. Apply the cotton ball on top of mole.
  3. Use a band-aid to secure cotton ball over mole.
  4. Leave the secured cotton ball on the mole for up to 8 consecutive hours each day.
  5. Continue steps 1 though 4 until mole scabs up and falls off.

Note: Although weak, apple cider vinegar is acidic and it may cause skin sensitivity. Using apple cider vinegar to remove a mole also creates a “wound” on your skin, just like a scrape or a cut. Treat it like a wound, keep it clean and use your best judgement as it continues to heal.


Doesn’t that sound better than having a doctor freeze it off? Mrs. Crumbs would apply the saturated cotton ball right before bed time and would remove it in the morning before going to work the next day. The first morning the mole looked “white.”


Day 2 of Apple Cider Vinegar Treatment


Remove moles in less than a week with this simple tip! Ugly moles will go away and stay away!

The mole turned darker again during the day, but by day 3 it started scabbing up and “crusting over.”


Day 3 of Apple Cider Vinegar Treatment


Moles in the wrong spot can be uncomfortable and unattractive. Remove those pesky moles with this simple apple cider vinegar trick!

Day 4 of Apple Cider Vinegar Treatment


Need to remove moles? Try this DIY natural solution at home. Apple cider vinegar for the win!

After day 4, we decided not to apply any more ACV to the area. We weren’t really sure what was going on, but it appeared to be working.


Additionally, the area around the mole became a little red from the vinegar because it’s acidic.


One Month After Treatment


You can remove moles at home in less than a week with this easy tip. Follow my photo tutorial and see how you can get rid of moles for good!

This method was painless. Maybe a little irritation from ripping the band-aid off of my scalp, or from the apple cider vinegar on the skin, but it was easy and I would definitely do it again.


Note: Although I did not experience any skin sensitivity to the ACV, some readers who tried this felt some burning and skin irritation. Using Aloe Vera or Coconut Oil around the mole before or after application of the ACV may help. If you experience pain that seems out of the ordinary quit treatment immediately and let your skin heal.


Here are a couple of shots of what the area looks like now six months later (with my hair shaved extra short so you can get a good look):


Don't want to go to the doctor just to remove an ugly mole? Get rid of it yourself with this single ingredient from your kitchen!

And that’s it!


UPDATE: Here’s another couple of shots, now 8-9 months later.


Remove moles for good with Apple Cider Vinegar. This easy DIY will take care of any pesky moles.

No more unsightly moles! Remove moles with this simple treatment at home.

A funny side note: when I mentioned to a family member that we were going to attempt to remove moles ourselves, they were completely against it. Once we told them we were only using apple cider vinegar to remove the mole, their tone of voice changed and they figured “what’s the worst that could happen.”


And that was pretty much our view too, until it worked!


The apple cider vinegar mole removal process appears to be relatively safe, and you are not applying harsh chemicals on your skin. If you are looking for an alternative to mole removal, you might want to give this a try!


Other Non-food Related Uses for Apple Cider Vinegar:


  • Facial Toning: Mix 1 Tbsp apple cider vinegar with 1 – 3/4 cup water (Mrs. Crumbs has done this and liked it.)
  • Treat Sinus Infections: Mix 1 tsp apple cider vinegar with 2-3 Tbsp water, gargle for 30 seconds and swallow. Repeat every hour for the first 6 hours, then every 2 (except while sleeping). Repeat until symptoms subside and the body heals itself. (I’ve actually done this myself. The sinus infection took about a full week to heal – which was how long it took to see a doctor – but I was able to heal it myself and the doctor confirmed it!)
  • Manage Seasonal Allergies: Similar to treating a sinus infection with apple cider vinegar, mix 1 tsp with 2-3 Tbsp water, gargle for 30 seconds and swallow. Repeat twice daily, or up to four times for more severe allergies. (Mrs. Crumbs did this and her symptoms were gone within two days).
  • Rid Croup: My son had a strange cough that included no other symptoms. We waited for a week to see if the cough would go away, but it didn’t. It was harsh, loud and often. We gave him the same remedy as the sinus infection and his cough had reduced significantly within one day and was completely gone within three.
  • Regular Immune and Detoxification Support: Heather from NeverLackingZeal found a way to incorporate ACV into her regular routine to boost her immune system and detox daily. Check it out right here on Crumbs – DIY Apple Cider Vinegar Detox Elixir.
  • Common Cold: Katie Mae at Nourishing Simplicity created a “knock your socks off” cold kicking cider. The vitamins, antioxidants and phyto-nutrients are powerful and WILL kick your cold to the curb!!
  • Bug Repellent: We make our own bug repellent with essential oils (I prefer to buy my essential oils through Young Living, but I’ve heard good things about Rocky Mountain Oils and Plant Therapy too). However, readers have suggested that drinking just 1 teaspoon of apple cider vinegar on a daily basis has kept bugs away too!
  • Homemade Conditioner: Just 1 tablespoon and warm water can replace your typical shampoo. Not only does it work, but this will save you TONS of money too!

The anti-infective properties of ACV are amazing! The studies on vinegar show that it can help with a wide variety of infectious issues. Anytime you’re thinking about healing something naturally, definitely consider apple cider vinegar!


Written by Mr. Crumbs


Have you tried to remove moles using apple cider vinegar? What was your experience? Share your thoughts and ideas in the comments below!


Original article and pictures take dontwastethecrumbs.com site

четверг, 9 января 2014 г.

How to Recognize Secondary Drowning

How to Recognize Secondary Drowning

Secondary drowning doesn’t look like drowning. It can happen hours after someone has been in the water. It’s important to educate ourselves and others about this rare but deadly form of drowning! Here’s how to recognize secondary drowning.


Secondary drowning doesn't look like drowning. It can happen hours after someone has been in the water. It's important to educate ourselves and others about this rare but deadly form of drowning!

We’ve lived in the Lake Norman area of North Carolina for almost six years now, but we had never gone out on the lake as a family until this past Saturday.


The day couldn’t have been more gorgeous: 80-degree weather and not a cloud in the sky. We slathered our three fair-skinned beauties in sunscreen, fastened on their puddle jumpers, and set out for a day with my mentor Holly‘s family.


We had a blast soaking up the sun and splashing in the lake. When she first got in, my 2-year-old had swallowed a tiny bit of water, but it was nothing alarming.


Within an hour of being on the boat, her demeanor had changed. She wasn’t fussy, but she became extremely clingy and more and more sluggish as the day moved on.


When we arrived to the lakeside restaurant (via boat!) for dinner, she refused to eat and just lay in my arms.


day on the lake

I joked that she wouldn’t be able to sleep that night since she had slept all day long! But when we got home, she became even more lethargic.


As my husband started baths for the other girls, I lay beside her in my bed.


At this point, I was starting to worry.


I jolted out of bed when these two words entered my mind: secondary drowning.


I carried my little girl downstairs and began googling the symptoms of secondary drowning. Years ago, I had read about it.


Sure enough, she had several of the symptoms of secondary drowning.


Unlike the drowning we typically think about, secondary drowning can occur hours after a child has been in water.


In a nutshell, secondary drowning occurs when a child has inhaled water either through a sudden rush (think: jumping in a pool or lake) or via a near drowning experience.


symptoms of dry drowning

The child can appear fine for hours after a secondary drowning incident.


“But over time, water left in the swimmer’s lungs begins to cause edema, or swelling, said Dr. Juan Fitz, a spokesman for the American College of Emergency Physicians in Lubbock, Texas. “When the lungs’ alveoli are filled with water, they cannot exchange oxygen to and from the blood. This causes the heart to slow as the swimmer’s blood oxygen level drops.” (source)


The symptoms of secondary drowning include:


  • Coughing
  • Chest pain
  • Trouble breathing
  • Feeling extremely tired
  • Fever
  • Change in behavior, such as drop in energy level (source)

My daughter had a slight cough, a “tummy” ache, extreme tiredness, fever, and a change in behavior.


symptoms of secondary drowning

When I read that my daughter’s symptoms matched up with many of those associated with secondary drowning, I rushed her to the emergency room.


Honestly, the ER receptionist did not take me seriously at first. She had never heard of secondary drowning. And it seems some nurses have never heard of it either.


But I was persistent in that they move her up the line of the crowded waiting room and get her checked out. Thankfully, a chest X-ray proved clear.


It turns out she was dehydrated.


Secondary drowning is extremely rare, but it still does happen. I knew what to look for and did not want to delay getting my daughter checked out when she exhibited some of the symptoms. I wanted to be safe rather than sorry.


Another non-stereotypical form of drowning is called dry drowning. The symptoms of dry drowning and secondary drowning are the same. But the method of drowning is different:


“With dry drowning, water never reaches the lungs. Instead, breathing in water causes your child’s vocal chords to spasm and close up after he’s already left the pool, ocean, or lake. That shuts off his airways, making it hard to breathe.” (source)


With secondary drowning, the water does enter the lungs and build up to a condition called pulmonary edema.


Dry drowning usually occurs right after the event in the water, while secondary drowning can occur up to 24 hours after.


Both types of drowning cause trouble breathing and need immediate medical attention.


As I cuddled my daughter on Sunday and pondered the events of the day before, I realized that I needed to take the small knowledge I have about secondary drowning and share it with you all.


If just one of you learns about this from my post, perhaps it could save a life.


symptoms of secondary drowning

I do not want to make you paranoid about something that will most likely never happen, but I do want you to be informed.


I encourage us all to watch our children around the water and to enroll our kids in swimming lessons. My oldest daughter is the only one who has ever taken swimming lessons. We are putting all three of our girls in lessons this summer.


Read more about secondary drowning in the following sources:


Secondary Drowning Symptoms @ CNN.com


Secondary Drowning and Dry Drowning @ Web MD


Secondary drowning doesn't look like drowning. It can happen hours after someone has been in the water. It's important to educate ourselves and others about this rare but deadly form of drowning!

Had you ever heard of (or experienced) secondary drowning?


Original article and pictures take thehumbledhomemaker.com site