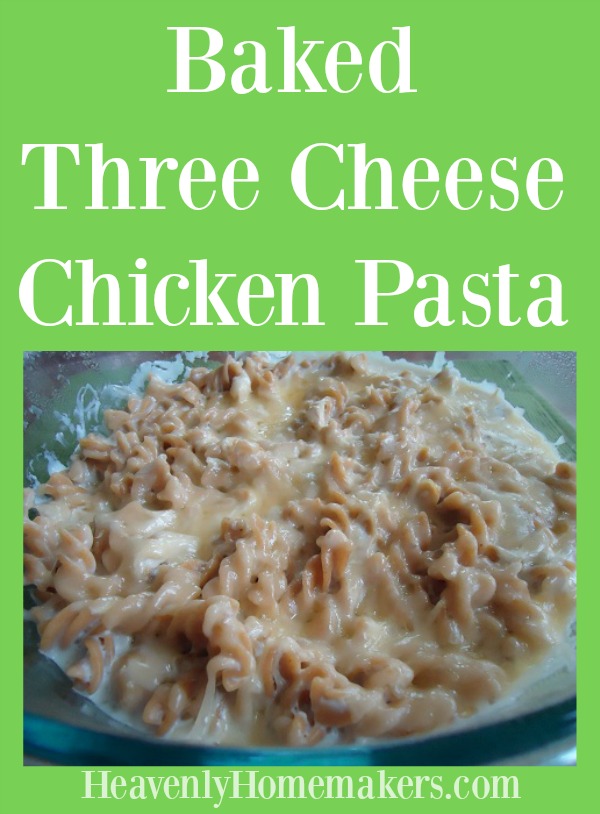
Baked Three Cheese Chicken Pasta – a Make Ahead Meal
This might be the best chicken pasta dish you’ll ever eat.
The chicken was on its last leg.
Well actually, the chicken no longer had legs, as it had already fulfilled its glorious life purpose and had been cooked and made into a rich broth and good healthy meat for my family.
Regardless, legless though he was, the last little bit of cooked chicken in my fridge was indeed on its last leg. It needed to be eaten. It could no longer be left alone…neglected, unused, and unwanted.
(It would appear that, apparently, I felt the need to create some chicken drama when all I really needed to say was: “I had leftover chicken- so I used it.” I can’t just be normal. What fun would that be?)
So the chicken – it was begging to be used. I needed a quick lunch for the family. But I needed to make the meal in the morning and have the capability to reheat it quickly at lunch time. Therefore, I decided to play with my Three Cheese Garlic Chicken Pasta recipe and make it into a “Make Ahead Meal“. The chicken and I are happy to report that my idea worked, and the meal was delicious.
Actually, the chicken has nothing at all to report because not only is he not on his last leg anymore, he is officially gone.
Why? Why do I say these things? I’m going to just give you the recipe already before I say anything else ridiculous about the chicken.
2 cups cooked chicken, cut into bite sized pieces
½ teaspoon garlic powder (add more if you like)
¼ cup grated parmesan cheese
1-2 cups shredded cheddar cheese
In a large cooking pot, combine cooked chicken, uncooked pasta, milk, garlic powder, and sea salt.
Cook and stir over medium-high heat until pasta is tender and the starch from the pasta has thickened the milk, creating a creamy sauce.
Remove cooking pot from the heat.
Stir in parmesan cheese and cream cheese until it is mixed throughout.
Pour pasta mixture into a casserole dish. (A 9x13 inch pan works well, or any variety similar in size.)
Sprinkle shredded cheese on top and bake in a 350° oven for about 15 minutes or until cheese is melted.
If you make this ahead of time, you may need to adjust the baking time so that the casserole will be heated through and through. Also, you can freeze this dish! Simply thaw and bake in a 350° oven for 30-40 minutes.
All this talk about chickens and legs kind of has me hungry for fried chicken legs, which pretty much makes no sense – unless you are in my brain and then it does make sense. Oh people. Be glad you are not in my brain. It is not pretty.
So tell me, what do you do when your chicken is on its last leg? (Yes, I think I am actually talking about leftovers here.)
Original article and pictures take heavenlyhomemakers.com site
I may receive a commission if you purchase something mentioned on this page. See more details here.
One of the things I miss now that we are a Real Food family is tater tots…really crispy, crunch tater tots. I loved those things!! These days we are focusing on eating food that is made with nourishing ingredients and it is possible to make tater tots nourishing by choosing better ingredients!
You know what is even better with tater tots? Bacon. Yep, bacon. Bacon always makes everything better!!
My friend, Kyndra Holley, who blogs over at Peace, Love and Low Carb has an excellent recipe for Bacon Sweet Potato Tots.
Friends, this cookbook has gobs of delicious, easy to make low-carb recipes…and many contain BACON!!! Bacon guacamole? Caprese salad with bacon vinaigrette? Yum!!
But the book doesn't cover only bacon recipes. You can expect a lot more:
85+ Low Carb, Primal and Gluten Free recipes
All easy to find, whole food ingredients
Full page color photo for every recipe
Nutritional analysis for each recipe
Simple swaps for your favorite snacks
Create ways to maximize your grocery budget
Kitchen must haves
Seasoning and spice blends
In the meantime, try these fabulous Bacon Sweet Potato Tots! They are a perfect addition to your dinner table or to bring to a potluck!!
Preheat the oven to 400°F (205°C). Line a rimmed baking sheet with parchment paper.
Bring a large pot of salted water to a boil. Boil the sweet potatoes for 15 minutes, cooking only partially. Remove from the water and let cool.
Using a box grater, grate the sweet potatoes into a large mixing bowl. Press paper towels into the grated sweet potatoes to soak up as much excess moisture as possible.
To the sweet potatoes add the crumbled bacon, almond flour, garlic powder, sea salt and black pepper. Mix until all the ingredients are well incorporated. Form the mixture into small logs.
Bake the tots for 40 minutes, or until they are nice and crispy on the outside.
Original article and pictures take ohlardy.com site
Back To School On A Gluten Free Diet It takes me half an hour to pack food any time we have to eat away from home.
Half an hour.
Minimum.
Lunch for one adult and two small children, I’m sure, should not take that long.
And starting in just two short weeks, I’ll be packing a lunch every day for my new first grader. Gluten-free, possibly. Eco-friendly, definitely.
Be still, my beating heart!
I’m petrified!
Clearly, I need to figure out some streamlining processes for the everyday lunch packing dance. And I will, I’m sure, but for now, I’ll just shake in my boots for a while, because I do not have half an hour every night to devote to lunch.
Packing healthy lunches when you’re short on time and out of bread is mind-boggling. Is there such a thing as a lunch without a sandwich? Is it possible for it to be healthy too?
The Healthy Lunch Box: Sandwich-free Secrets to Packing a Real Food Lunch is loaded with strategies to streamline your packing process, stock your pantry with emergency backups for your backups, and send healthy, delicious food in the lunch box, no matter how old your eater is. Read more and start packing healthier, processed-free lunches today.
A Lunch with No Sandwich?
One reason lunches are more complicated here is the general lack of bread. We haven’t had bread in the house for months after we dabbled with the gluten-free lifestyle, determined that my husband definitely has some sort of issue with gluten, and have since remained “low-gluten”.
Since we’re living with my husband’s parents for a short time while we find that Perfect House, I really don’t make bread because I left all my handy-dandy tools (breadmaker, KitchenAid) in storage.
Unless I try the soaked no-knead bread again, I won’t be sending any sandwiches in Paul’s lunchbox.
I still have a hunch that gluten isn’t so great for him either, so I’m happy to keep him largely gluten-free as well.
I’ve been thinking a lot about what to pack, and although my previous list of healthy lunch packing ideas has much to offer, remaining gluten-free is another question entirely.
But I’m getting mentally prepared.
Juggling special diets along with the craziness of back-to-school isn’t easy, and sometimes it isn’t cheap. Making sure your kids are nourished midday for best learning is worth the effort, though, and you can definitely pack a lunch to help them eat well while you spend less.
When you can’t pack a sandwich, what can you pack? Think outside the bread. Turn the sandwich inside out and present the contents in a new way (bread is just a carb-filled vehicle for the good stuff inside anyway).
School lunches are hard enough. Take out gluten and they are even harder! Here's a huge list, plus some considerations for peanut allergies.
egg salad (nothing wrong with a bowl of egg salad and a fork. You can also wrap it in a sturdy lettuce leaf or include a splurge item like Nut Thins, gluten-free crackers. Make it with pastured eggs and homemade mayo. My only problem with eggs for lunch is that I have to make sure I don’t serve our best ever scrambled eggs for breakfast, too!)
tuna salad (just include pickles and a fork. No problem! My culinary creation as a child was tuna salad wrapped in a big lettuce leaf with crushed potato chips on top. Maybe a fun ‘sometimes’ treat to include the chips!)
corn tortilla wrap or cold homemade refried beans with corn chips (almost any sandwich can be redone in a good corn tortilla – nitrate-free lunchmeat and cheese, leftover chicken, PBJ, or a cold burrito)
grain-free crepes also make any sandwich into a wrap (my family was pleasantly surprised that the coconut flour (use the code STEWARDSHIP for 10% off at that site!) crepes from Health Home & Happiness’s menu planner don’t taste like coconut at all)
your favorite soup in a thermos (we live on leftovers for lunch, so I know Paul will have a thermos of soup sometimes, heated on the stove for lasting hotness. I’ll rinse the pot and use it for my lunch with Leah later in the day.)
meat, cheese and a dip (think Lunchables without the crackers and additives. Last week my kids turned down leftovers, even nachos, three times and opted for plain chicken, cheese, and mustard with a few veggies on a plate. Kids don’t require a lot of fanfare; just train them to eat simply. You can even make your own lunch meat. It’s super easy!)
a dressed up salad (salads aren’t the most immediately kid-friendly meal, but if you add enough goodies: veggies, nuts, dried fruit, cheese, frozen peas, meat, ETC. and a great dressing, you might have a winner.)
quinoa or millet salad (cook any whole grain and add a favorite vinaigrette, beans, veggies, and even meat to make it a main course. Check out our favorite cold grain salad and just sub GF grains.)
hard-boiled egg (cut in half is easier to handle; often a good part of a picnic style meal with cheese, nuts and other finger foods to eat. A sprinkle of unrefined sea salt is great on top!)
leftovers: (use a thermos OR ask your kids what they might eat cold. My daughter would eat cold potatoes and I’d gladly munch on cold stir fry, for example.)
Even More Ideas: Find more grain-free lunch ideas from my affiliate partner’s eBook, The Grain-Free Lunchbox.
School lunches are hard enough. Take out gluten and they are even harder! Here's a huge list, plus some considerations for peanut allergies.
The easiest way to skirt around just about any food restriction is to stick with real fruits and vegetables. Most kids love a piece of fruit in their lunch, but presenting veggies so they’re not brought home limp and warm can be a challenge.
Veggie ideas:cherry tomatoes, carrots, pea pods, cucumbers, cauliflower or broccoli spears, celery, fresh green beans, colored peppers – cut fun shapes to encourage dipping
Apple slices with natural peanut butter, sunbutter or almond butter to dip
Whole fruits: bananas, oranges, apples, pears, plums, melon, grapes, cherries, strawberries, peaches, nectarines…try to stick with what is more or less in season and watch the Dirty Dozen list. Be sure to ask your child if they need the fruit cut for ease of eating or time constraints; I hate to think of big pieces of leftover fruit tossed out simply because the child ran out of time.
Freeze-dried fruits:ideal for toddlers, these lightweight wonders are pricey, but super fun and last halfway to forever.
Other Side Dishes:
School lunches are hard enough. Take out gluten and they are even harder! Here's a huge list, plus some considerations for peanut allergies.
Fruits and veggies do not a full tummy make. It’s important to make sure your child’s stomach isn’t rumbling well before the final school bell, so you want to make sure you have a nice balance of fats and proteins, maybe some fiber. Think dairy, nuts, gluten-free grains, beans and legumes, healthy fats in dips, etc.
homemade yogurt with vanilla and honey, fresh or frozen fruit, applesauce or homemade granola mixed in. This is a staple in our lunches at home, and I can only imagine sending a little one-cup glass dish every day just like my husband does for work.
cottage cheese with various fun things mixed in
trail mix (don’t pay a factory to mix together nuts and dried fruit. Do it yourself with crispy nuts and even home-dehydrated fruits)
gluten-free coconut muffins (recipe can be found in the newly expanded Healthy Snacks to Go eBook along with over 45 real food snack recipes – click HERE to learn more.)
School lunches are hard enough. Take out gluten and they are even harder! Here's a huge list, plus some considerations for peanut allergies.
Considerations: Talk to your Child’s Teacher
Just as you’d have a discussion with your child’s teacher if he or she needed special academic support, it’s really important for teachers to understand special dietary needs.
Whether your child has a serious allergy or a gluten sensitivity, a new diet can be foreign territory for a teacher. I recommend bringing a helpful list of foods that your child CAN eat, especially if snacks are a community affair. It’s almost guaranteed that the class will eat something together throughout the year, and a pizza party is not a very good reward for a gluten-free child.
You also need to make sure that the teacher understands the ramifications of your child getting his or her hands on a forbidden food. The teacher must understand that the food allergy is no laughing matter, and that the child can’t just “have a little cheat.”
Trading food is a sore spot for those on specific diets. Your first and best line of defense is to make sure your child knows the rules. Have a serious consequence in place for trading food. Even if you ask the teacher to police food trading, they can’t catch everything, and most lunch eating takes place far beyond the confines of the classroom.
Nut Allergies: a Different Beast
I’m happy that I can be in charge of what my son eats at school, and my dietary choices don’t really have to impact the other kids. But not all dietary restrictions are that way.
Since nut allergies are airborne and much more serious, the entire classroom needs to be involved in keeping the child safe.
If your child has a nut allergy, you’re probably well-versed in explaining the issue to teachers and insisting on a nut-free room.
If one of your child’s classmates has a nut allergy, I beg you to be understanding. Nut allergies can kill. The consequence is very serious, and a peanut butter sandwich eaten by a neighbor (your child, perhaps) could send a child with a peanut allergy into anaphylactic shock.
Even if PBJ is the only food your child will eat for lunch – and I sympathize with you, I really do! – the nut allergy needs to be prioritized first over the picky eater, which is not life-threatening.
I taught third grade for two years and had three kids with peanut allergies. We ate lunch in the room and had to have safe areas for peanuts and special clean-up considerations. I made a “no peanut snacks” rule and a “peanut only once a week” for lunch rule. Some parents balked, but it simply had to be.
One parent of a child with the peanut allergy brought in a few pages of peanut-free lunch ideas that I copied and sent home to all the families. I thought that was a super idea and very supportive of the needs of everyone.
Avoid Postpartum Depression with Placenta Encapsulation
In ancient cultures of the world, the placenta has been venerated as a magical or spiritual organ that helps to form the deep bond between mother and child. Indeed, the placenta anchors the baby to the mother via the lifeline of the umbilical cord – the placenta is the root from which nourishment pours.
The placental has traditionally been placed in the earth with a tree planted over it, cooked or eaten as part of a ceremony of blessing for a healthy baby. The placenta that has nourished the developing baby is loaded with critical hormones, growth factors and minerals that should not be wasted.
This may sound strange but humans are amongst just a few land mammals that do not consume the placenta after birth. Most land mammals instinctively do this for a reason.
A good reason.
The practice of consuming the placenta after birth is known as placentophagia. It serves as a way of replacing many of the hormones and minerals that are made available to the baby in the womb, from the mother.
The placenta is often called the after-birth because after the baby is born, it detaches from the mother’s uterus and follows the baby out of the birth canal. Our modern western medicine practices usually dispose of the placenta via incineration.
When I was in my child bearing years I had never heard of the practice of placental encapsulation – or eating one’s own placenta. I think I might have passed out just from the idea… I know my husband would have for sure.
However, times have changed and once the baby is born, this incredible mass of nutrients can be used to nourish the mother who may be in a depleted state from the pregnancy. I certainly could have used that extra boost after giving birth!
Sadly, today our young mothers are certainly depleted as most young women already have heath issues due to our modern foods and lifestyle. For our young mothers today it becomes more critical to get proper nutrition and replacement of lost hormones and minerals.
After a Birth – Hormones Rule
Problems that may arise after birth, such as postpartum depression, poor milk supply, fatigue and stress are all hormone related. Supplying the mother with a natural form of hormones from her own body makes sense.
Once you get over the ick factor, it starts to make a lot of sense, so much so, that some new moms are now asking for placental encapsulation.
What Nutrients Does the Placental Contain?
The placenta is chock full of many crucial nutrients:
There are critical hormones and endorphins that control mood, milk, stress and inflammation. There are minerals such as iron present which can aid in fatigue and help a new mom recover from anemia.
There are vitamins such as vitamins A, D, E, K, C, B6 and B complex.
Prolactin is present and will help to increase milk supply.
Oxytocin is present and will help with stress and helps bring the milk down.
Corticotropin Releasing Hormone reduces stress. This hormone falls dramatically after birth and may be one reason for postpartum depression. However, it is still in rich supply within the placenta.
Urokinase Inhibiting Factor & Factor XIII – stop bleeding and promote healing.
Other hormones in the placenta include thyroid hormones, estrogen and progesterone.
There are other natural opioid and endorphin stimulating factors in the placenta that help relieve pain and inflammation.
Clearly, it is an organ that is full of deeply nourishing compounds – and just when the mother is in need of them, they are typically removed.
What are the Benefits of Placental Encapsulation?
You can read about the various studies on the placenta here, some from way back in 1918 all the way up to the present. Additionally there is plenty of anecdotal evidence that the benefits are real.
Women report:
Improved mood and less depression, especially if they had postpartum depression after one child and not after the one where the placenta was used
Increased milk supply again, comparing one birth experience with another
Faster healing from the birth and reduced blood loss, anemia and fatigue
Higher energy and healthier skin, hair and nails
What is Placental Encapsulation?
Placental encapsulation is performed by a placenta encapsulation professional (usually a midwife or doula). These professionals have special training and equipment and know how to follow the OSHA safety guidelines for exposure to bloodborne pathogens.
Typically they retrieve the placenta from the birthing place and process it in their own workplace or even in your home. They use their specially reserved equipment to dry and encapsulate the placenta.
There are two main methods for encapsulation. The first is the raw method – simply put, the placenta is not heated any higher than 118ºF as it is dehydrated. This method provides a more potent supplement , using just a few capsules each day, due to its potency. These will need to be in the freezer and they will expire after one year. The specialist you use to prepare the capsules will tell you how to use them.
The second method is following the Traditional Chinese Medicine Method of steaming the placenta with ginger, lemon and other herbs before dehydrating and grinding down into a powder form. This process creates a supplement that may be stored in the refrigerator for much longer periods of time, but is less potent. However, here again, it is advised to use the capsules judiciously, taking the advice of the specialist you use to prepare the capsules.
There is actually a third method and that is really raw – that is eating the placenta as an organ meat perhaps in a smoothie. For me, that is a hard one to get around and you have to use it rather quickly as it is not preserved in any way. This goes along with arranging ahead of time to keep your own placenta from your birthing place and preparing it at home.
It is a personal choice as to which method works best for you. You can also make your own capsules at home if you so choose.
Have you ever heard about placental encapsulation? Would you choose to do it? Leave a comment and let me know!
As always, do not attempt this at home without proper instructions from qualified professionals. Always speak to your health care provider before making any changes to diet or lifestyle. See more of my disclaimer here.
Original article and pictures take realfoodforager.com site
Autoimmunity is Just One Disease Expressed in Different Body Parts Autoimmunity: Just One Disease Expressed in Different Body Parts
Autoimmunity is a broad condition that has been segmented by medical specialties. Autoimmunity is just one disease expressed in different body parts.
There are over 80 different diagnosed autoimmune diseases and they are all treated in different, yet somewhat similar ways with the ultimate goal being to suppress the inflammatory immune response. However, in conventional medicine the patient is never regarded in a holistic way.
Patients find themselves running to many different specialty doctors who are not communicating with each other, but rather are subscribing different medications for each ailment. There might be gastrointestinal symptoms, skin issues or joint problems. Patients can end up with handfuls of prescriptions but no long term cohesive plan.
It’s frustrating to talk to a doctor yet never get to the bottom of why this has happened. The conventional approach is to essentially put a patch on the problem with stronger and stronger medications, while the disease progresses. That said, when there is a severe flare of the symptoms, these strong medications are useful and appropriate.
The holistic approach looks at the entire list of symptoms and tried to get to the basic pathology that underlies them. This may involve conventional testing as well as testing through functional medicine labs.
Intestinal Barrier Dysfunction May Develop in Many Autoimmune Diseases
Intestinal Barrier Dysfunction is a hallmark of autoimmunity. The immune system is housed in the gastrointestinal tract. When there is inflammation present, the lining of the intestine becomes damaged and becomes leaky. This allows larger molecules of food and toxins to enter the bloodstream, become systemic and travel to extra-intestinal areas of the body. These areas include the joints, skin and other organs.
All autoimmune conditions have the common denominator of intestinal permeability. In this condition, abnormally high levels of zonulin are present. This protein regulates the permeability of the tight junctions of the intestinal barrier. Once the gut is permeable, immune responses to foods can occur.
In this study published in 2014, researchers worked with experimental autoimmune encephalomyelitis (EAE), which is the prototypic animal model of MS in mice.
At the onset of the disease, they found intestinal permeability, increased zonulin and alterations in the mucosal layers of the intestines. Significantly, they found this in a disease of the brain. The researchers concluded,
Our findings show that disruption of intestinal homeostasis is an early and immune-mediated event in EAE. We propose that this intestinal dysfunction may act to support disease progression, and thus represent a potential therapeutic target in MS. In particular, an increased understanding of the regulation of tight junctions at the blood-brain barrier and in the intestinal wall may be crucial for design of future innovative therapies.
Perhaps this concept of intestine involvement can be generalized to many of the other autoimmune diseases – in fact it is.
Today in the research labs they are looking at auto-antibodies. By testing these antibodies they can predict what diseases a person may get years ahead of the expression of the disease. Hopefully in the next 10 years this kind of testing will be more available and used clinically.
Through the science of epi-genetics we know that environmental influences will affect the expression of genes. This may lead us to develop a way to prevent this expression.
Leaky Gut is Implicated in Celiac and All Autoimmune Diseases
In February 2012 in the journal, Clinical Reviews in Allergy and Immunology a paper calledLeaky gut and autoimmune diseaseswas published. The author, Alessio Fasano, M.D., had been researching this topic in relationship to celiac disease and gluten sensitivity. The review paper he wrote is focused on the role of impaired intestinal barrier function (leaky gut) on autoimmune pathogenesis. In short, he is trying to get to the real causes of autoimmunity.
In this paper, Dr. Fasano proposes a new theory that suggests that autoimmune disease is not only preventable, but also reversible. Amazing!
It involves a perfect storm of three conditions:
Increased intestinal permeability (leaky gut)
A genetic predisposition to autoimmunity
An exposure to the environmental trigger (in this case gluten)
What this means is that people who have a leaky gut, as well as the genetics for celiac disease, can develop autoimmunity when they eat gluten. This will cause intestinal damage. The increased intestinal permeability that is part of the leaky gut, allows the environmental trigger (which in this case is gluten) to access the body and this triggers the genetic predisposition.
Conventional understanding of celiac included variable numbers 2 and 3, but instead of leaky gut, the third variable was the presence of circulating auto-antibodies to the enzyme tissue transglutaminase. Using these antibodies excludes many people who do not test positive for them – however, they may still have problems with gluten (gluten sensitivity).
Acknowledging that auto-antibodies are present does not explain why they are there. Fasano’s theory does explain this. Furthermore, it suggests that if you can cure the leaky gut, you can cure the autoimmune disease.
Routine Blood testing for Autoimmunity
Each condition also has their own set of blood markers used for the initial diagnosis in addition to these listed below that are used as maintenance markers.
CBC w/Diff
CMP-14
HAIc – sugar in blood stimulates immune cells to release inflammatory cytokines
Insulin – fasting and 2 hour post prandial
Homocysteine — shows how we are methylating –if it is high must look at MTHFR and other genetic snps
CRP – is an inflammation marker
Sedimentation rate – is an inflammation marker
Iron Panel – check for anemia
Vit D (25-OH vitamin D) – ideally levels over 50
Thyroid antibodies and complete panel including T3, T4, TSH, and reverse T3
Environmental Triggers in Autoimmunity
The environmental trigger is the third aspect of the autoimmunity perfect storm. Some of these are:
Gluten – Testing for celiac disease overlooks a lot of the folks who are gluten sensitive – just eliminate gluten (and maybe all grains) if you have autoimmunity
Food Sensitivities – IgG response is delayed and not traditionally performed by a medical allergist even though these are more common and inflammatory – IgE is for immediate allergy testing
Nutrient deficiencies – Organic acids testing and RBC testing
Stress and Hormone Imbalance – Organic acids testing – organic acids are urinary metabolytes – In cases of enzyme insufficiency certain metabolytes get kicked out into the urine and can be identified
Dysbiosis – Use stool testing to identify some of the bacteria and yeast
Infections – Use stool and blood testing
Toxins – Hair analysis for heavy metals and xenobiotics, pesticides, etc.
Treatment Based in the 4R Approach
Remove – gluten, dairy, egg, nuts and other potential allergens, as well as aspirin, NSAIDS
Replace – support function in the digestive tract with enzymes and HCl if needed
Reinoculate – the bowel with prebiotics and probiotics and a diet that includes resistant starch
Repair – the gut mucosa with gelatin rich bone broths, L-glutamine and other nutrients
This approach attempts to uncover the actual cause and imbalances in each individual rather than simply putting a bandaid on the symptoms. Each individual has their own set of imbalances and this needs to be corrected in a specific and individual way. Using conventional medicines that suppress the symptoms may be necessary alongside the integrative functional approach while healing is going on.
More and more there are chiropractors, naturopaths and functional medicine doctors that take this approach. As always, never change your diet, medicines or supplements without involving your health care provider.
Get the Most Current Information about the Microbiome
Are you as fascinated by the microbiome as I am? Are you hoping for a cure through this new research explosion?
I may receive a commission if you purchase something mentioned on this page. See more details here.
Perhaps you have found yourself in a situation where you could use an attitude adjustment. No? Then perhaps it is everyone else around you!!!
I have to say, the biggest surprise in my Essential Oil journey has been how they can profoundly affect emotions. I used to think that was weird hocus pocus, until I was able to see it first hand. Not only the calming abilities of certain oils, but how they can actually improve the moods of those in my house. Because, lets get real here, THEY are the ones who need the attitude adjustment. Not me! (Actually, this blend has gotten me out of a few sticky situations – I am sure the kids were greatful!)
For this blend, I like to make it in a roll on so that it is convenient and easy to use! And it is labeled appropriately in my drawer, so we can all easily find it! And just between me and you? I keep one in my purse, too! I just never know when it could come in handy!
This blend has 4 oils. Lemon, Stress Away, Joy, and Abundance! Lemon is incredibly uplifting, Stress Away, well, it totally does what it says it does, Joy encourages hope and overcomes stress, and Abundance promotes calming, emotional balance, and positive thoughts!
Original article and pictures take ohlardy.com site
The Sponsored Listings displayed above are served automatically by a third party. Neither the service provider nor the domain owner maintain any relationship with the advertisers. In case of trademark issues please contact the domain owner directly (contact information can be found in whois).
This pasta dish is made withe fresh tomatoes, garlic, and garden greens for a treat all year long!
It’s a quick and simple meal to make for those busy nights, and a great way to get green veggies into your pickier eaters. I used this as a way to introduce arugala to my family. It has a peppery bite to it, but is so good for you. Arugula actually is a cruciferious veggie, in the same family as broccoli. It provides calcium and vitamin C as well as other valuable phytonutrients. Paired with fresh tomatoes, garlic and olive oil, it is out of this world delicious!
You will need
1 pound pasta, penne or shells work great for this
3 campari tomatoes, diced in quarters. You could also use 1 pound cherry or grape tomatoes, halved.
1 cup olive oil
2 cloves garlic, minced
1 tsp salt
1/2 tsp black pepper
5-6 ounces Arugula
(I have seen both size packages at different stores, and both work well in this recipe)
Begin by mincing the garlic and quartering the tomatoes. Add both to a medium sized mixing bowl and cover with olive oil. Sprinkle salt and pepper and mix well. Allow to sit while pasta is cooking to blend flavors.
Cook your pasta according to package directions.
Drain pasta, and add to mixing bowl with the tomatoes and garlic. Add the arugala and mix together gently.
Serve at once, and sprinkle with feta cheese if desired.
Other great greens and cheese mixes for this dish:
spinach and mozzerella
swiss chard and fresh parmesan
mustard greens and goat’s milk cheese
Original article and pictures take thehomesteadinghippy.com site