Ketchup is almost a food group in our home. My kids and husband could practically drink it and they put it on everything. There are weeks when we can go through 2-3 pints of homemade ketchup. Seriously. It’s like an addiction here. One that I can’t seem to fight against.
Why lacto fermented ketchup? The benefits of fermented foods are amazing. They include:
probiotic rich
digestive supporting enzymes
they help us to absorb other nutrients
can help heal leaky gut
they are relatively inexpensive to make at home
What are you waiting for? Let’s get started making our own lacto-fermented ketchup! It’s so easy, you’ll wonder why you waited so long.
What you will need:
1 1/2 cups tomato paste
1/2 cup (more or less) filtered water
1/4 cup whey
1 tablespoon honey
2 cloves garlic
1 1/2 teaspoons sea salt
1/8 teaspoon ground cayenne (or to taste)
1/2 teaspoon ground cloves
1/2 teaspoon ground allspice
1/2 teaspoon black pepper
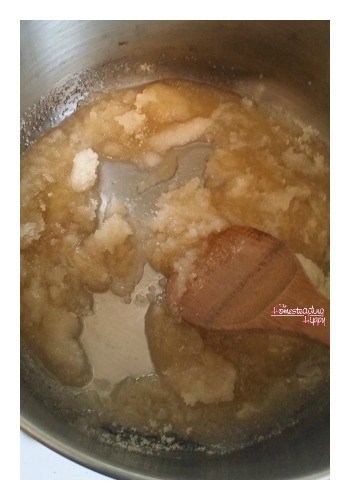
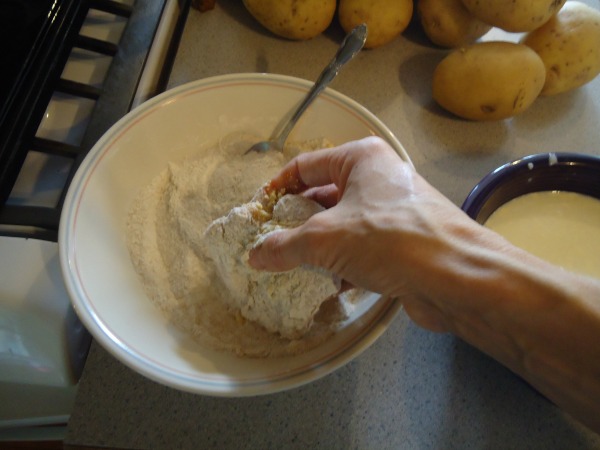
Blend all the spices together in a medium sized bowl.
Add to the rest of the ingredients in a non-reactive bowl and stir well to combine.
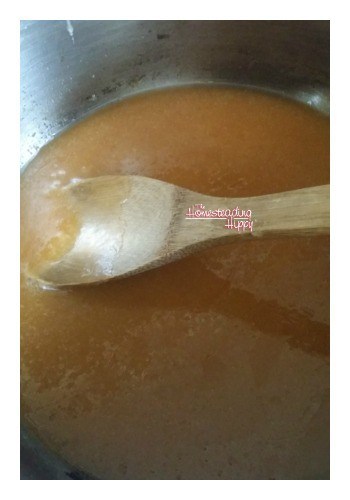
Add filtered water to achieve the consistency that you prefer. It will thicken as it stands, so you might want to leave this a little on the thin side.
Transfer ketchup to a jar with a tight-fitting lid and allow to sit at room temperature for 72 hours before transferring to refrigerator for long-term storage.
To use, simply use as you would regular ketchup. Top a grass fed burger, smear over homemade french fries, top your meatloaf. The possibilities are endless. The shelf life of this ketchup is approximately 3 weeks. I can’t be more sure, to be honest, because it’s never around that long.
Have you ever made your own lacto fermented ketchup? What foods do you make fermented at home? Be sure to pin this for later!
Original article and pictures take thehomesteadinghippy.com site
It has an amazing blender that goes on the side with the same 900W horsepower to deliver some awesome blending. I decided to get on the quick and easy ice cream bandwagon, and my family is loving it! An awesome, healthy, frozen concoction in just 30 seconds makes them so happy! Happy family=Happy mama. (and vice versa, too)
You just need 3 simple ingredients, most likely in the kitchen already.
Frozen fruit, milk and cane sugar. That’s it. I used strawberry this time, but it can easily be substituted for blueberries, peaches, raspberries, blackberries and so on. You can also mix it up and make all different combinations. We like triple berry, peach/strawberry, strawberry/peanut butter, blueberry/peach, raspberry/peach. We also have been known to toss in some homemade chocolate syrup in there as well. The choice is truly up to you. You can also make several different flavors, by just emptying out the blender and starting a new batch. This is one frozen dessert you won’t mind your kids eating a bunch of at one time, either.
Simply add 3 cups of frozen fruit of choice in the blender.
Add one can of coconut milk. You can also used 1 1/2 cups of almond milk or dairy milk if you choose. This recipe really lends itself to creativity as well as any food allergies being considered. Sprinkle 3 T. sugar (more or less to taste) and blend, blend, blend!
You’ll get a soft serve texture from about 30 seconds of blending.
If you would like it to be a bit harder, simply place in an airtight, freezer safe container and place in the freezer for about 20-30 minutes. Viola! Ice cream in 30 seconds.
BE SURE TO PIN THIS TO YOUR FAVORITE BOARD FOR LATER!
Need some help getting back into the kitchen and cooking from scratch? Try this delicious collection of easy to make recipes to get you started!
Original article and pictures take thehomesteadinghippy.com site
Spring is here, soon to be followed by the dog days of summer.
Most of us naturally spend more time outside, gardening, tending animals, foraging, or just enjoying the sunshine and fresh air. You still need to be protecting your skin from the harmful rays of the sun, and there are times when a big hand, sunglasses and light colored t-shirts may not be enough. Slathering on a commercial sunscreen isn’t always in your best interest, as there may be chemicals you want to stay away from. Making your own sunscreen is pretty easy, and this recipe always seems to work for us, whether we are bike riding, or swimming at the lake.
Carefully melt the shea butter and coconut oil in a double boiler until just melted.
Add the zinc oxide powder and stir until the powder is all mixed in. This took a loooooong time for me to do. Add the essential oils and mix through. Store in the fridge. Use liberally and apply every 2-3 hours, or after swimming or heavy sweating.
Remember of course that a hat, loose clothing and staying out of the sun during the most intense parts of the day (10AM-2PM) are going to go a long way toward preventing sunburn.
If you do happen to get a sunburn though, you want to treat it as quickly as possible to help soothe the pain. I love to save tea bags during the winter and store them in the freezer. When a minor sunburn hits, laying a couple of the tea bags on the area help to soothe the burn. Also, coconut oil in a light layer directly on the burn has helped to soothe pain, as well as keep it moist to minimize peeling.
Original article and pictures take thehomesteadinghippy.com site
Of course, you could give the argument that you rinse it out quickly and that the absorption is minimal. But, even minimal is too much for me.Yeah, I’m crunchy that way.
Besides, the chemicals also strip your hair of natural oils and your body works twice as hard to keep up, and thus hair gets greasier if you don’t wash it every day.
There is also the argument of less trash. Reusing bottles and having ingredients that you already use for other stuff? Totally green! I have reused the same shampoo bottle for about 3 years now.
When I tried the baking soda/ACV method,
I could never get the vinegar rinsed out completely and always smelled like someone was coloring eggs or something. So, I gave that up. Then, I found out how to make my own homemade shampoo!
This recipe took my hair about 3 weeks to really adjust and not be all “dry and fly-away” and NOT be overly greasy. My normally wavy, frizzy, dry, fine hair is now much easier to manage.
So, here’s my homemade shampoo recipe:
Pour all ingredients into a bottle, and gently swish to mix. Use 1-2 Tablespoons each time.
I don’t use conditioner, as my baby fine hair would get weighed down.
Just a touch of coconut oil on the ends once or twice a week is good. And, of course, I never brush my hair when wet, just gently comb. You don’t want to stretch or pull your hair when it’s wet, as it’ll break much easier. (learned that one in beauty school!)
Do you make homemade shampoo? What do you put in yours? Be sure to pin this for later!
Original article and pictures take thehomesteadinghippy.com site
When you or your loved ones get a cold, the last thing you want to have to worry about is their suffering, right?
You want that nasty cough to stop, the one that seems to keep them up all night long. You want them to be able to rest during the day without hacking all over the place.
Cough drops are easy enough to make at home, and you can feel better about the ingredients contained in them. There is a lot of sugar in this recipe, but it’s necessary not only for the “candy” part, but it also acts as a preservative. You will only be consuming 2-3 of these drops at the most a day as well.
You’ll need just a couple of homemade ingredients.
I used modified versions of the original recipe I found to make it more child friendly for my kids. I like what I was able to come up with, and they do help my family’s cough quite a bit. For example, instead of plain sugar, I used mint sugar. Instead of plain honey, I used a lemon-ginger infused honey. So, here’s my new recipe:
4 Tablespoons coconut oil
1/2 cup lemon-ginger honey
3/4 cup mint sugar
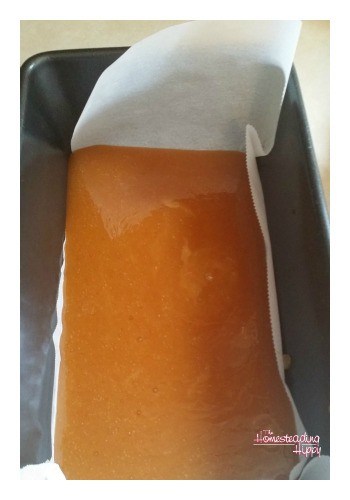
Prepare a loaf pan with parchment paper and lightly greased with coconut oil.
Over low heat, simply melt the oil and sugar and honey together over low heat. Stirring constantly, bring to a boil and boil until it’s at a hardball stage, about 250°.
Pour the mixture carefully into the loaf pan and allow to cool just long enough to handle, about 10 minutes.
It may still be hot in some places, so take care cutting it. Using a sharp knife, cut into 32 equal pieces. You can wrap them in wax or plastic paper if you desire, but I found that I didn’t need to, as my family needed these NOW and there wasn’t much of a risk of them sticking together. You could also carefully dust the pieces with cornstarch to keep them separate, although that may change the taste of the drop itself in the beginning.
Store at room temp in an air tight container.
The shelf life on these should be about a year, with the amount of sugar, but I have always made small batches that are used up within a week or two.
BE SURE TO PIN THIS TO YOUR FAVORITE BOARD FOR LATER
Original article and pictures take thehomesteadinghippy.com site
How to Make Homemade Chicken Patties for Sandwiches (Freezable!)
You want to know one of my favorite convenience foods I miss the most since switching to real food? Processed chicken patties for chicken sandwiches. (Bet you never would have guessed that, since that’s what this post is about.)
I grew up microwaving Schwan’s chicken patties and slapping them on white buns for a quick meal or snack after a sports practice. They were yummy and easy and while I couldn’t care less about many other processed convenience items (I gave up boxed pizza rolls several years ago and never looked back) – I do miss the taste and handiness of chicken patties.
So why it’s taken me this long to figure out a recipe that resembles the beloved frozen chicken patties, I do not know. But here I am, finally learning a way to make breaded chicken patties for sandwiches. The best news is that you can make these in bulk and freeze them for a fast, convenient, ready-made meal on a busy day.
4 teaspoons onion powder, divided
3 teaspoons garlic powder, divided
1 teaspoon sea salt, divided
3 cups whole grain flour (I used whole wheat, but if you need these to be gluten free, use your favorite flour choice)
Palm shortening or oil of choice
In a large bowl mix ground chicken, 2 teaspoons onion powder, 2 teaspoons garlic powder, and ½ teaspoon sea salt.
Shape meat mixture into 15-20 patties (make them larger or smaller depending on your family's portion size needs)
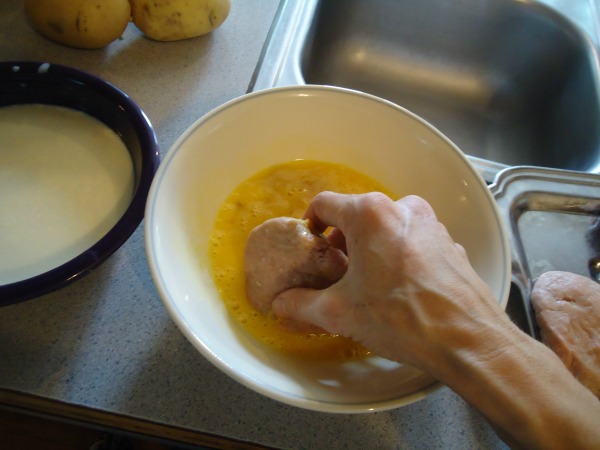
Beat eggs into a bowl.
Pour milk into a separate bowl.
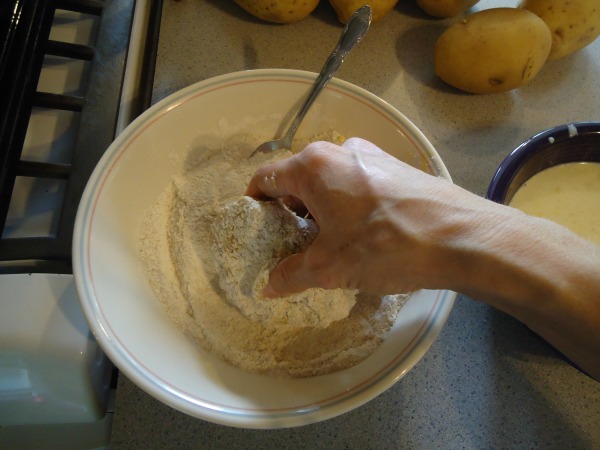
In a third bowl, mix flour, 2 teaspoons onion powder, 1 teaspoon garlic powder, and ½ teaspoon sea salt.
Heat palm shortening or oil on a griddle.
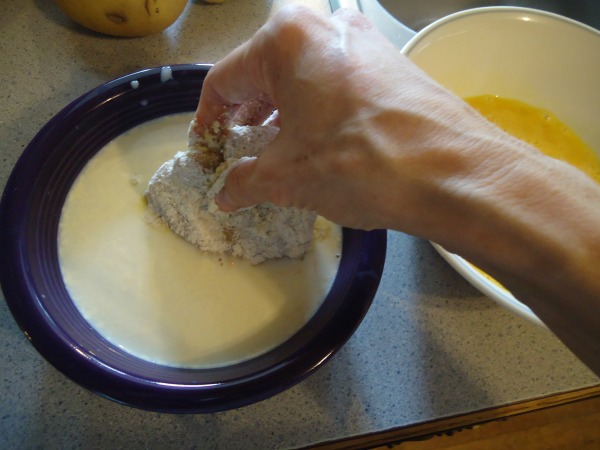
Dip prepared meat patties in egg, then flour mixture, then milk, then flour mixture again.
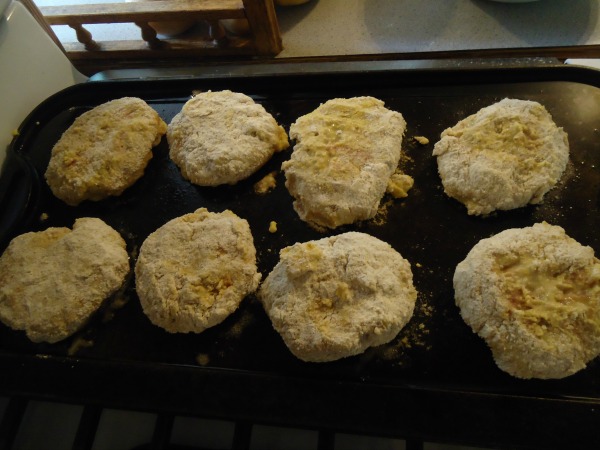
Place battered chicken patty into oil on the griddle.
Repeat process with each chicken patty.
Cook for 7-10 minutes on each side, mashing down lightly as needed.
Serve right away, or cool and freeze for future use, then rewarm in a 350 degree oven until heated through.
Are you ready to see some ugly chicken patty pictures? This isn’t pretty, friends. Raw meat pressed into patties – well there’s a reason we call stuff like this “processed food.” But take great comfort in the fact that this is all made from real food and wholesome ingredients and ignore the fact that naked ground chicken pressed into a patty really just ain’t purty.
See the patty breading process? First the egg.
Then the flour.
Then the milk.
Then the flour again.
Then comes the part where we fry the patties in oil.
We watch in amazement as they turn into beautiful chicken patties we can’t wait to put on a bun or between two big leaves of lettuce.
Sure, it’s thicker than the patties we grew up eating. We like it that way. That means there’s double the meat.
One of the biggest perks is that you can form your chicken patties into any size you need for your family. Have small children? Make small patties. Have teenage boys? Make the patties nice and big. Have some big eaters and small eaters? Make a variety.
The biggest win is that if you make a bunch, you’ll have yummy chicken patties ready to warm up for sandwiches on a day you don’t have time to cook!
Did you grow up eating and loving processed chicken sandwiches?
Original article and pictures take heavenlyhomemakers.com site
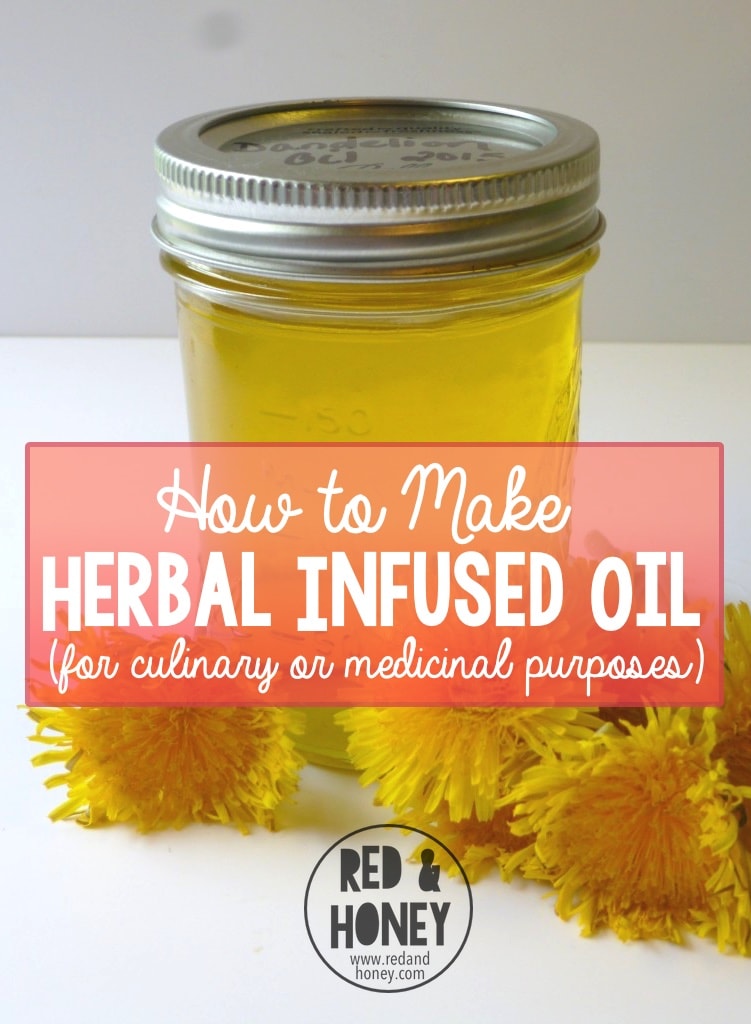
I don’t know about the rest of you, but this girl is super ready for summer. I love spring but summer is the time to harvest and preserve herbs, which is one of my favorite things to do.
Summer is a great time to harvest fresh herbs, whether they be medicinal or culinary. There are so many fabulous ways to preserve the bounty of greens, but one of my favorites is to make herbal infused oil.
I like herbal infused oils because they are a great base for making salves, lotions and lip balms. It’s nice having them on hand because the different herbs offer many options to amp up the power of homemade body products.
Many different herbs are used to fight infections, and soften and offer protection to the skin.
And do you know what else? It is so easy to do! It’s a great first step for those learning about herbs and trying their hand at making herbal preparations. A good quality base oil infused with herbs is a perfect stepping stone to making herbal products.
There are two basic ways to infuse oils: cold infusion and heat infusion. Both are simple to do and provide you with rich, herbal oil.
Cold method:
What you will need:
2 glass jars and lids
Quality oil of your choice (my preferred oil is olive)
Fresh herbs
How to:
Harvest your herbs
Clean the sand, dirt and extra little critters from the herbs.
Allow to set out over night to wilt (this helps reduce the water content so it doesn’t spoil)
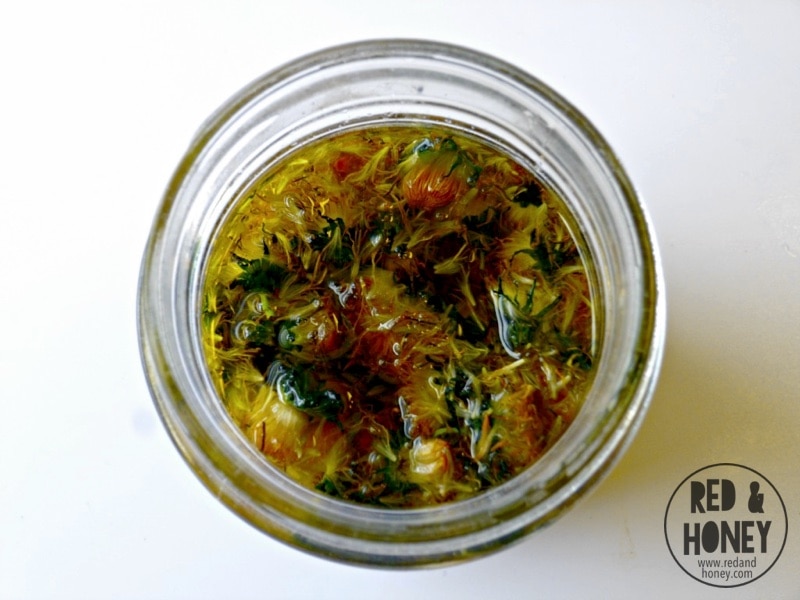
Pack the herbs tightly in the jar, at least 1/2- 3/4 full
Cover the herbs with oil and place lid on jar
Allow oil to steep in the sun for about two weeks
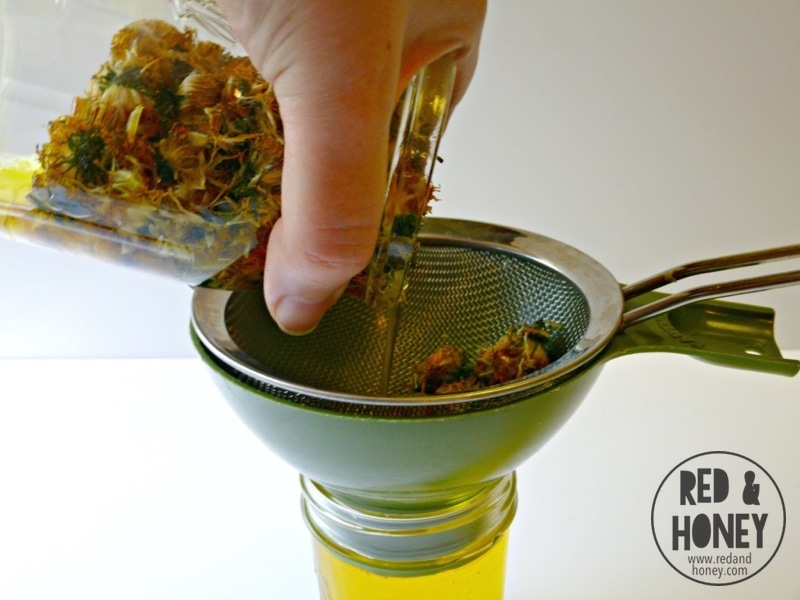
Strain herbs through a cheese cloth into clean jar
Put lid on the jar and LABEL (this is really important because it is so easy to forget which oil is which!)
Hot method:
What you will need:
2 glass jars and lids
Quality oil of your choice
Fresh herbs
A pan large enough for you to fit the jar and get water halfway up the jar
How to:
Follow the same method as above for cleaning and allowing the herbs to wilt
Pack jar 1/2 – 3/4 full of herbs and cover with oil
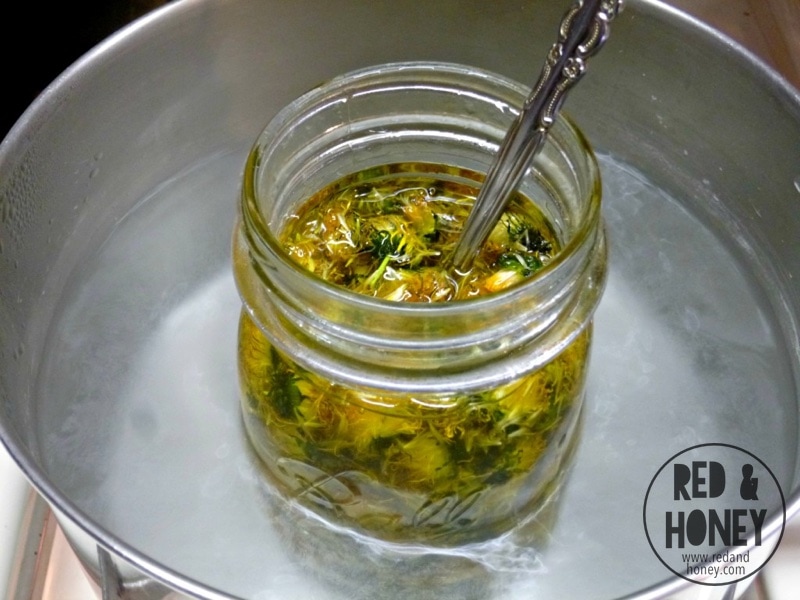
Place jar in your pan and fill the pan so the water is about halfway up the jar
Bring the water to a simmer
Allow the jar to lightly simmer for about two hours
Remove from water and heat and allow to cool for a bit before straining into clean jar
Place lid on jar and label
And now, you have your first jar of herbal infused oil. You can use this oil as massage oil or apply it to wounds, bug bites or just to soothe rough skin.
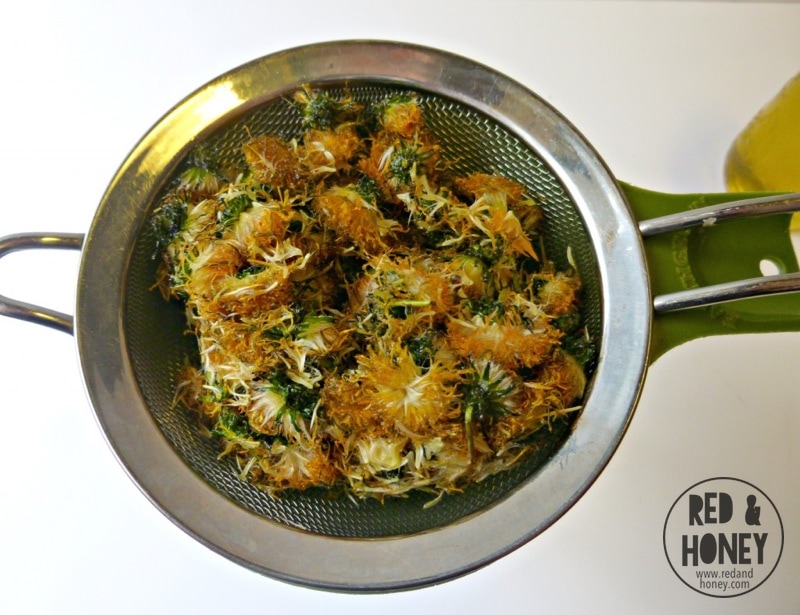
Summer is a great time to harvest most herbs right in your yard. (Or you can order online to get herbs that are already dried.) My favorites to harvest are plantain, comfrey, and dandelions. All are great for skin ailments and should be easy to find.
A fun way to use your oil is to make a dandelion balm ,which is great for soothing sore muscles.
If you use culinary herbs like basil or oregano, you have a wonderfully-flavored oil to use to fry and sauté foods for your meals. Nothing compares to the fresh taste of these herbs in your dishes!
If you haven’t tried making herbal infused oil, stretch yourself this summer and find an herb to preserve. It’s a great project to do with kids. All of you will learn a lot together.
How have you used fresh herbs?
___________
Jessica is a wife and mama to two boys and she loves spending her days with them, watching them grow and explore the world around them. Jessica grew up on fast food and quickly ditched that life when she became pregnant with her first. Since then it has been journey of learning about whole food nutrition, herbs and natural supplements. Her goal has been to keep her family healthy and happy…as naturally as possible. You can follow her blog Simply Healthy Home or find her on Facebook.
Original article and pictures take redandhoney.com site
{Heads up: I’m taking a break from posting about South Africa for the next few days in order to finish up this long-overdue series! I’ll be back with more South Africa posts next week!}
I’ve always eaten fairly healthfully, having grown up with a mom who valued healthy living and taught us to love whole grains, real butter, and big salads.
(Truth: we basically never bought white bread unless we were making croutons or feeding the ducks and I don’t recall a time we ever bought margarine. Yes, she was pretty hard core when it came to health!)
My husband wasn’t so keen on health food when we got married. In fact, he was more keen on McDonald’s and Vanilla Coke. ��
During our lean law school years, I just did the best I could do with the small budget we had while also making sure the food I cooked was stuff Jesse would actually eat. We didn’t eat terribly unhealthy, but I knew it could be improved upon.
First, we eliminated artificial dyes. Next, it was corn syrup. Then, we stopped cooking with anything but olive oil, coconut oil, and butter. And then we stopped buying bleached flour and refined sugar.
This journey has been years in the making, but as we’ve made slow and steady changes, we’ve seen such positive improvement in so many areas in our lives.
And that’s not really surprising because food is your body’s fuel. If you’re mostly fueling yourself with donuts, candy bars, and carbonated beverages, there’s a good chance that’s contributing to you feeling tired, worn out, and lethargic.
We only get one body. There are no replacements. So it’s in our best interest — and in the best interest of everyone we love — for us to fuel that body well.
However, let me be quick to say that the last thing I am trying to do with this post is to make anyone feel stressed about how they are feeding their family or heap on mom-guilt. Trust me, we don’t eat anywhere near “perfectly” and that I find that it can be overwhelming to even figure out what is best for your family with all of the noise and chatter out there from so many different sources telling you that you should eat this and shouldn’t eat that.
With this in mind, if you’re I just want to encourage you to focus on three priorities when it comes to healthy eating:
1. Keep it simple.
Don’t stress over making your own kombucha, soaking your grains, growing all your vegetables, or driving miles away to get the “best” dairy for your family. If trying to eat healthfully feels overwhelming and stressful, it’s likely because you’re making it more complicated than it needs to be.
Keep it simple. Make one small change every month or two. Eliminate one item from your diet or switch out a healthier alternative (maybe eliminate food dyes or switch out white rice for brown rice or start using whole wheat pasta instead of pasta made with refined white flour, etc.)
Once you feel like that one small change has become part of your lifestyle, add another small change. And then another. And then another.
Over time, these babysteps will add up to a lot of progress and traction made!
2. Focus on YOUR family’s priorities.
What matters most to your family? Is it eating more whole grains or having more fruits and veggies in your diet or eating consistent meals or cooking from scratch?
Don’t worry about other families and what they are making a priority. Tune out a lot of the conflicting reports out there telling you that you MUST eat this or you MUST eliminate this from your diet.
Really think about what is best for you and your family. And then make a plan of action based upon that.
3. Prep ahead.
My biggest secret for actually eating healthfully 95% of the time is because I choose to make it a priority by planning and prepping ahead.
Here’s the thing: Life is likely always going to be full of responsibilities and to-do’s. Every day, we can come up with excuses for what we just can’t eat heathy today.
If you’re not willing to make something a priority, it will always fall to the bottom of the list and then probably not happen at all. Healthy eating happens when we choose to make it a priority and then we choose to plan ahead to have nourishing food options available.
I’ve found it helpful to make raw fruits and veggies really accessible. If I have a big bag of carrot sticks pre-washed and chopped in the fridge, fresh fruit already cut up, and eggs already hard-boiled, I have a lot fewer excuses for not grabbing a healthful snack or for not filling up on good foods at lunchtime instead of reaching for empty carbs and desserts.
My Personal Guidelines for Healthy Eating
A lot of people have been asking me what I’m eating now that I’m working out in earnest multiple times per week. Here are some of my own personal guidelines right now (please remember that these are my guidelines, not guidelines I think everyone should follow or adopt!):
1. Eat breakfast every day, early in the day. (I have a tendency to get busy and then it’s 10 a.m. and I’m starving… not good if you’ve been up since 5 a.m. and put in a strenuous 1+ hour workout.) 2. Eat smaller meals/snacks at least 5-6 times per day. 3. Eat when you are hungry. (i.e. If your body is telling you you need to eat, listen to it.) 4. Eat healthful foods at least 95% of the time. (I give myself a little wiggle room for splurges and cheat foods a few times per week.) 6. Eat a big salad every day. 7. Drink water. And more water.
Most importantly: I’m learning to re-define what “healthy weight” is for me. I used to let the number on the scale define me and how I felt about myself.
Weight-lifting has helped me realize that I feel happier and stronger and healthier when the number on the scale is higher than it once was. And it’s helped me feel liberated to realize that the number on the scale does not dictate or determine my worth.
You are more than a number.
Day 13 Project
1. Decide what your family’s priorities are for healthy eating and what areas you want to change or improve.
2. Pick one area that you’re going to focus on for the next 3-6 weeks. Remember to keep it simple and doable.
3. Leave a comment letting us know what area you’re committed to focus on for the next 3-6 weeks. You can do it! I’m cheering for you!
(Note: The links in this post are affiliate links, and we will be compensated when you make a purchase by clicking through our links. Read our disclosure policy here.)
For 15 days, we’re exploring the topic of making our health and well-being a priority as part of the 15 Days to a Healthier You series. You can read Day 1 here.
Before we go any further in this series, I think it’s important that we define self-care. It’s a term that gets bandied around a lot and I think it is often misused and abused.
The reality is this: I don’t want to just survive life. Thus, I’m not looking for survival tactics.
I want to thrive. I want to live life as my best, boldest, and bravest self. I want to live up to my fullest potential.
Yesterday I talked about the importance of making our health and well-being a priority, but I want to be clear: I’m not making self-care a priority so I can cope with life. I don’t want to limp along through life just trying to make it.
I want to prioritize self-care so I can succeed in life. So I can grow stronger, embrace life more fully, love more enthusiastically, live more generously, and serve others more wholeheartedly.
The Difference Between Self-Care & Self-Comfort
I heard Megan and Kelly on the Sorta Awesome show recently discussing the differences between self-care and self-comfort and I thought it was really profound. I think it’s important that we define what this looks like in our own life. It can be easy to confuse the two.
What Self-Care Is: Making our health and well-being a priority. Listening to and attending to what our body and soul needs so that we are able to live our lives with energy and purpose.
What Self-Care Isn’t: Numbing ourselves from reality, using coping mechanisms, or turning to addictive behavior to try to survive life.
To help you understand where I’m coming from with this, let me give you a really practical example. Let’s say your child fell down and skinned their knee and it was bleeding pretty seriously. Yes, you should comfort your child, but you also need to care for your child by getting the bleeding to stop, getting medical attention (if necessary), and bandaging up the wound.
Comfort can be very important, but it’s not enough if our souls are bleeding. We can’t just slap a warm hug or chocolate ice cream and a chick flick on as a bandage labeled “self-care” and think that all will be well.
No, we need to stop the bleeding. And often, that means we first need to determine where the bleeding is actually coming from in the first place.
To me, this is what self-care is. It’s not a temporary fix that might make you feel better in the moment but does nothing for you long-term. Self-care is dealing with root causes, healing from deep wounds, and working on permanent solutions to struggles.
Pay Attention to the Pain; Listen to Your Tears
Until you are willing to admit there is pain, you can’t figure out where it’s coming from or how to fix it. So today, I want you to get really honest with yourself and ask: What’s bleeding? Where does it hurt? Am I trying to cope with life because I’d rather avoid a painful situation? Am I self-medicating in some way in order to mask what I’m really feeling deep down?
That’s how you get to the heart of what’s hurting and discover where the pain points are. These answers might not be obvious at first. They might require some intense soul-searching. They might dredge up things you’d rather stuff down and pretend don’t exist. They might invoke tears or a knot at the pit of your stomach.
Pay attention to the tears. Pay attention to the anxiety rising inside of you. Don’t dismiss it. Don’t run from it.
Instead, when you feel the tears or the anxiety, stop and let yourself stay in it. Ask yourself, “Where is this coming from? What triggered this? Why am I feeling this?”
What Does Your Soul Need?
Remember how yesterday we talked about how taking care of ourselves will look different for different people and I encouraged you to make a list of what energizes you? Today, I want to drill down further and I want you to really ask yourself, “What does my soul need?”
This is a question I’ve really been asking myself the past 6 months as part of my Year of Rest.
I’ve talked about the Year of Rest multiple times on the blog and on social media. So many people have commented with things like, “I’m sure that’s been amazing!” Or, “Are you feeling all rested and refreshed?” Or, “It must be so incredible.”
The truth is: It has been wonderful — but not at all in the way I was expecting. I was expecting a year of rest to be filled with more sleep, more time with my family, more fun, more reading, more time for things I love. And it has been that… and that’s been wonderful.
But what has completely caught me off guard is that it’s also been a year of ugly crying. I’m not a crier, usually. I can be the only one in a group to experience something deeply touching without ever shedding a tear. I’m known to be stoic and non-emotional.
That’s all changed this year, however. I’ve probably cried more tears than I have in all the past 20 years put together.
As I’ve been weaning myself off my addiction to “hustle” and intentionally sought quietness and stillness in my life, I’ve struggled to figure out who I am without all of the noise, the accolades, and the accomplishing.
I’ve realized that the busyness was a bandage I tried to slap on. Instead of addressing deep wounds and aches and longings in my soul; I tried to medicate with productivity.
It felt good in the moment. It numbed the pain. It filled the empty spaces. And as long as I kept up the out-of-breath living, I didn’t have to confront the reality or deal with the broken parts of me I’d rather hide.
I realized that instead of dealing with the pain and hurt and hard situations of life over the past number of years, I’d stuffed them down deep, pretended they didn’t exist, and heaped on more busyness to distract myself.
What Self-Care Looks Like in This Season for Me
As I’ve asked myself, “What does my soul need?” I’ve realized that self-care in this season has been me allowing myself to cry. Allowing myself space to really feel. To acknowledge the pain. To open up with safe friends in safe spaces about how much my heart feels broken by situations in my past.
Self-care has meant letting other people see the under-belly of who I really am. It’s meant welcoming people into the authentic messiness and rawness and not apologizing.
It’s been ugly and real… and oh so healing for me! Allowing myself the space and permission to feel, the permission to acknowledge the pain, and welcoming people in to see that I’m a broken, hot mess some days, has made me so much stronger, happier, and healthier than I’ve been in, well, probably ever.
Self-care has also looked like making weight-lifting a priority, giving myself permission to gain a little weight, becoming more spontaneous, working a whole lot less, experimenting with new things, saying “yes” to what once would have seemed way too crazy for me, sleeping more, and making space for a whole lot more fun in my life. {Read more about all of this here.}
Note: Want to talk more about this with me live? I’d love to have you join me on Periscope (around 8 to 8:15 a.m. CT) and Facebook live (around 8:30 a.m. CT) every morning where we’ll be discussing each day’s topics more in-depth and you can bring your questions, chat with others, and we can share together what we’re learning! (You can watch today’s Facebook Live video here.)
Day 2 Project
Is there deep pain or past wounds you’ve been trying to stuff down, hide, or run from for a long time? Give yourself permission to acknowledge these, cry about them, grieve your losses, and process the hurt with a safe person. {If you feel comfortable sharing in the comments section here, I welcome that. You are also more than welcome to email me privately if you’d like a safe place to share. I would be honored to listen and pray for you.}
Ask yourself, “What does my soul need?” Give yourself time and space to really contemplate and ponder that question. If you feel comfortable, tell us in the comments section what self-care looks like for you in this season of life.