Encourage Kids to Make Fruits & Vegetables Center Stage
This Food Day, encourage kids to make fruits and veggies center stage on their plates by keeping it delicious and fun! Plus a review of Teddy Tries a Veggie!
Encourage kids to make fruits and veggies center stage on their plates by keeping it delicious and fun. @jlevinsonRD
I received a complimentary copy of Teddy Tries a Veggie, but was not compensated for writing about it. As always, all opinions are my own.
This Saturday, October 24th, is Food Day, a day to aspire – and inspire others – to make positive changes to our diets and food policies. This year’s focus is Toward A Greener Diet, with the primary focus on raising awareness about the importance of eating less meat and enjoying more whole plant-based foods as a way to become healthier and to help animals and the environment.
In honor of Food Day, this year I am participating in the Food Day Blogger Takeover along with many other dietitians and food bloggers. Be sure to check out the links below for the other posts!
Food Day 2015
The importance of eating a plant-based diets, and in particular fruits and vegetables, is not news to anyone (and if it’s news to you, it’s time to get your head out of the sand!). But that doesn’t mean we as a population are meeting the recommendations for fruit and vegetable intake. In fact, according to the Produce for Better Health Foundation, overall consumption of fruit and vegetables in the US has declined seven percent since 2010. Wamp, wamp. That means we need to do better job of adding produce to our plate – remember, the USDA MyPlate recommendations are for half the plate to be filled with fruits and veggies at every meal!
One of the best ways to encourage more plant-based eating is to start it at a young age. That means getting kids interested in and exposed to all different foods with an emphasis on produce. Personally, I make it a point to include a fruit and/or vegetable at every meal for my kids. Some days it’s easier than others, some days they eat it and other days they don’t. But my feeling is as long as they are exposed to it and they try it, that’s enough – at least for now. I have to say I’m pretty lucky that my almost four year old twin girls are pretty good eaters and they eat a fair amount of produce (they’re definitely not lacking in the fruit department, that’s for sure!).
I know it’s not the same for everyone (and there’s still a chance that it will change in my house), which is why I am always looking for new ways to encourage kids to eat more produce. Recently I learned about an interactive e-book, Teddy Tries a Veggie, written by registered dietitian nutritionist Jennifer Glockner for children 4 to 8 years old. The book follows Teddy, an almost-six-year-old girl who loves to garden with her father, but hates eating the vegetables she grows. That is until she stumbles upon a band of fruits and veggies rocking out in her garden!
Get the kids excited about eating their fruits and veggies with this new e-book, Teddy Tries a Veggie, by Jennifer Glockner, RDN.
The book conveys the importance of eating a variety of fruits and vegetables as part of healthy eating and familiarizes kids with terminology such as vitamins, minerals, antioxidants, and fiber, all with pretty pictures of adorable fruit and veggie characters like Maya Papaya and Beta Carrot and unique interactive elements like pop-up fun facts! There’s even a recipe at the end for Teddy’s Broccoli Orange Crunch. Teddy Tries a Veggie is just one more way to get the kids excited about eating their fruits and veggies. (Plus, it’s the first e-book in Jennifer’s Smartee Plates series and I can’t wait to see what she comes up with next.)
In moving back to Belgium, I was quite anxious about our food. In Liberia, food isn't abundant as it is in Europe, but we did eat mostly wild, local, grass fed etc. Things that aren't even concepts in Belgium. Yes, Organic is gaining terrain in the supermarket, but even just the concept supermarket is something we dislike.
Now, I have adopted a strategy of saying yes to whatever comes along my path (I will talk about this in a future post), so I have in the past week, received a part of my mom's apple harvest, as it was too much for her to use.
Aside from apple sauce, we've made juice (with the raisins my dad brought in).
We also got really lucky and found out about a CSA farm nearby. Which we joined instantly. We already took the family to harvest.
Pulling those lovely carrots out of the ground made my daughter crave some apple-carrot juice.
As I'm writing this, I've got some herbal vegetable broth on the stove and will be starting cabbage mash with salmon and sour cream for dinner. Guess it's no surprise we'll be going back tomorrow.
We still need to go to the store for a couple of things, but we're slowly finding our way to healthy, nutritious, sustainable food.
So why is food sourcing so important?
I think it's really important for the kids to know where their food comes from, plus, as unschoolers, it's all about learning from reality. How better to learn about food than to get your hands dirty in the field?
Our family eats primal, so it's important to know where your food comes from, what the animals you eat have eaten, how the vegetables were grown.
Smart friends who give me great, easy, healthy recipes are my favorite kind of friends. As are my friends who give me chocolate. Or jars. Or hugs. Or the friends who listen to my constant and sometimes nonsensical chatter. And the ones who put up with my unreasonable freak-out moments of stress. And the ones who pray with me. And the ones who deal with me during soccer season when I can’t finish sentences.
Let me just pause and wipe a tear. I really have the best friends ever…
Well now. (stops to loudly blow nose and gain composure) I really brought all that up to say that one of my great friends, Nikki, shared this recipe with me. She’s one of my smart friends who I believe has done all of the above and then some (God bless her).
Once when I was at her house, she let me try some of the bread she had made that morning. It was great! And then she started telling me how she made it. How you don’t have to knead it. How you start it the night before and how it takes about three minutes to mix up. I think I grabbed her neck, hugged her fiercely, and knocked her over when she handed me the recipe. Not really. I truly can control myself. Usually. But hey, there was a great recipe involved, so no guarantees. See, I told you my friends are great to put up with me.
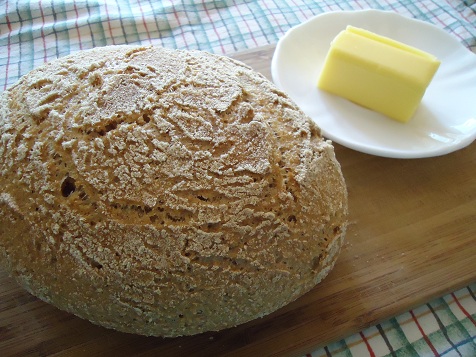
And now, the easiest bread recipe in the world…
3 cups flour (This recipe works a little better with unbleached white flour, but I prefer to use freshly ground hard white wheat so that it is healthier.)
½ teaspoon active rise yeast
Note: You need a covered dish to bake this bread. I found a deep-dish casserole dish with a lid that worked for me, similar to this one. But if I can save up and splurge on this one, would that not be the coolest?
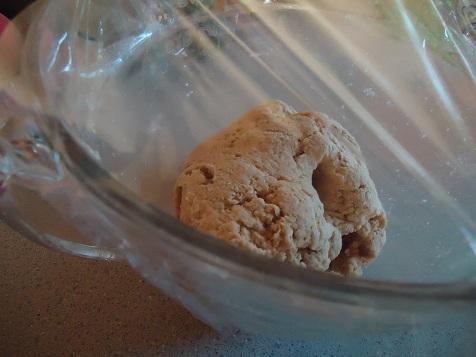
When you mix it and cover it in the evening, it starts out looking like this:
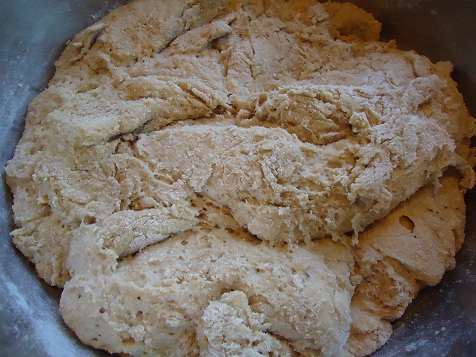
In the morning it will look like this:
After you bake it, it will look like this:
And when you slice it it will look like this:
Once you serve it, it will look like this:
(There’s no picture. The bread is gone. Obviously.)
I highly recommend that you give this recipe a try, and that you consider serving it with this wonderful Calico Beans dish. It’s a wonderful combo!
Original article and pictures take heavenlyhomemakers.com site
Note from Katie: I received so many requests for more learning/homeschool articles after my post about how we set up our homeschool classroom, that I’m excited to welcome my real-life friend Angie (the most organized and creative homeschool mom I know) to share how she is incorporating Montessori at home and using Montessori-inspired principles in her classroom. Even if you don’t homeschool, these ideas are wonderful for pre-school age children or for a more engaging play area for children of any age. Enger Angie…
So many homeschooling parents (and parents of young children) are jumping on the “Montessori bandwagon”, and it’s easy to see why. You can easily incorporate Montessori at home for children of any age, whether you planned on primarily using your dining room table for preschoolers, or have a decked-out, designated homeschool room.
You don’t have to be inherently creative or spend a lot of money for your young child to benefit from what a Montessori-inspired education offers.
What is Montessori?
The Montessori Method was created by Maria Montessori, Italy’s first female physician. Through her direction, meticulous observations, and work with children in low-income apartment complexes in the early 1900s, she refined the use of experimental materials and created a revolutionary way to teach children that is still used worldwide in many private and public schools.
Simply put, a Montessori environment allows children to learn about the world around them through the use of their senses. The aim is not to teach facts, but to cultivate a life-long love of learning.
Montessori materials often concentrate on a single function or mechanism. These individual concepts build upon one another rather effortlessly, and so concrete objects aid the child to easily understand abstract ideas. Children work independently and focus on one task at a time.
When I give my kids these liberties to mold their environment, I really see how internally-motivated they get. You see the desire in their eyes to dig deeper into a topic that interests them.
Can you Mix and Match?
While I can certainly admire and respect the Montessori “purist” view on having everything exactly as Maria Montessori expressed, you can absolutely benefit from even the smallest implementations of her ideas by using Montessori at home.
Adapt the Principles to Work for Your Family
Since many homeschooling families have several children with ages that wouldn’t normally be grouped together in a typical Montessori setting, you must adjust.
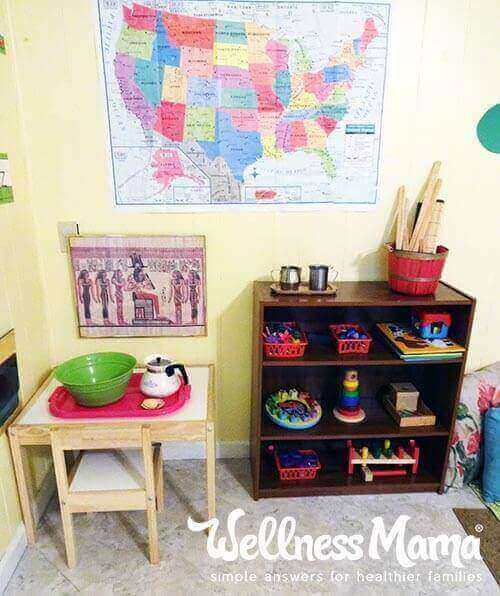
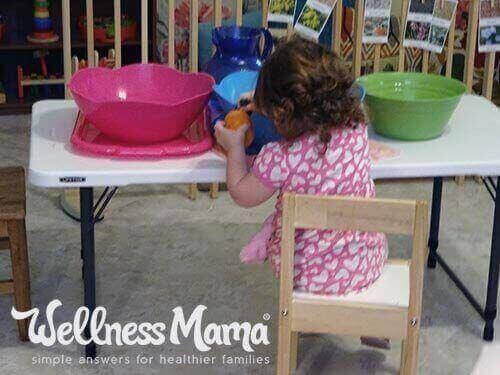
When my youngest child was one year old, I had a large gated-off section within the schoolroom for her to safely work on age-appropriate materials. It allowed my older kids to work with small manipulatives and trays with ceramic bowls and glass cups, so I didn’t have to worry about her getting into them and choking.
A year later, though, the section was opened up and reconfigured into a “toddler zone” and reading nook so that all the children can freely move around all sections of the class, observing their sibling’s work and helping one another.
Worksheets aren’t inherently evil, but they do have a limited place in our classroom. The kids see them as novelties and not as a boring daily torture, so I think we found our sweet spot with them.
Our homeschool is always evolving and while I do not claim by any means to be a “Montessori purist”, there are a few Montessori fundamentals I would suggest you try.
The Use of Scaled Furniture and Materials
Montessori is child-led learning. Maria Montessori stressed the need for freedom and independence, that children have “absorbent minds” and with the careful preparation of the environment, the child is able, through “free, natural manifestations”, to have these “spontaneous discoveries” creating a deep love of learning.
Creating spaces and using objects that are easily accessible to your child is key. Some pieces to think about acquiring are:
Low shelves – Openly displaying the work materials, instead of in big bins or out of reach, show your child that these materials are special and are to be carefully handled and cared for. What you choose to put on these shelves will vary depending on the developmental level of your child and how much space you have.
Small tables and chairs – Chairs and tables shouldn’t be a hindrance to learning. If the chairs and tables are lightweight, your child can freely move them into different rooms fostering independence. It’s neat to see this in action. My kids use them to prepare, serve and eat their snacks, help do the dishes and fold laundry, get art materials to make artwork early in the morning and get really creative with playing pretend. Don’t have the budget? Repurpose an old side table or coffee table.
Various-sized trays or baskets – One work or activity goes on its own individual tray. Once a work is introduced by the parent, then the child has permission to take the tray to his/her work table, and carefully with much concentration, does the work until he or she decides they are finished. Then the child returns the tray to its allotted spot on the shelf. The key is that your child has to be able carry the tray or basket from the shelf to his/her work space and back with ease, so be mindful not to buy them too large. The natural wood ones look lovely but I’d personally spend my money on more things to go on the trays than the trays themselves. Dollar stores, thrift stores, and online stores carry a ton of inexpensive options to suit your needs.
Small pitchers, bowls, scoops, small measuring spoons, small tongs – These tools are all used on a daily basis in the practical life skills area of Montessori as well as the pre-writing area. For example, transferring dried lentils with a small measuring spoon from one small bowl into another, starts the process of developing a proper writing grasp. You want these tools to aid your child in their work, not frustrate them to death, so try them first before putting them on the shelves.
You can save a ton of money and make many of your materials at home and then make them durable by laminating them. (An amazing resource online with Montessori printables that are free or very budget-friendly is Montessori Print Shop).
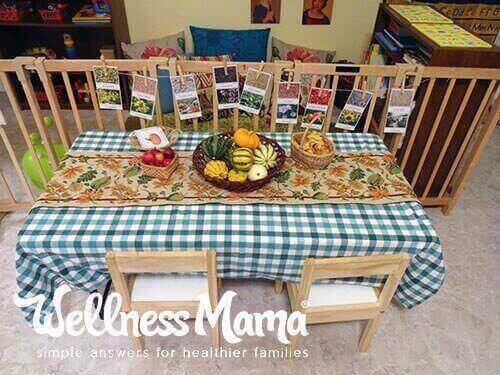
Inspire a Love of Nature
Maria Montessori put a huge emphasis on fostering the connection between child and nature through the care of plants and animals, as well as placing a great value on creating aesthetically-pleasing surroundings.
Create a Nature Table
Fill different-sized baskets and bins with a variety of natural materials that your child can freely touch and arrange. You can change it monthly or seasonally, and while the majority can be actual organic matter, throw in some meaningful miniature objects or artificial plants as well.
In our house, some of the best group discussions and peaceful interactions happen around the Nature table.
Some Seasonal items that can be used are:
Fall: Gourds, pumpkins, apples (real or fake), leaves, sunflowers (artificial or real) for flower arranging, mums, acorns, sticks, leaves, art cards of fall landscapes, cards on the life cycle of a pumpkin, dried corn, lentils, Raffia, books on fall, fall leave rubbings, etc.
Winter: Evergreen, Images of winter landscapes and hibernating animals, bare branches, white table cloth to look like snow, snow globes, plastic icicles, paper snowflakes, wool snowman, animal figurines who do not hibernate, piece or pictures of winter fur on animals.
Spring: Seeds, small indoor plants, small water pitcher, Assorted flowers (real and artificial), miniature birds, nest, eggs (fake), twigs, spring landscape art cards, frogs, life cycle of frogs or butterfly cards, bugs, magnifying glass, books on spring, rocks, petals, moss, green leaves, leaf rubbings, miniature dinosaurs, etc.
Summer: Shells, starfish, ocean animal figurines, small figurines of boats or lighthouses, cards on whale species, plants, images of summer landscapes, flowers, bowls of fruit, herb garden, painted wooden fish, cards on the lunar phases, pictures of constellations, planets, etc.
If you don’t have space for a Nature table, make a Nature tray. And if you are really pressed for space, use the nature tray as your dining room table centerpiece, or put small plants throughout your schoolroom with small pitchers beside them for the children to use.
Let the Child Self-Correct
So your kid didn’t grasp the concept right after you gave a lesson? They might not be ready. Relax, and let it go for the day. I’ve introduced lessons 3-4 times before my child positively responded.
Most Montessori materials are either self-correcting or include a control of error. So when the child is doing the activity, they can always test themselves to see if they did the work correctly. The motivation to get things correct then comes from an internal drive to learn, not from external consequences like getting a treat if you got the problem right or being punished if you made a mistake.
It can be so easy to try to correct something before the child has had the time allowed for them to recognize the mistake. Be more of an unnoticed observer. You can write down your child’s progress for your records. Be encouraging and allow the progress to naturally unfold.
I keep daily records of all the work my kids do and where they are in the mastery of a skill. I write (i) for when I started introducing a skill, (p) for when the child is actively practicing a skill, and (m) for when the skill has been mastered. This way you can know when to move to a new skill in your sequence of lessons.
Stress Courtesy
So you now have at least a vague idea of how to start setting the stage for a unique learning environment, but what good are beautiful shelves filled with utterly-inspiring work material if your child has not been taught how to respect his/her work, or how to use the materials appropriately and show courtesy to others while doing so?
Before the school year begins, my primary focus is on creating that very unique classroom culture by teaching the children how to conduct themselves through lessons in politeness and proper behavior.
It is a privilege to be at liberty to independently work as you wish, but with the freedom of this type of environment also comes responsibilities.
We have a duty to society to instill good citizenship and courtesy in our children.
With the use of role-playing scenarios and simple concentration activities (such as practicing pushing in a chair as quietly as possible), the child learns how to respond with good manners and reinforces polite behavior in various situations.
The six rules I use in my homeschool are put in small phrases so the kids can memorize them. In our classroom we are constantly practicing these rules through role-playing. The older kids get a refresher and the younger kids get to practice.
“One work at a time” – You can choose from the variety of materials, but you can only choose ONE at a time. You can carefully take the tray with its materials anywhere in the room or house to work (except on the shelves themselves, which would deny other children easy access to the other materials). Once the child is finished, he/she carefully brings it back to its original spot.
“Go slowly” – while walking into the room, while taking a tray to your spot, and doing the work without rushing – all help maintain a mode of concentration and purpose in our actions.
“Keep the room tidy” – Each child has an apron and wash rag, and at the beginning and end of each school day, they do things like dust the shelves, push in their chairs, throw away scrap papers, empty out the wash basin used for washing hands, bring the snack dishes into the kitchen, and water the plants.
“Quiet Voices”– This rule is a constant struggle in our house but a necessity to creating a courteous and productive work environment. I’m constantly trying to come up with new games or activities to help my children become sensitive to volume.
“Be Gentle” – with how they handle the materials, with how they speak to their siblings and with how they care for the plants and animals they interact with.
“Use your words” – We still deal with tantrums and issues with personal space in our house, but growing in grace and courtesy has really helped. We insist that the kids use their words to express their feelings in a clear and calm manner, and this is where the role-playing activities have come in handy.
Examples of Scenarios to go over with Your Kids
What do you say when you first meet someone?
What do you do when a guest leaves your house?
What do you say or do when you need to apologize?
How do you ask someone to play?
How do you tell someone no?
If my kids do not follow the classroom rules, they get a reminder of which rule they are breaking, and if the behavior doesn’t stop, they can sit in a chair until they are ready to resume their work with courtesy. If the bad behavior still persists and becomes a distraction to their siblings working, they must leave the learning area altogether.
I want the kids to know that the environment is a special privilege.
Grace and courtesy, I believe, are such a huge reason why Montessori classrooms have that “magical air” about them. I would recommend going to a Montessori open house to see in practice just what I’m talking about.
Whether you are a hard-core Montessori purist wanting to eventually go all the way with your pink towers, metal insets and Kandinsky paintings on the wall, or if you just wanted some fresh ideas to create a new, creative and productive learning atmosphere, I hope these simple ideas will be an inspiration to get you to started!
Resources that Gave me the Confidence to Move Forward
(If you really want to get into the real nitty gritty of what to teach, when, how to give a lesson or display the materials on the trays, and what to buy vs. what to make, here are a few of my favorite resources to help you dig deeper!)
Teach your Preschooler to Read and Write and Teach Your 3-7 Year Old Math by John Bowman – Does a fantastic job of outlining the sequence of work in these areas of literacy. John Bowman is to the point and gives great ideas for using things around your home as substitutes for the commercial Montessori materials…oh yeah, and free online printables with the book is a welcome addition!
My Favorite Blogs/Websites on Montessori
Livingmontessorinow.com – the writer is a Montessori educator who homeschooled her children through high school. This is an excellent place to browse for links to printables, or to go to when you want to make a unit study and need ideas.
Montessoriprintshop.com – a go-to in my classroom for making materials at little to no cost, as well a deeper look at Montessori theory.
Justmontessori.com – offers a no-cost Montessori curriculum with links to downloads and pictures. It’s awesome!
Do you incorporate any Montessori at home with your children? Will you try any of these?
Original article and pictures take wellnessmama.com site
Once you try this Tuna Casserole recipe you’ll be asking, “Who needs Tuna Helper?” Although, for the record, I used to really like Tuna Helper and would buy it anytime I had coupons to purchase it at a great deal. I used to also really like Hamburger Helper – which is why I came up with this Cheeseburger Macaroni recipe to make myself feel like I was eating Hamburger Helper. Shock upon shock, my fix for Tuna Helper uses the same basic Creamy Mac and Cheese recipe, only instead of adding seasoned hamburger meat, I add tuna. See how fancy I am? (snore)
I’m not sure why, but I absolutely love tuna casserole served with frozen peas. Well, I cook the peas – I don’t serve them frozen. You knew that, right? Okay, just checking.
This Tuna Casserole is THE PERFECT go-to meal if you don’t have meat thawed for dinner or for the times you need something quick and wholesome. Easy as this is, it’s one of our family’s favorite meals!
Are you a fan of tuna? Do you like tuna casserole? Don’t you just love frozen peas? (The cooked kind, of course.)
Original article and pictures take heavenlyhomemakers.com site
So sticky, so tender, so moist and just packed with so much flavor. And it’s an easy peasy weeknight meal, made in 30 min or less!
As a food blogger, there is always a ton of “work food” that needs to be consumed in a timely manner, especially when it’s just the two of us humans and two baby corgis. And since I make a ton of chicken recipes, well, there’s just a lot of leftover chicken in my fridge.
So when my husband asks what’s for dinner and I say, “Chicken, as usual,” he replies with, “How many different ways can you make chicken?”
Shortly after that response, he devoured these sweet and sticky Thai chicken thighs in seconds without taking a second to look up. He never complained about another chicken dinner after this.
Original article and pictures take 23209-presscdn-pagely.netdna-ssl.com site
This one was Justus’ idea. He’s my 17-year old, my senior in high school. These are my last few months with him at home so when he said, “Mom, do you think you could figure out how to make Peanut Butter Pudding?” of course I immediately dropped whatever I was doing to work on his request.
I kid. I mean, I would never drop whatever I’m doing to go with a whim of one of my children. Never would I attempt to spoil any of my kids. Especially when it comes to food. They must be taught patience, that the world doesn’t revolve around them, even if it is their senior year and the mother can’t breathe at the thought of missing out on the delightful morning conversations she enjoys with her second born every morning before the others wake up. Even if.
Okay fine. I dropped what I was doing and I made the kid some Peanut Butter Pudding. It sounded like an amazing treat, and I agreed with Justus that the protein mixed in with the sweetness would be a fabulous combination.
As an aside, it is worth a mention that I learned with our first born that the world doesn’t end when you graduate a child and send him from home. Life with your adult child does, indeed, grow in richness (this is ironic because of the college bills). But this doesn’t stop me from feeling all of the many feelings associated with launching another child from our nest. I will enjoy this time with him to the full. I will cry tears of joy and pride frequently. And I will make him pudding with peanut butter in it, just because he mentions that it sounds good.
The recipe is simple (you would expect nothing less, right?). It is creamy and rich and delightful. It tastes even better served with Chocolate Pudding.
Easy Peanut Butter Pudding
½ cup natural creamy peanut butter
½ cup real maple syrup, honey, sucanat, or brown sugar
4 Tablespoons corn starch
¼ teaspoon sea salt
1 Tablespoon butter
1 teaspoon vanilla
In a medium saucepan, whisk together all ingredients except butter and vanilla.
Cook over medium heat, stirring constantly until pudding begins to thicken.
Stir over the heat for about 15 more seconds or until pudding has reached desired thickness. Remove immediately from the heat, and continue to stir until pudding is creamy.
(I use my whisk the whole time for stirring and find this works great!)
Add butter and vanilla and continue to stir until mixed.
Pour into serving dishes and serve warm, or chill for two hours and serve cold.
It’s possible you can look forward to me sharing other great food ideas Justus has this year. Not that I’ll drop everything and make them on a whim. We would never, ever want to spoil our children. Especially with food. Even if it’s their senior year.
Easy No-Knead Whole Wheat Cinnamon Rolls For the Freezer ~ With Honey’d Orange Glaze!
No-knead breads are THE WAY to go.
I’m not sure that my dearly missed, hard working grandma would be too pleased with me about this – but I’ve decided that kneading bread dough just isn’t my favorite thing. I mean, I’ll do it if I have to. But I’d rather stir ingredients, smile at the pile of dough (you know, for encouragement), then walk away.
This is how I found myself experimenting with my Whole Wheat Cinnamon Roll recipe. I had all the ingredients mixed together, but then I was like, “Really? Do I really have to knead this now? That just sounds soooo hard and time consuming.” (Really, Grandma. I know you lived through the Great Depression and fed nine children three meals a day from scratch with food that you grew or raised on your farm, that you worked from sun-up to sun-down in your teeny-tiny kitchen, and the only time you rested was to watch Judge Wapner after you turned 80. But do try to understand what I’m up against here.)
I figured that at the very worst, I’d have little hard cinnamon roll hockey pucks we could dunk in milk. So I did it. I walked away from my dough without kneading it.
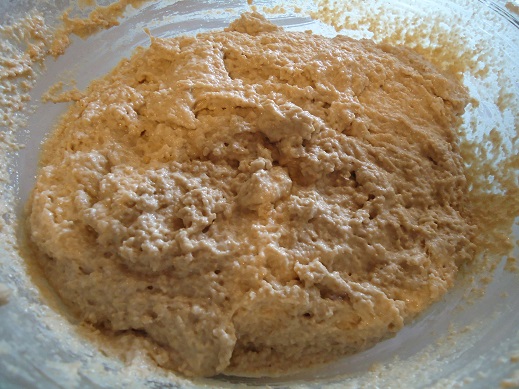
It looked like this when I covered it up:
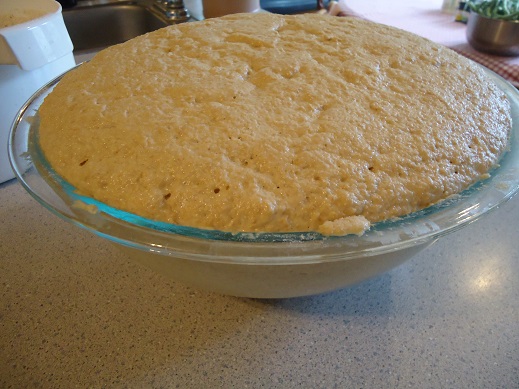
An hour later, it looked like this:
Did it work, or did it work?
Thus, my Whole Wheat Cinnamon Roll recipe is being turned into a No-Knead Whole Wheat Cinnamon Roll recipe because our lives are too full from all the hard work it takes to think about Grandma scrubbing all of the manure-crusted clothes on a wash-board.
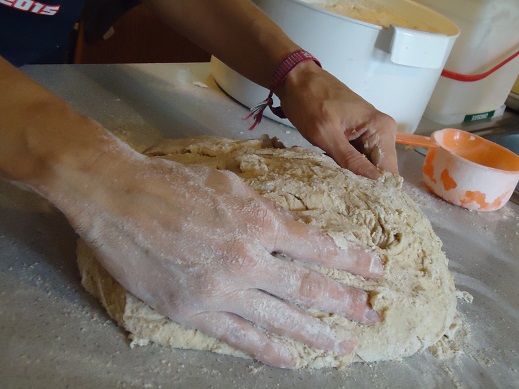
What you see here is absolutely not a picture of me kneading the dough. It is simply me working a little flour into the dough after it rose so that I could roll it out without it sticking to the countertop.
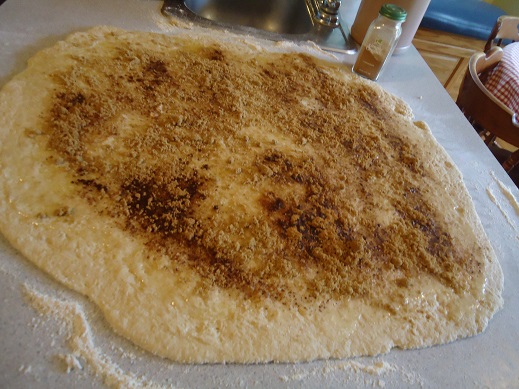
After I rolled it out, I spread melted butter over it and sprinkled a little sucanat and cinnamon over it.
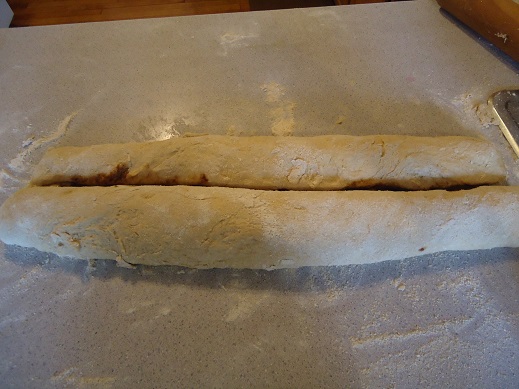
Then (like a boss) I rolled both ends until they met in the middle and separated the rolled dough with a knife. (Start on the outside, top and bottom, and roll them into the middle.)
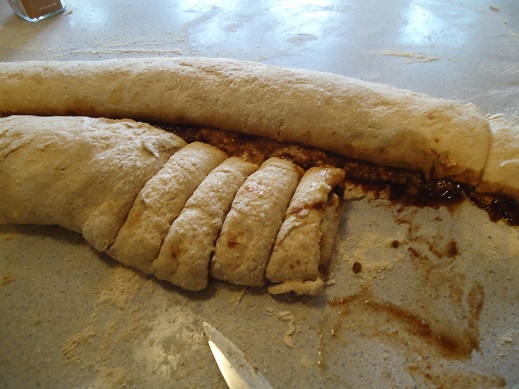
I then proceeded to cut individual rolls, making a huge mess in the process.
My rolls went on a pan in a most unattractive way because I leave perfectionism up to the perfectionists. Do not poke fun. They can’t help how they look.
I froze the dough rolls on the pan, then transferred the frozen rolls to a freezer bag for another day. I will use them when I am busy not having to pluck a chicken for our dinner.
No-Knead Whole Wheat Cinnamon Rolls – for the freezer (or for directly into the oven)
Easy No-Knead Whole Wheat Cinnamon Rolls For the Freezer ~ With Honey'd Orange Glaze!
In a large bowl, mush the yeast and 2 teaspoons honey together with the warm water and set aside. It will begin to form bubbles soon.
In the meantime, stir together milk, butter, ½ cup honey, and sea salt on the stove until the butter has melted and the mixture has reached 120°.
If the temp exceeds this, allow it to cool before moving on.
Pour the milk mixture into the bubbly yeast mixture and stir.
Mix in flour, two cups at a time until a nice dough has formed.
Do not knead. (There is no need.)
Cover the dough and allow it to rise for at least one hour, or until you remember that you were making rolls.
Prepare the innards:
Ingredients for the “innards” of your cinnamon rolls: ½ cup melted butter, ½ cup sucanat or brown sugar, and ½ Tablespoon ground cinnamon
On a well-floured surface, roll the dough to about ¼ inch thickness.
Spread melted butter over the rolled dough.
Sprinkle with sucanat, then cinnamon.
Roll up the dough from the outsides of the "dough circle" as pictured above.
Cut apart the two rolled lengths, then cut the dough into ½ inch thick rolls.
Place the rolls side-by-side on a baking pan.
Allow them to rest/rise for about 20 minutes, then bake the rolls in a 350° oven for about 25 minutes or until they are golden brown.
Glaze and serve!
Honey’d Orange Glaze
1
2 teaspoons orange juice concentrate
1/4 cup heavy cream
2 Tablespoons honey
Whisk ingredients together on the stove until smooth. Drizzle over baked cinnamon rolls.
To Freeze and Bake:
Place the prepared rolls about a 1/2 inch apart on a baking sheet. Freeze for about two hours, then transfer them to a freezer bag. Store in the freezer for up to two months.
To bake, place the desired number of frozen rolls on a baking pan. Cover and refrigerate overnight. (In the winter, I leave them on the countertop overnight.) Place the rolls into a cold oven, then turn the oven on to 350°. Bake as directed above, adding a few minutes of additional time as needed.
These are deliciously easy, and mostly low in sugar! They kind of resemble those frozen orange rolls you can buy in the freezer section – except that these have a little bit of nutritional value and not nearly as much sugar, so we can all rejoice.
Are you a perfectionist? Did my frozen roll picture cause you to cringe? I’m just a “get the job done and move on” kind of girl…which basically means that I am a mess when I cook.
Original article and pictures take heavenlyhomemakers.com site
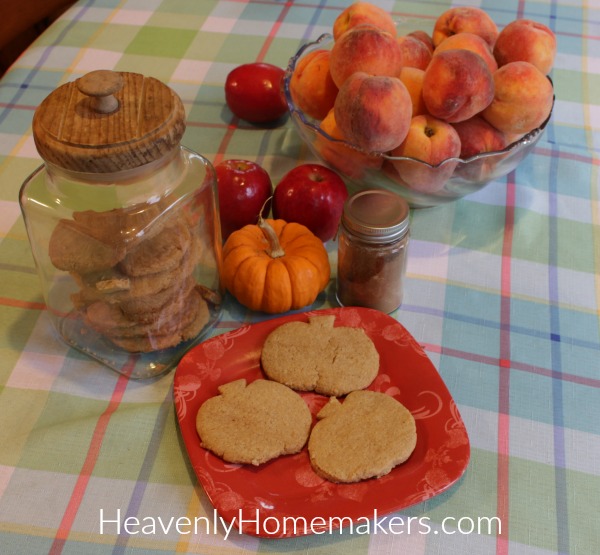
Allow me to introduce a new seasonal favorite: Easy Low Sugar Pumpkin Spice Roll-Out Cookies.
While I’ve shared that I just can’t get behind Pumpkin Spice Coffee (typing it actually makes me shudder just a little bit), I most certainly enjoy making many Pumpkin Spice treats this time of year – to eat while I drink my (plain, non-pumpkin-spice) coffee. If my house smells of nothing but Pumpkin Spice from now until Christmas, there will be much joy in the holiday season.
Of course, seeing as I live with a houseful of teenage boys, my house not only smells of Pumpkin Spice, it also frequently smells like Old Spice. And old shoes. Annnnnd cute girls.
It’s an interesting combination, you can be sure. One that I am so very blessed to experience. What a great God we serve!
Do you see His goodness all around you? Even in the midst of struggle? Even throughout the daily grind? Even during times of hardship and devastation?
I love God. All that He offers is good, and all good comes from Him. I am continually in awe of how He provides for our spiritual needs, which makes all else fade.
What does this have to do with Pumpkin Spice Cookies? Ha. I don’t know. Lately I find myself working my way through all the day-to-day of life, which includes this houseful of teenage boys (and the cute girls that stop by) and in the midst of the cookies and the shoes and the vacuuming and the piles of mail, I sit in wonder at the peace God is revealing to me though His Spirit.
And in the Pumpkin Spice Cookie – well – there is joy. Especially when there is a great cup of coffee (sans Pumpkin Spice) to go with it.
Easy Low Sugar Pumpkin Spice Roll-Out Cookies
I’d love to hear about the joy of the Lord you are experiencing right now. Struggling to see His goodness? Look around at what you have, and I’m not talking about your stuff. See His goodness in the details of your life. In joy, in pain, in suffering – God is good. His mercies are new every morning.
And sometimes, they take on the form of a Pumpkin Spice Cookie dunked in coffee.
Original article and pictures take heavenlyhomemakers.com site