Ready to learn how to cut a boys’ hair like a pro?
Remember how I promised to show you how I give my boys’ haircuts…and then just at the moment I had my long-haired boys all lined up for haircuts and pictures…my camera batteries died? While we’re waiting for my boys’ hair to grow back for the photo op, Cheryl from Moms in Need of Mercy offered to guest post on this subject for us! And she got her PROFESSIONAL cosmetologist to help us out!
——————————————————–
When thinking about giving your son a haircut, do you:
a) shudder at the thought of what it might look like if you did it yourself,
b) reach for your scissors with a glint in your eye,
c) reach for your phone to make an appointment for him,
d) wish you knew more of what you were doing, so you weren’t just “winging” it (come to think of it, he kind of looks like he has wings when you’re done)
Haircuts, even for boys, are expensive. As often as their hair grows, this adds up to some serious cash. But if you know how to cut your son’s hair at home, and you know how to do it right, both of you will be pleased. He’ll be pleased at the result, and you’ll be pleased with how much you’re saving by doing it yourself.
If you’ve ever wanted professional lessons on how to cut his hair by yourself, my friend Liz–a licensed cosmetologist–agreed to show me (and you) the tricks of the trade. Normally, these lessons would cost you a partial cosmetology school tuition, but we are bringing them to you free! Now go pour yourself an ice water on me, and let’s get to work!

As you can see from the above picture, cutting hair successfully is all about the angles. To begin, you may want to start with the neckline. (Liz thought that beginners may want to start at the top. This way, you can set the top length as your guide and blend down from it, rather than having to cut everything again if it doesn’t blend properly when you get to the top last).
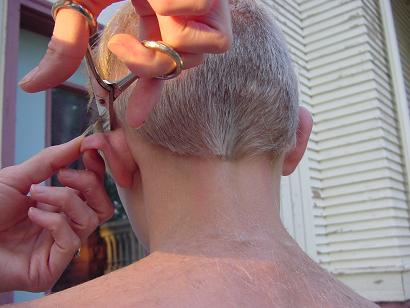
But let’s say you start at the neckline. Working on the back of the head, starting from the area of the top of the ear down, use your water bottle ($1 at the Dollar Store/Walmart/Target) to spray the hair down and cut at a 45-degree angle, slanting toward the neckline. You will hold the hair according to this angle and cut along your fingers, as you can see in these pictures.


Once you have worked your way across the back of the head, you can use your scissors to carefully go straight across to form the base of the neckline. As you can see Liz demonstrating, you want to make sure to hold the hair down firmly so you cut it evenly.
Liz says if you are right or left-eye dominant, it could make your haircut slant. So when you finish the neckline, get eye level with it and check that it does not slant. If it does, correct it!

Once the back area is finished, you can move up to the sides. You will continue with the 45-degree angle.


Do you notice all the different lengths in this closeup? You don’t want that. When you are making a cut, you will want to have a few hairs from the last cut you made included in the section you are currently cutting. These hairs will serve as your guide, and you will cut the hair to match the length of the previous cut (which should be the shortest hairs).

When you come to the ear, you will tuck the ear by folding it down gently, and then cut around the ear as if you were tracing the pattern of the ear.

Once you have completed the sides and worked back around the head in that section, you can move up toward the top. You will now pull the hair out at a 90-degree angle (the mathematicians among us may argue that this is actually 180-degrees) and cut it straight off of the head.


Just as your child’s patience has about reached its limit, you will reach the top. Reassure him that you’re almost done and you’ll give him a reward for sitting so nicely (or not so nicely!) when you’re finished. Take the hair from the center of the top of the head, lift it up, and cut it straight across. If the very front of the forehead looks too choppy when you’re done, you can point-cut it. This is where you will use the point of your scissors to cut small points in the hairline (you don’t want it to look like candy-corn) :)

If your son has cowlicks at the top of their head (mine do), you can leave the hair longer here to compensate. The extra weight will help prevent it from sticking straight up. To accomplish this, you will want to angle the hair slightly toward the front.

Now you’re just about done! The only thing left is to check the cut to make sure it’s even. You should be able to run your fingers through the hair, pull up various sections, and have the lengths line up evenly (angling in places, but with no long hairs jutting out). It should be well blended. Correct any mistakes you find, and try again in another 3-4 weeks, depending on how quickly your son’s hair grows!

Subscribe for FREE to Heavenly Homemakers so you won’t miss all the new Simple Recipes and ideas we share to save you money!
Original article and pictures take heavenlyhomemakers.com site
Комментариев нет:
Отправить комментарий